Name change from SAP Data Warehouse Cloud to SAP Datasphere. Some links may break
In this blog post, I want to share an idea of how you can generate month-to-date (MTD), quarter-to-date (QTD), and year-to-date (YTD) values in SAP Datasphere (DSP). This is only one way, I think
there are several other ways how you can solve this issue. I am happy to discuss your ideas in the comment section. In my old post, I describe the same logic for SAP HANA Calculation Views.
Control Table
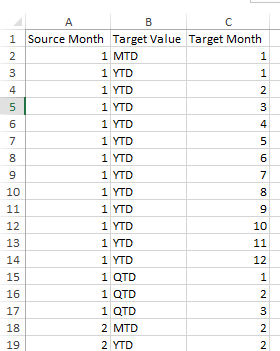
The starting point is a control table that has the following structure:
control table
The whole table has entries for each source month.
Data Table
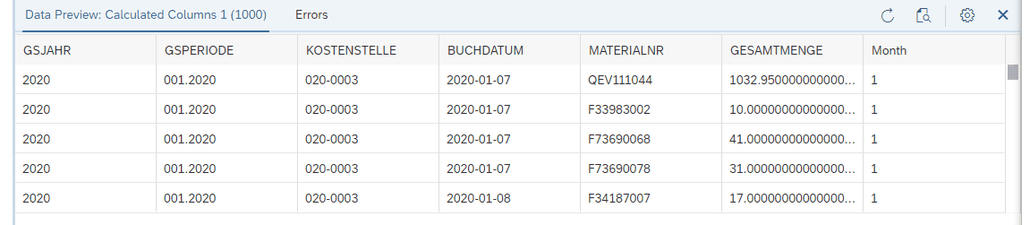
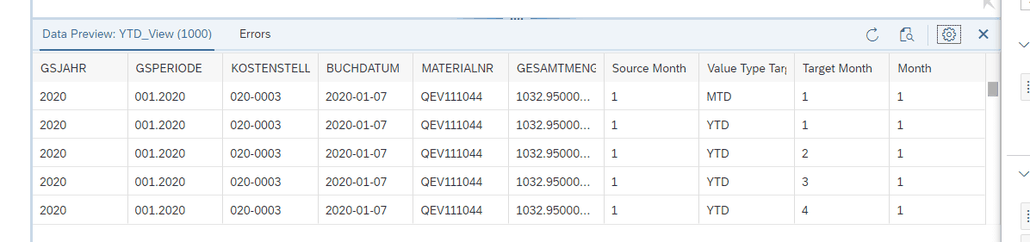
After we have now the control table for the calculation, we now create a view. This is what the data looks like:
data preview
Data Model
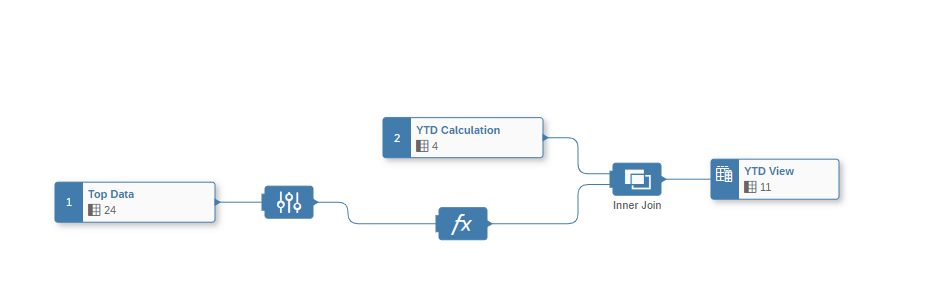
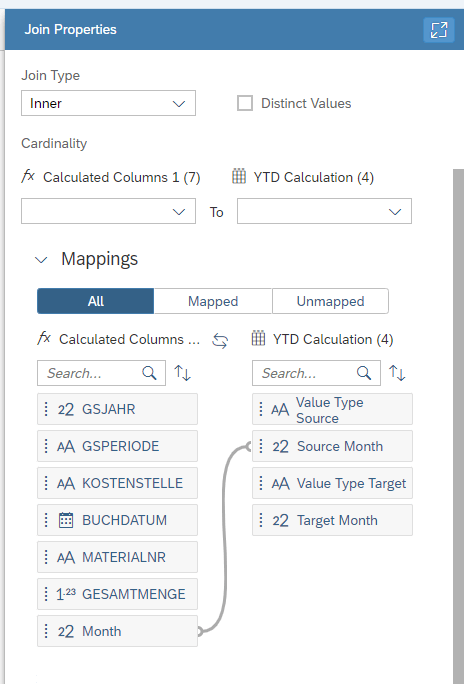
Now we have the data and the calculation table, we just create a simple join to the data, which you see in the following screenshots.
Join between control table and data table
Join
Output
Output data preview
SAP Analytics Cloud Output
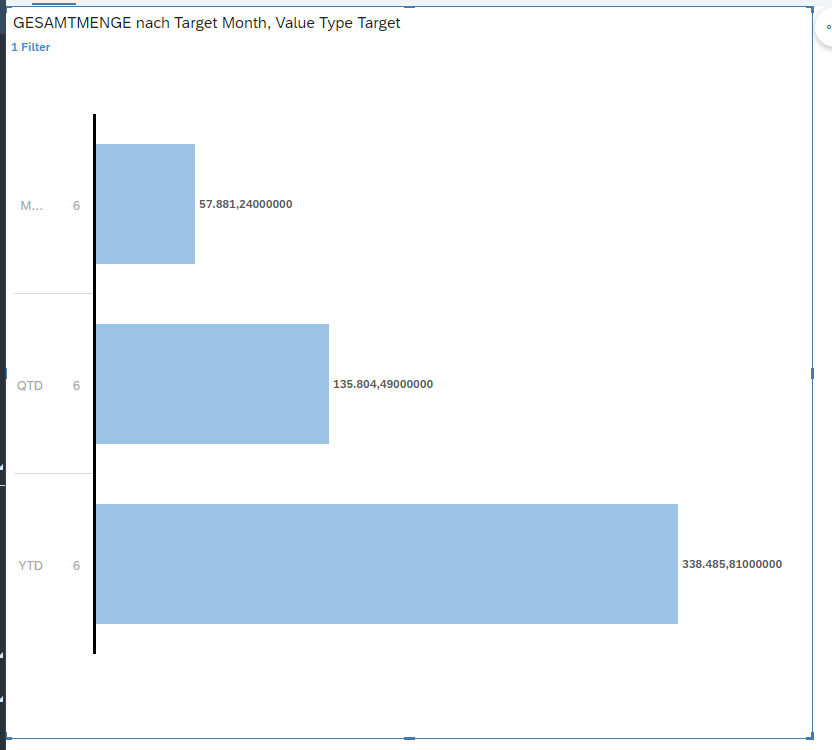
With the value type, we can now filter our data for MTD/QTD/YTD and the corresponding month. In the SAC, it will look like this:
YTD June Output
In this example, I filter my data for June, and so I see directly the aggregated values. For the MTD you see the month value of 578881,24. For the QTD you get the values for the second quarter of
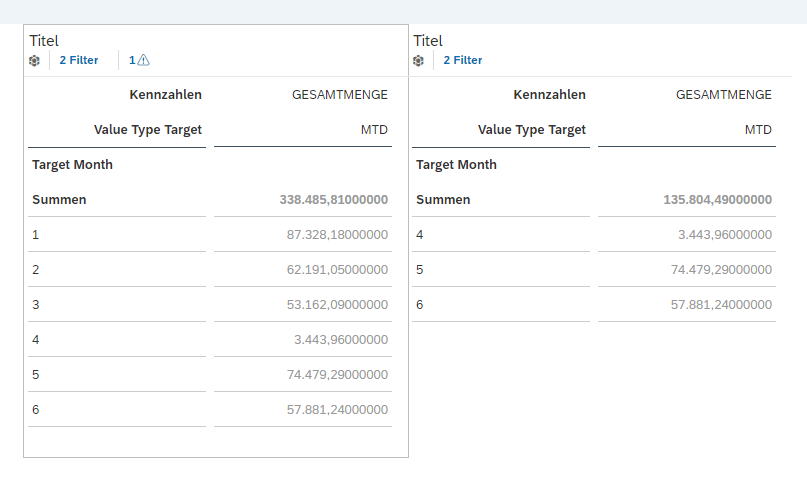
the year and for the YTD you get the values of the entire year. Here are the MTD values to validate the chart
MTD Output
Conclusion
As you see, it works perfectly and is very fast. I had a similar post where I used this logic in one on Premise SAP HANA DB.
What do you think about this solution? I know this is only one approach and there are more out there. Maybe someone has a better solution?
author.
Hi,
I am Tobias, I write this blog since 2014, you can find me on Twitter, LinkedIn, Facebook and YouTube. I work as a Senior Business Warehouse Consultant. In 2016, I wrote the first edition of . If you want, you can leave me a PayPal coffee donation. You can also contact me directly if you want.
Name change from SAP Data Warehouse Cloud to SAP Datasphere. Some links may break.
In the last post I wrote about authorizations in SAP Datasphere and I had an open topic
about authorization on hierarchy nodes in SAP DSP. So I looked into and here is one example of how it could work at the moment. I don’t know if SAP changes something in future releases.
So let us started with a CSV file to create our authorization we can use in the SAP Datasphere. I would now authorize my user to a Product Category because my hierarchy looks like this:
Product Category 01
Product 1
Product 2
Product Category 02
Product 3
Product 4
So we have the same structure as in the last post:
Be aware that the technical key of the product category is used for authorization. After we uploaded this table and created a data access control (how this works can be read in the last post) we also need a hierarchy on our product table.
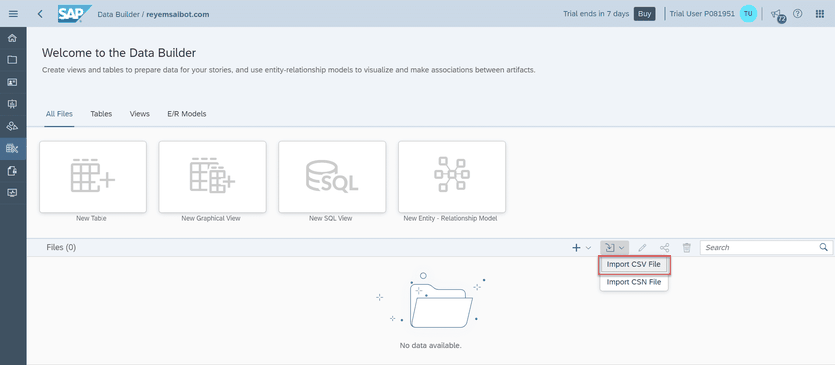
So we go to the Data Builder and choose our space and either upload a CSV file or create a new table with the semantic usage „Dimension“. I used a CSV file, and now we can create a hierarchy on
this dimension table.
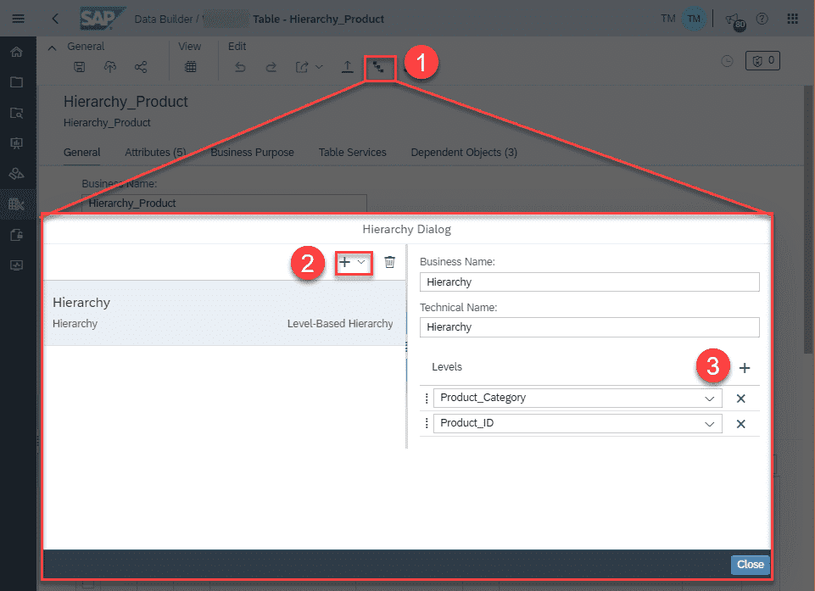
Create a hierarchy in SAP Datasphere
In the hierarchy dialog, we create a new hierarchy and the corresponding levels. In my case, you see above the levels are product category and then the product ID. After clicking on Close the
hierarchy is created. We can now save and deploy our dimension table again to make sure all changes are applied.
View in SAP Data Warehouse
Now we create a new graphical view and there we join the fact table with the dimension table. It is called associations. Click on the plus sign and select an association target. In this case, it
is the Product Hierarchy. Now the system matches automatically the product ID of the fact table with the product ID of the hierarchy dimension. In case it doesn’t work automatically, you have to
make the connection for the join.
Create Association in the Model Properties of the View
Check Mapping between the view and the association
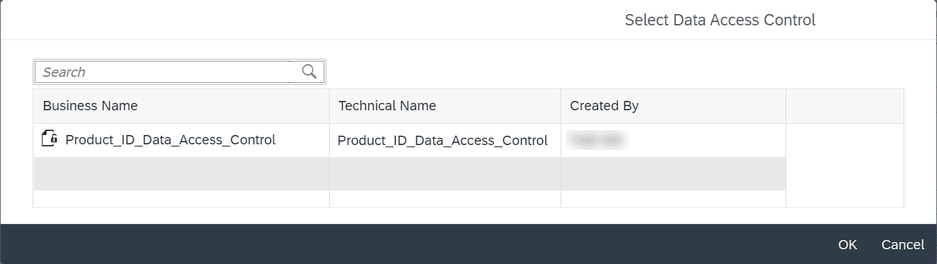
After we add the hierarchy dimension, we now add the data access control to restrict the data of the view. Click on the plus sign to add a data access control we created earlier.
Add Data Access Control in SAP Datasphere
Check Mapping between the view and the data access control in Datasphere
As before, you have to map the fields of the sales view and the data access control. At the end save the view and deploy it. We switch to the Story Builder and create a new chart based on
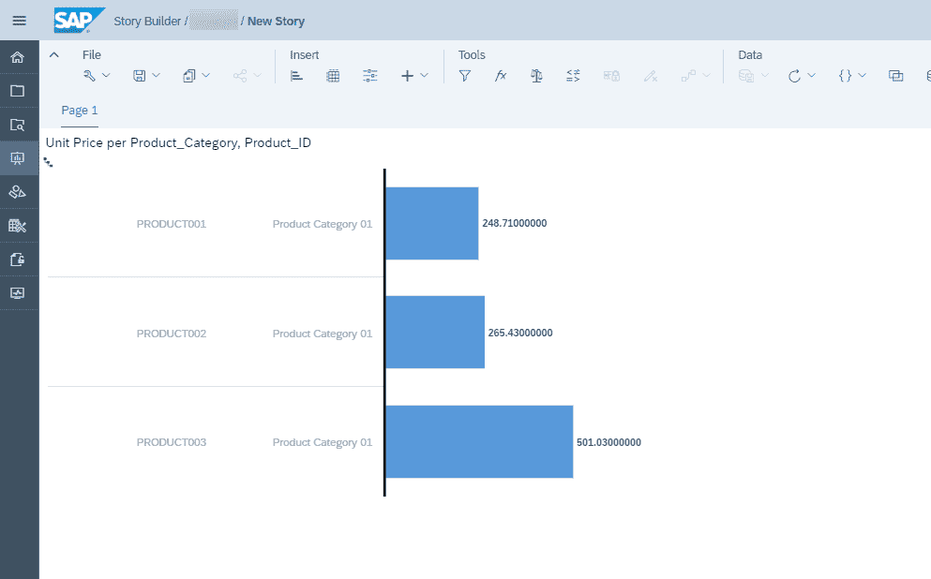
the sales view we just deployed. Select as source the sales view and add the product to the dimension and unit price to the measures.
Hierarchy Node with Children are visible
As you see the data access control restricts the product ID with the product group we assigned before.
Conclusion
The restriction on a certain hierarchy node is common-use in several companies. In this post, I described one way you could build it. I don’t know if there are other ways in the future.
author.
Hi,
I am Tobias, I write this blog since 2014, you can find me on Twitter, LinkedIn, Facebook and YouTube. I work as a Data & Analytics Consultant. If you want, you can leave me a PayPal coffee donation. You can also contact me directly if you want.
Name change from SAP Data Warehouse Cloud to SAP Datasphere. Some links may break
In this blog post I want to show you how you can use data authorizations in SAP Datasphere. First, we have to log on to our SAP Datasphere and select the space we want to use for this.
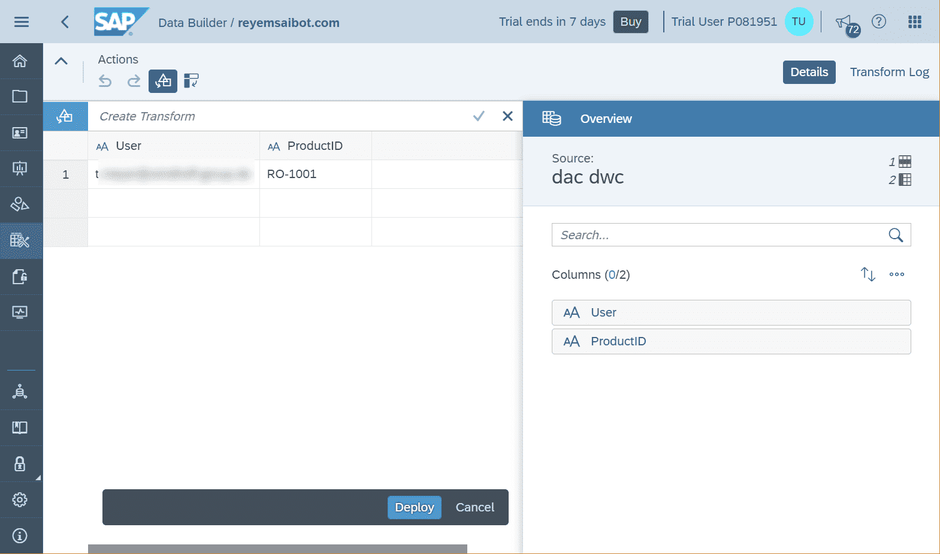
After we have selected our space, we open the Data Builder of SAP Datasphere. Here we have to import a new table with our authorizations. In my case we want to filter the Product ID, so the table
looks like this:
User
ProductID
User_email@dwc_tenant.de
RO-1001
SAP Datasphere Import Table
You have to define the user with the logged on email address and the column for the data you want to restrict. Now we upload and deploy this table to our space and give it the name Authorization_Example.
SAP Datasphere Deploy Table
Now after we have deployed this table to the space, we switch to the Data Access Control, which we select in the menu bar. Here we can create a new Data Access Control we need to restrict our
data access later. When we create a new Data Access Control we have to select the table we want to use for the Authorizations. In this case the table has the name Authorization_Example with the
columns User and ProductID.
SAP Datasphere Create Data Access Control
SAP Datasphere Select authorization table
After we have selected the table, we have to make some adjustments for the Data Access Control. First, we have to define a Business Name, a Technical Name and define the Principal Name Column as
well as the Output column. We can also enter a responsible person for this Data Access Control. After we have done this, we can save and deploy our Data Access Control to use it.
SAP Datasphere Define Data Access Control
Now I describe as first way how to use it in a view and after how to use it in a SAP Datasphere Dimension as well as Consumption Model. So, let’s start with the view. Select the Data Builder
and create a new Graphical View.
SAP Datasphere Create new graphical view
We use the table Products and connect it to the output of the view. Now we select the properties of the view and select there the + icon under Data Access Control to add a new Data Access
Control.
SAP Datasphere Add authorizations to view
In the new dialog we can select one of our defined Data Access Controls and use it. In this case we have one for the Product ID.
SAP Datasphere Select Data Access Control
After we have selected it, we see the properties of the view again and see a point called join. Here we have to join our view with the Data Access Control. Now after we have joined our view
with the Data Access Control, we look into the data preview of our original table and then of the view.
SAP Datasphere Join view with Data Access Control
As you see in the original table, we can see all entries of the table and when we now look into the view, we see that the Data Access Control is working because we only see the Product we defined
above. This was the first way. Now I show you the way how to use the Data Access Control in Dimensions and Consumption Models.
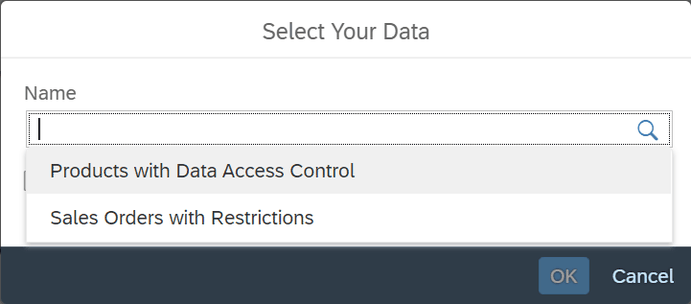
So, let’s select the Business Builder and here we create a new Authorization Scenario we need to use later. We have to select a Data Access Control and create out of it our new Authorization
Scenario.
SAP Datasphere Create Authorization Scenario
SAP Datasphere Create Authorization Scenario with Data Access Control
In the Authorization Scenario we can define our Data Restriction. In my case it is the Target Business Entity Products with the Target Key Product ID. After we saved our Authorization Scenario,
we switch to the dimension Products and select the tab Authorization Scenarios. Here we click on the + sign to add an Authorization Scenario. We select the Authorization Scenario we just created.
We can do the same on the Analytical Data Set.
In the Consumption Model we have to add our Authorization Scenario under the General tab. When we now open the data preview of our Consumption Model, we see under the settings the Authorization
Scenario we can select. As you can see, we have here our Product ID Scenario. When we select it, the data will be restricted, and we only see the data we are allowed to.
The last step is to use this Consumption Model in the embedded SAP Analytics Cloud. Therefore, we switch to the Analytics Application and create a new story in this workspace. Now we select our
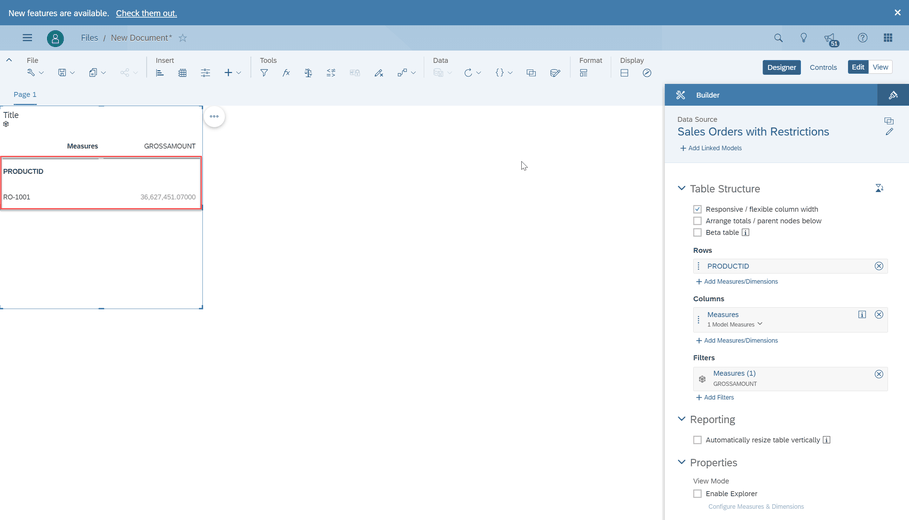
Consumption Model, here Products with Data Access Control and use the table template. When we now add the Product ID to the rows, you see the data will be restricted.
SAP Analytics Cloud Select Data for Story
SAP Analytics Cloud Story with Table and Authorization
Conclusion
At first, I was little confused about this solution but after implementing it, it makes really sense. Because I don’t have only BW/4HANA sources, so I could not use the Authorization from
BW/4HANA. And I am very flexible with this authorization table and can also expand it for more columns. The only thing is I don’t figure out yet is an authorization on a hierarchy which is very
common in BW/4HANA. Maybe someone has an idea?
I am Tobias, I write this blog since 2014, you can find me on Twitter, LinkedIn, Facebook and YouTube. I work as a Data & Analytics Consultant. If you want, you can leave me a PayPal coffee donation. You can also contact me directly if you want.
Name changed from SAP Data Warehouse Cloud to SAP Datasphere. Some links may break
Someone ask me how you could create a time hierarchy in SAP Datasphere (DSP) to use it in SAP Analytics Cloud (SAC). Because out of the box by just create the time dimension it isn’t working
right now. So here are the steps you have to make.
1. Create a new Space
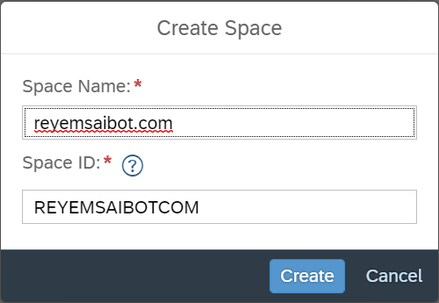
First we create a new space and start from scratch.
SAP Datasphere Create new space
SAP Datasphere Create space reyemsaibot.com
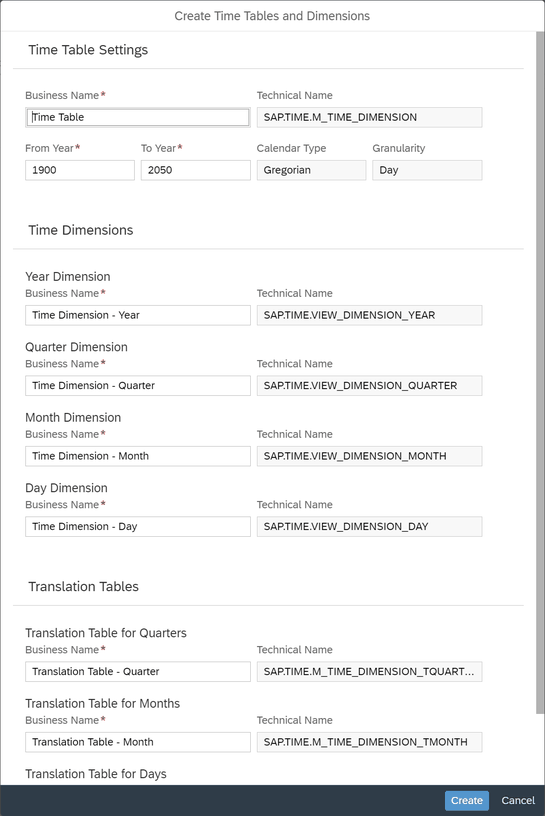
After we created our new space and added our user to this space, we are able to create the time dimensions direclty in SAP Datasphere.
SAP Datasphere Add time dimension to space
SAP Datasphere Create time dimension
2. Data Builder and Upload an own file
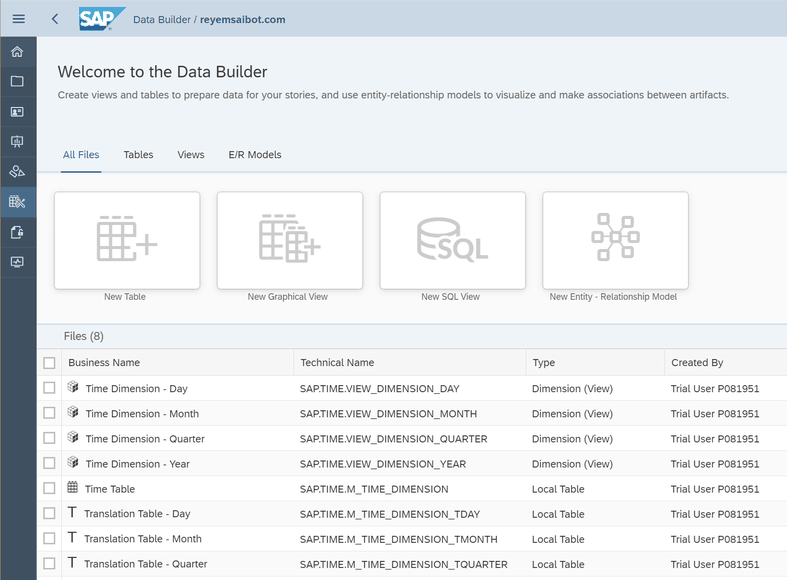
Now we see in the Data Builder of the SAP Datasphere the time dimensions we just created.
SAP Datasphere Data Builder
To show you an example I need to upload some example data. We use for this the CSV-File upload functionality of Datasphere.
SAP Datasphere Import CSV File
My example file here are the sales orders with a date in one column, so we can build our hierarchy.
SAP Datasphere Import CSV File
3. Create a new graphical view
After I uploaded my files, we can create a new graphical view to associate our time dimension to our sales data.
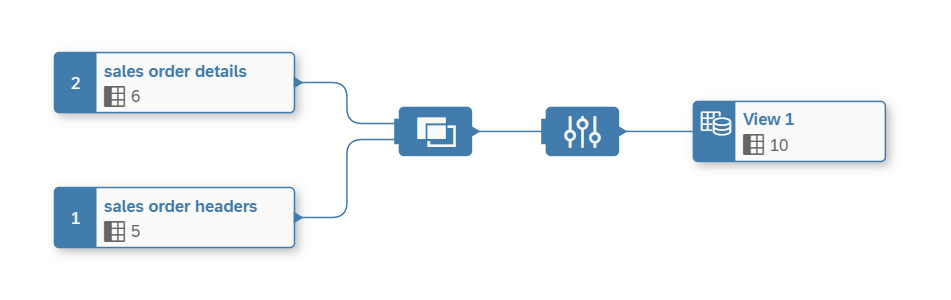
SAP Datasphere Graphical View
As you see the view is very simple we just join the sales order header with the details. Now we can assign in the properties of the view element our time dimension.
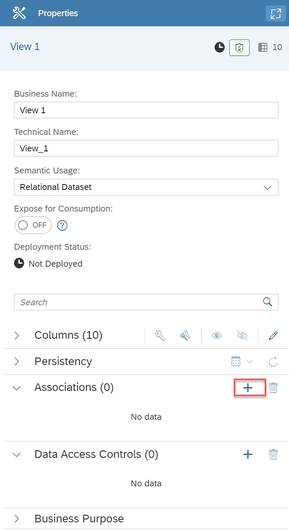
SAP Datasphere Properties of View
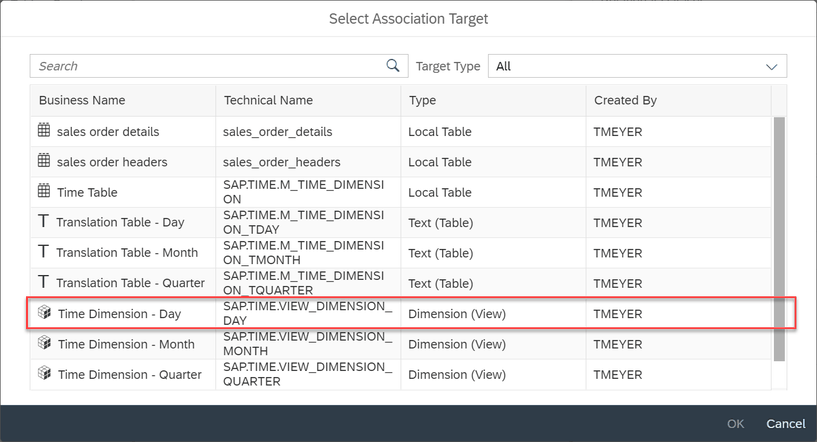
Now we can select our association target and here we select the time dimension day and click OK.
SAP Datasphere Select association target
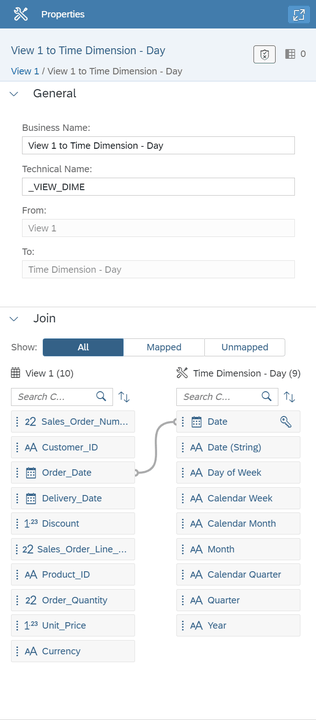
Now we have to join our view with the time dimension. In my case I use the order date for my hierarchy.
SAP Datasphere Join between view and association target
As penultimate step of this view we define our view as an Analytical Dataset and expose it for consumption. As last step we save and deploy our view to make it available in the SAP
Analytics Cloud.
4. Create SAC Story
Now after we have deployed our view we can switch through the application switcher to the SAP Analytics Cloud.
SAP Datasphere Switch to SAP Analytics Cloud
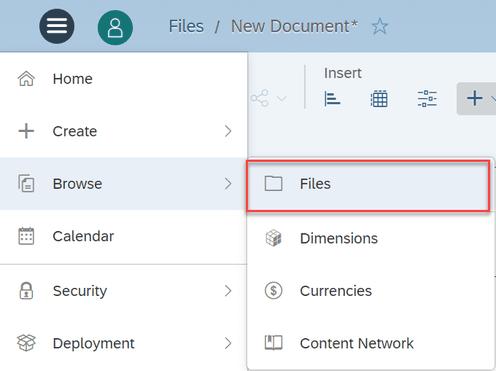
We open via the menu our corresponding space and create a new story there.
SAP Analytics Cloud Browse Files
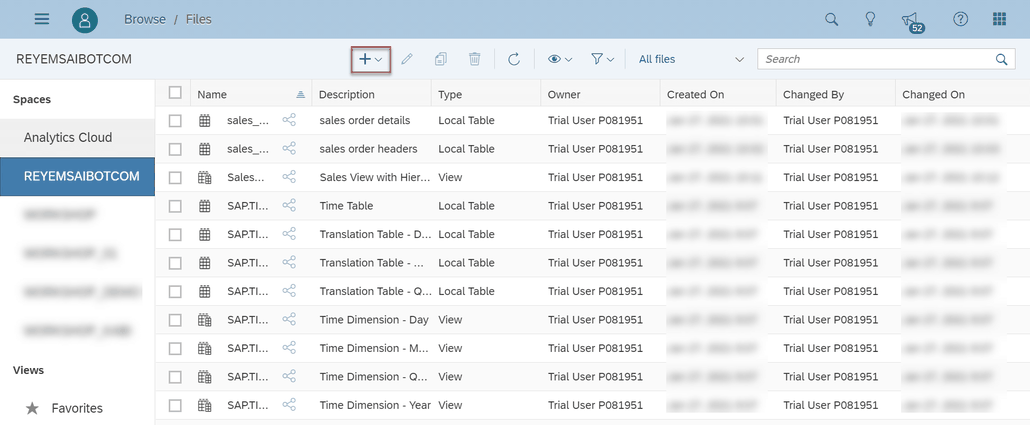
SAP Analytics Cloud Create new story
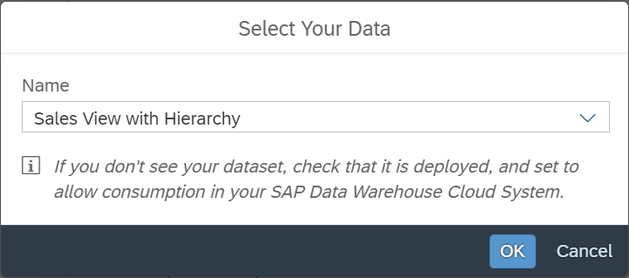
Here we have to select our Analytical Dataset.
SAP Analytics Cloud Select Dataset
After we selected our Analytical Dataset, we choose for the demonstration a table to show the hierarchy.
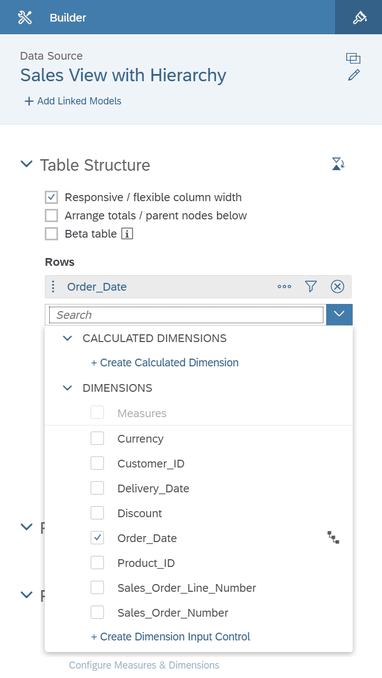
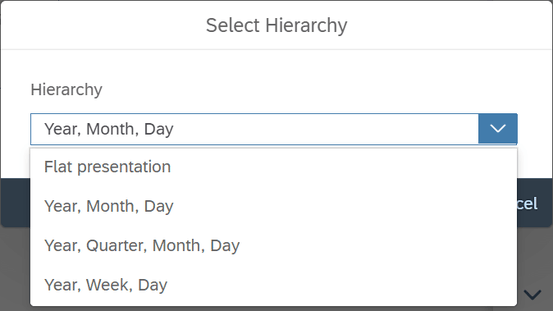
Now we add the Order Date to our table and can select our corresponding hierarchy.
SAP Analytics Cloud Add dimension with hierarchy
SAP Analytics Cloud Select Hierarchy
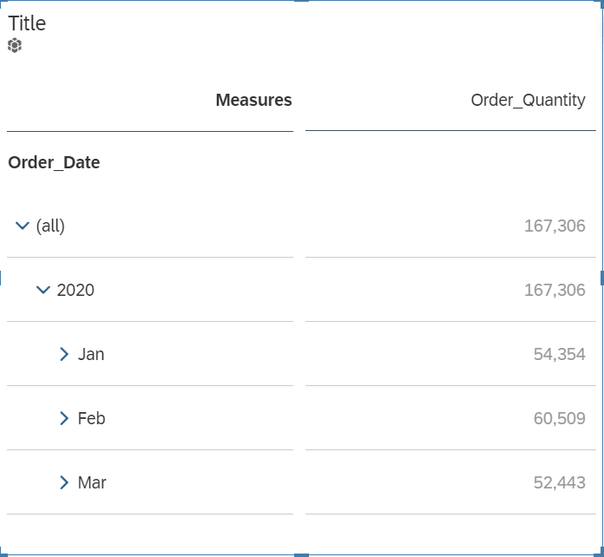
As you see our table shows the time hierarchy.
SAP Analytics Cloud Story with Table and Time Hierarchy
Conclusion
When you know where the options are, it is not heavy to build a time hierarchy in SAP Datasphere and use it in SAP Analytics Cloud. I hope this will help to get started with Datasphere. If you
have any questions, feel free to ask in the comments.
author.
Hi,
I am Tobias, I write this blog since 2014, you can find me on Twitter, Facebook ,and YouTube. I work as a Data & Analytics
Consultant. If you want, you can leave me a PayPal coffee donation. You can
also contact me directly if you want.