reyemsaibot

SAP BI Blog about SAP BW/4HANA, Analysis for Office and SAP HANA - by Tobias Meyer

Schlagwort: Net

  • Decode an Analysis Office Workbook

    The Analysis Office Workbook saves a lot of information in it. The Microsoft Excel format xlsx is a container which can save a lot of other information besides the normal data. When you rename a
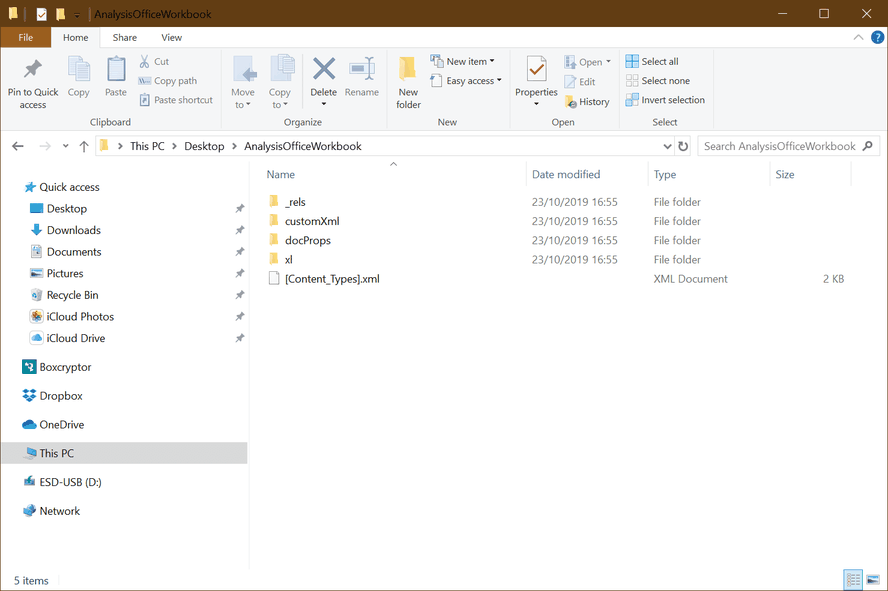
    xlsx file to a zip file you can extract it with for example 7-Zip. Now you see the following folder structure.

    Analysis Office Workbook Structure
    Analysis Office Workbook Structure

    When you open the folder xl, you see the custom property. Normally there are several customProperty.bin files listed.

    Overview Custom Properties
    Overview Custom Properties

    In my case it is customProperty3.bin (just search for the custom property with the highest size). When you open it for example with notepad++ and select the language setting xml it should look
    like this.

    Custom Property
    Custom Property

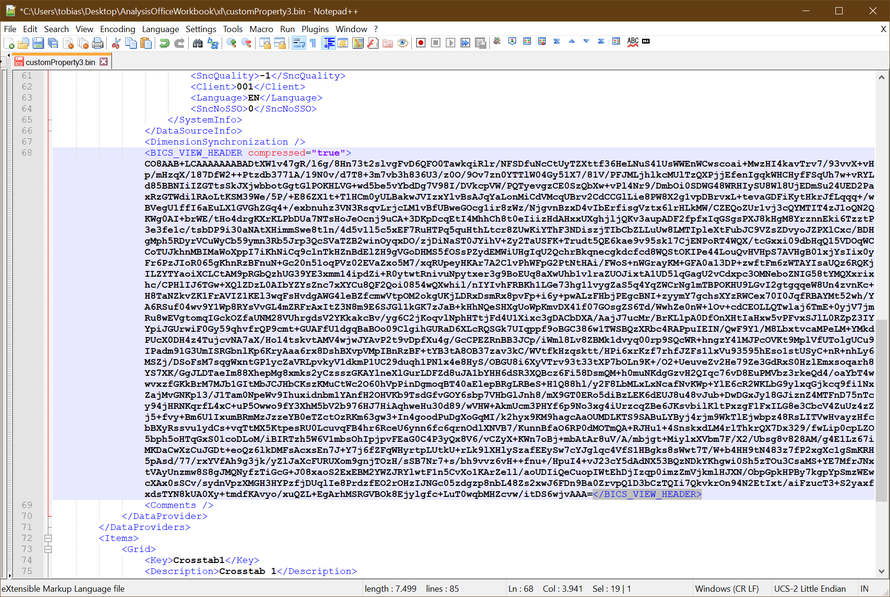
    You see information like system ID, server, data source and all information which you can set in the component tab in Analysis Office. And you also see a compressed and encoded area which we will
    now analyze.

    Encoded Area
    Encoded Area

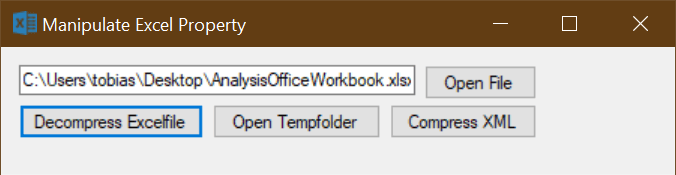
    In this encoded area SAP stores a lot of information which you cannot see at the first sight. I developed a little tool in Visual Studio to decrypt this area to a readable text.

    Manipulate Excel Property Tool
    Manipulate Excel Property Tool

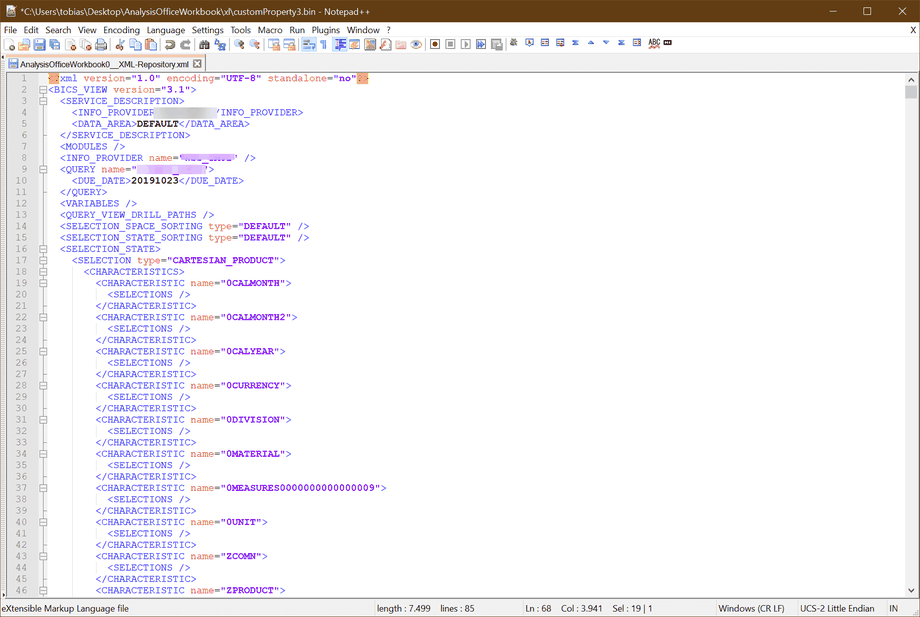
    Now you see what SAP encoded in this <BICS_VIEW_HEADER> area.

    Decrypted <BICS_VIEW_HEADER>
    Decrypted <BICS_VIEW_HEADER>

    Here we go, we see which dimensions are in this workbook, how sorting for each dimension is adjusted or which valus are stored in the prompt. So we can analyze in detail how the workbook behaves
    and maybe discover difference between a development and production system.


    Is this something anyone needs? Then I would upload the program to github. Here is the link to github.com

    author.


    Hi,

    I am Tobias, I write this blog since 2014, you can find me on twitterfacebook and youtube. I work as a Senior Business
    Warehouse Consultant. In 2016 I wrote the first edition of . If you want you can leave me a paypal coffee
    donation. You can also contact me directly if you want.


  • Open documents from BI platfrom with .Net

    After we can log on to a BI platform with our .Net application, we want to open a document for
    example a Analysis Office workbook. First we have to define several variables.

    1
    2
    3
    4
    Dim boInfoStore as InfoStore
    Dim boEnterpriseService as EnterpriseService
    Dim boInfoObjects as InfoObjects
    Dim boEnterpriseSession as EnterpriseSession
    

    After we have now all variables, we expand our source code from the previous post. So if something isn’t clear, feel free to write a comment.

    1
    boEnterpriseSession = mySessionMgr.Logon(user, password, url & ":" & port, auth)
    

    After we initialize the boEnterpriseSession, we could work with this session to get our objects from the BI platform.

    1
    2
    boEnterpriseService = boEnterpriseSession.GetService("", "InfoStore")
    boInfoStore = New InfoStore(boEnterpriseService)
    

    Now we connected the EnterpriseService with the InfoStore-Object, so we are able to execute SQL commands. You can find all objects inside the BI platform with SQL statements. You can reach the
    AdminTools via http://yourBIplatform:8080/AdminTools/ to test your SQL statements.

    1
    boInfoObjects = boInfoStore.Query("SELECT * from CI_INFOOBJECTS WHERE SI_KIND = 'AO.Workbook'")
    

    This command makes a SQL Select Statement and delievers all Analysis Office Workbooks. You can now open or display all
    boInfoObjects. If there are any questions feel free to ask.

    author.


    I am Tobias, I write this blog since 2014, you can find me on twitter and youtube. If you want you can leave me a paypal coffee donation. You can also contact me directly if you want.
  • Access BI platform with a .Net Application

    After we configured the BI platform with Windows Active Directory Single sign-on (SSO) we now
    can access the BI platform easily with a .Net application. 
    First you have to install the BIP .Net SDK. You can download it from the SAP marketplace. Go to Installations and Upgrades >> By Alphabetical Index (A-Z) >> B >> SBOP BI Platform (former
    SBOP Enterprise) >> SBOP BI Platform 4.2 >> Installation and Upgrade >> SBOP BI Platform 4.2 SP03 ENTER .NET SDK Runtime Windows
    . You need a S-User with download
    credentials. For more information about the SDK commands you can look into the help file and the documentation.
    So now start a new Visual Studio project and add the following dlls to your project.
    • CrystalDecisions.Enterprise.Framework
    • CrystalDecisions.Enterprise.InfoStore

    After you added these two dlls, we can build a test application in Visual Studio. We need a new button, which test if we have a connection to the BI
    platform
    . First we need a session manager.

    1
    Dim mySessionMgr as SessionMgr
    

    We also need variables for user, password, url, port and authentication.

    1
    2
    3
    4
    5
    Dim user as String
    Dim password as String
    Dim url as String
    Dim port as String
    Dim auth as String
    

    Now we have all variables which we need. So we can build our log on to the BI platform.

    1
    2
    3
    4
    5
    mySessionMgr = New SessionMgr
    user = txt_username.Text
    password = txt_password.Text
    url = txt_url.Text
    port = txt_port.Text
    

    As authentication we can use between Enterprise or Windows Active Directory. But after we created the logon via Active Directory, we should use this authentication.

    1
    2
    3
    4
    5
    6
    Select Case combobox_auth.Text
      Case "Enterprise"
        auth = "secEnterprise"
      Case "Windows AD"
        auth = "secWinAD"
    End Select
    

    So now we have all information to build our logon.

    1
    2
    3
    4
    5
    If mySessionMgr.Logon(user, password, url & ":" & port, auth) then
      Messagebox.Show("Login was successful")
    Else
      Messagebox.Show("Login wasn't successful")
    End if
    

    So now you can see if your logon is working or not. In the next article I write how to open a file on the BI platform (for this we need the dll CrystalDecisions.Enterprise.InfoStore). If you have
    any questions, feel free to comment under this article.

    author.


    I am Tobias, I write this blog since 2014, you can find me on twitter and youtube. If you want you can leave me a paypal coffee donation. You can also contact me directly if you want.

  • How to build a RFC Server with NCo 3.0 Part 2

    So it is done, Part 2 finally is written and an example is uploaded to github. It took me about 8 months to release Part 2 of these series. Part 1 was released in March 2016 and now I had time to write an example for Part 2 and upload it to
    github. Part 1 discover the basics about a
    RFC Server with the SAP NCo Connector, part 2 now explain how to build a RFC Server more flexible.

    First you have to create a new Microsoft Visual Studio project. In my case it was a Windows Form Application. I add some labels and textboxes so
    it look like this:

    SAP NCo RFC Server Sample Part 2
    SAP NCo RFC Server Sample Part 2

    I also add some fields in the application settings:

    Visual Studio Project Settings
    Visual Studio Project Settings

    After the fields are done, we can add our code for the save button.

    With My.Settings

    .RfcProgramId = txtProgramID.Text .

    .RfcGatewayHost = txtGatewayHost.Text

    .RfcGatewayService = txtGatewayService.Text

    .RfcIdleTimeout = txtIdleTimeout.Text

    .RfcMessageServer = txtMessageServerHost.Text

    .RfcMessageServerService = txtMessageServerService.Text

    .RfcMessageServerSystemID = txtMessageServerSystemId.Text

    .RfcLanguage = txtLanguage.Text

    .RfcPassword = txtPassword.Text

    .RfcUser = txtUser.Text

    .RfcRegistrationCount = txtRegistrationCount.Text

    My.Settings.Save()

    End With

    So now we are able to save our settings directly into the application settings. To switch between normal mode (able to save the settings) and a console mode I add a new module which checks if
    there are any arguments. In this case I check if the argument -R (remote) is available.

    Public Sub Main()

    Dim args() As String = Environment.GetCommandLineArgs()

    If args.Length > 0 And
    String.Equals(args(1).ToUpper, „-R“) Then

    Dim remoteServer As RfcServer

    Dim parameters As New RfcConfigParameters()

    parameters(RfcConfigParameters.Name) = „NCO_SERVER“

    Dim repository As String

    With My.Settings

    If String.IsNullOrEmpty(.RfcProgramId) OrElse String.IsNullOrEmpty(.RfcGatewayHost) OrElse String.IsNullOrEmpty(.RfcGatewayService) OrElse String.IsNullOrEmpty(.RfcIdleTimeout) OrElse String.IsNullOrEmpty(.RfcLanguage) OrElse String.IsNullOrEmpty(.RfcPassword) OrElse String.IsNullOrEmpty(.RfcUser) OrElse String.IsNullOrEmpty(.RfcRegistrationCount) Then

    MessageBox.Show(„Please fill all necessary fields!“, „Missing fields“, MessageBoxButtons.OK,
    MessageBoxIcon.Information)

    Exit Sub

    End If

    parameters(RfcConfigParameters.ProgramID) = .RfcProgramId

    parameters(RfcConfigParameters.GatewayHost) = .RfcGatewayHost

    parameters(RfcConfigParameters.GatewayService) = .RfcGatewayService

    parameters(RfcConfigParameters.ConnectionIdleTimeout) = .RfcIdleTimeout

    parameters(RfcConfigParameters.MessageServerHost) = .RfcMessageServer

    parameters(RfcConfigParameters.MessageServerService) = .RfcMessageServerService()

    parameters(RfcConfigParameters.SystemID) = .RfcMessageServerSystemID

    parameters(RfcConfigParameters.User) = .RfcUser

    parameters(RfcConfigParameters.Password) = .RfcPassword

    parameters(RfcConfigParameters.Language) = .RfcLanguage

    parameters(RfcConfigParameters.RegistrationCount) = .RfcRegistrationCount

    End With

    remoteServer = RfcServerManager.GetServer(parameters, New Type() {GetType(ServerFunction)})

    repository = CStr(My.Resources.ResourceManager.GetObject(„repo“))

    Dim fileFunc As New StringReader(repository)

    Dim rfcRepository As New RfcCustomRepository

    rfcRepository.Load(fileFunc)

    remoteServer.Repository = rfcRepository

    remoteServer.Start()

    Thread.Sleep(400000)

    Else

    Dim server As New NCoServer

    server.ShowDialog()

    End If

    End Sub

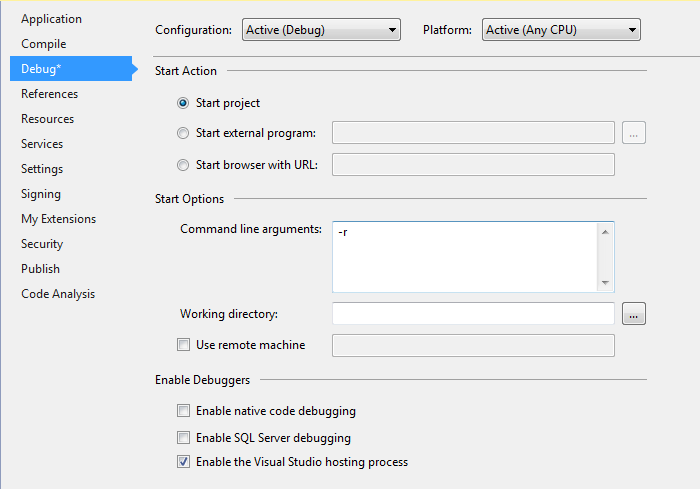
    You can check if the argument works when you add in the project properties under debug -R

    Visual Studio Project Properties Command line arguments
    Visual Studio Project Properties Command line arguments

    So if you run now Visual Studio in debug mode, the command line argument is executed. And code after this if will be executed.

    If args.Length > 0 And
    String.Equals(args(1).ToUpper, „-R“) Then

    So as you can see the RFC Server is build from the previous defined settings and it is more flexible than Part 1. And after we started the function module as in Part 1 described, our RFC Server now response.

    SAP NCo RFC Server Response after call from NetWeaver BW
    SAP NCo RFC Server Response after call from NetWeaver BW

    So that’s it. I hope you like the quick example and if there are any questions feel free to ask.

    author.


    I am Tobias, I write this blog since 2014, you can find me on twitter and youtube. If you want you can leave me a paypal coffee donation. You can also contact me directly if you want.
  • How to build a RFC Server with NCo 3.0 Part 1

    In some cases you want to trigger an external program from a SAP system. In this part 1 I explain how to build a RFC Server with NCo 3.0. I had several problems when I started with this topic so
    I decided to write a short example. If someone want the Visual Studio project files, please contact me.


    So let’s go.


    This Post describes how to build a simple RFC Server using SAP NCo 3.0 and the app.config. Part 2 will be describe how to build a RFC Server with RFC Parameter. As example program I use
    STFC_CONNECTION. It is a good example, because it contains importing and exporting parameters.


    First you have to download and install NCo 3.0 (OSS login required). Afterwards you have
    to start a new project in Visual Studio.


    Setting up the Visual Studio Project:


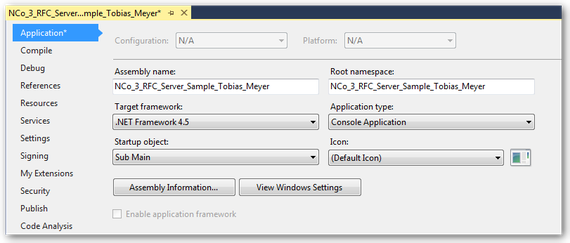
    In the properties of the project you have to use a new console application. As target framework I use .Net Framework 4.5.

    Visual Studio Project Properties
    Visual Studio Project Properties

    Next you have to add references to the SAP .Net Connector. There are two DLLs (sapnco.dll and sapnco_utils.dll). Since NCo 3.0 SAP offers a help manual which describes all commands.

    Visual Studio Project References
    Visual Studio Project References

    Define the SAP Connections


    There are many methods you can use to define a SAP host. For a quick and simple solution you can use the app.config to define your SAP connection.


    For basic RFC server configuration, there are two sections that are used. One section are the ClientSettings, the other the ServerSettings. A RFC server configuration is linked to a RFC
    repository by using the REPOSITORY_DESTINATION attribute. To be able to access function metadata, this attribute must match the name of a destination in the
    client settings.


    All RFC servers communicate with a SAP system through a service called the SAP gateway service. The server settings
    defines how the application connects to the gateway. In the server section the NAME field identifies this entry to your RFC Connection in a SAP system. The SAP .Net Connector uses the values in
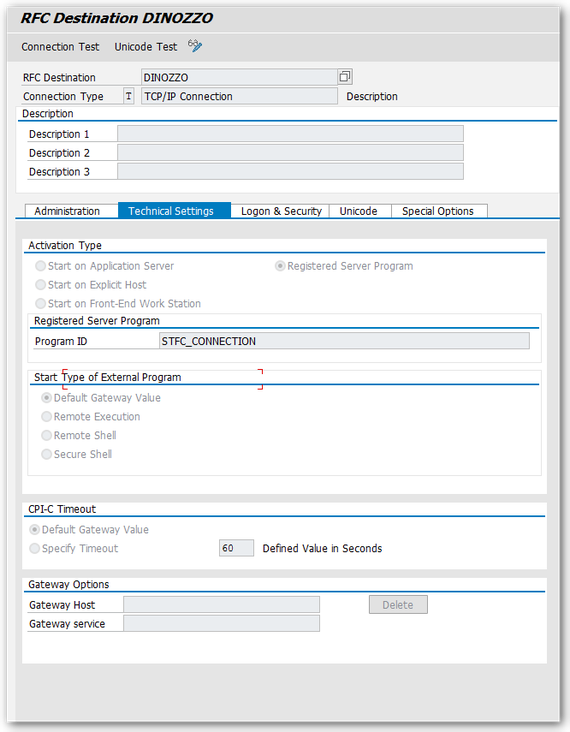
    the GWHOST, GWSERV and PROGRAM_ID fields to register your program on the SAP Gateway. The PROGRAM_ID must match the Registered Server Program of your RFC
    Destination.


     1
     2
     3
     4
     5
     6
     7
     8
     9
    10
    11
    12
    13
    14
    15
    16
    17
    18
    19
    20
    21
    22
    23
    24
    25
    26
    27
    28
    29
    30
    31
    32
    <? xml version="1.0" encoding="utf-8" ?>
      <configuration>
        <configSections>
          <sectionGroup name="SAP.Middleware.Connector">
            <sectionGroup name="ServerSettings">
              <section name="ServerConfiguration" type="SAP.Middleware.Connector.RfcServerConfiguration, sapnco"/>
            </sectionGroup>
            <sectionGroup name="ClientSettings">
              <section name="DestinationConfiguration" type="SAP.Middleware.Connector.RfcDestinationConfiguration, sapnco"/>
            </sectionGroup>
          </sectionGroup>
        </configSections>
        <SAP.Middleware.Connector>
          <ServerSettings>
             <ServerConfiguration>
               <servers>
                  <add NAME="DINOZZO" GWHOST="xxx.xxx.xxx.xxx" GWSERV="SAPGW00" PROGRAM_ID="STFC_CONNECTION" REPOSITORY_DESTINATION="ABC" REG_COUNT="1"/>
               </servers>
             </ServerConfiguration>
          </ServerSettings>
          <ClientSettings>
            <DestinationConfiguration>
              <destinations>
                <add NAME="ABC" USER="user" PASSWD="password" CLIENT="client" LANG="EN" ASHOST="xxx.xxx.xxx.xxx" SYSNR="00" />
              </destinations>
            </DestinationConfiguration>
          </ClientSettings>
        </SAP.Middleware.Connector>
        <startup>
          <supportedRuntime version="v4.0" sku=".NETFramework,Version=v4.5" />
        </startup>
      </configuration>
    

    SAP Function module:

    SAP transaction se37 can be used to find out the parameters for the STFC_CONNECTION. In this example, you receive a parameter REQUTEXT, which will be returned to the caller in ECHOTEXT.
    It also return a text string to the caller in field RESPTEXT.


    Transaction sm59 is used to configure the RFC Destination. The name of the RFC Destination.

    SAP RFC Destination
    SAP RFC Destination

    Coding:


    First you have to create a class that exposes a method that can be called via a SAP RFC Call. In the example that class is named ServerFunction and it
    contains one method which will supply the STFC_CONNECTION functionality.


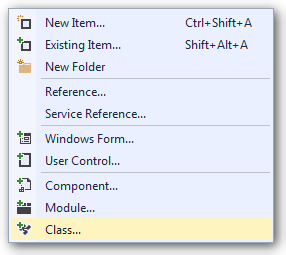
    Add a new class in the Visual Studio

    Visual Studio Add new class
    Visual Studio Add new class

    Import the NCo functions

    Visual Studio Import SAP NCo Connector

    Create a method, similar to this one

    Visual Studio Method
    Visual Studio Method

    Now you have to implement the coding for Main()


    First Import the NCo functions

    Visual Studio Import SAP NCo Connector

    Afterwards you have to create a similar coding

    Visual Studio Sub
    Visual Studio Sub

    RfcServerManager.GetServer(„DINOZZO„, New Type(0) {GetType(ServerFunction)})


    DINOZZO references to the RFC Destination name in transaction sm59 and in the app.config.


    ServerFunction references to the class above.


    The RFC Server will be started by following code: RemoteServer.Start


    In SAP transaction SMGW >> Goto >> Logged on Clients you can now see your program running on the application gateway.

    SAP Connection (transaction SMGW)
    SAP Connection (transaction SMGW)

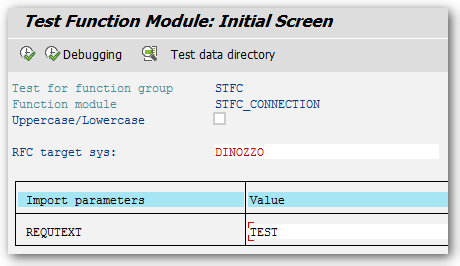
    Now you can use the test function screen in transaction se37 to test STFC_CONNECTION. The RFC Target System is set to the name of the RFC destination (sm59)

    SAP Test Function Module
    SAP Test Function Module

    Click Execute (F8)

    SAP Result Function Module
    SAP Result Function Module

    The console will also display some information.

    Console result
    Console result

    Part 2 will be describe how to build a RFC Server with a custom RFC repository and how to be flexible
    with RFC config parameters.

    author.


    I am Tobias, I write this blog since 2014, you can find me on twitter and youtube. If you want you can leave me a paypal coffee donation. You can also contact me directly if you want.
  • .Net Error Interop type cannot be embedded

    While developing in the Visual Studio for .Net you can get an error like this: „Interop type ‚CrystalDecisions.Enterprise.SessionMgr‘ cannot be embedded. Use the applicable interface instead.“ or
    in German: „Interop Typ ‚CrystalDecisions.Enterprise.SessionMgr‘ kann nicht eingebettet werden. Verwenden Sie stattdessen die anwendbare Schnittstelle.“


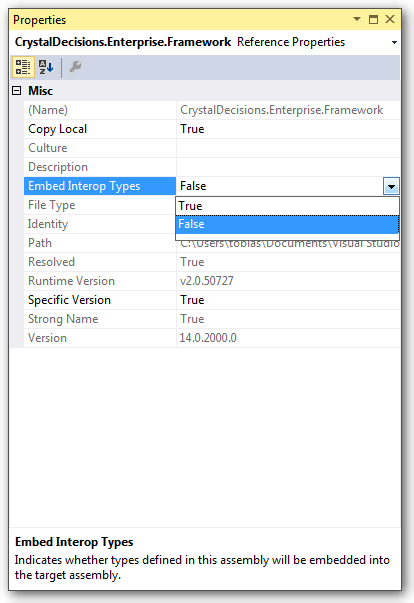
    To aviod this error, you have to change the properties of this reference. You have to switch the „Embed Interop Types“ from True to False.


    Visual Studio Reference Properties
    Visual Studio Reference Properties

    After this you can compile your program without an error.

    author.


    I am Tobias, I write this blog since 2014, you can find me on twitter and youtube. If you want you can leave me a paypal coffee donation. You can also contact me directly if you want.
  • Support SAP Connector for Microsoft .Net (NCo)

    In the last time I had several problems with external access to a SAP BW System. The access was realized with an old version of the SAP Connector. And that is the problem. If you have a SAP Business Warehouse System
    version which is greater than 7.3, you maybe get troubles. For example SAP added new fields or like in 7.4 you now have the option for „Long text is XL“ in the master data. So the old versions
    would not work with this.


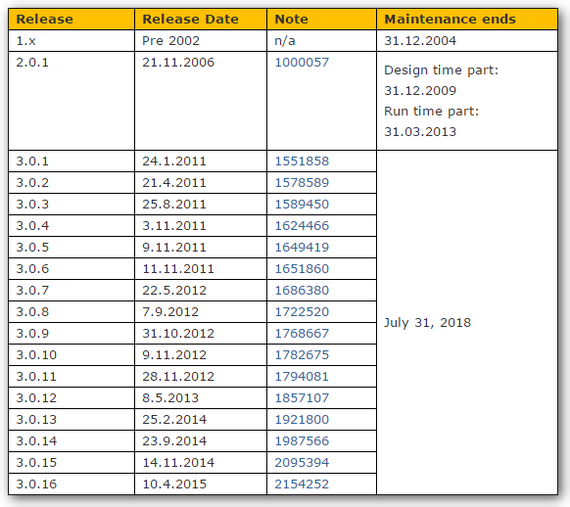
    I just found a very good table about the maintenance of all versions in Martins blog.

    Overview Support SAP NCo Connector
    Overview Support SAP NCo Connector

    So to make sure you work with the latest version of NCo, you should have an eye to the SAP Note 856863 or visit service.sap.com/connectors

    author.


    I am Tobias, I write this blog since 2014, you can find me on twitter and youtube. If you want you can leave me a paypal coffee donation. You can also contact me directly if you want.