Since Analysis Office 2.6 you are able to launch workbooks from BIP with variables. The biggest problem is to have a BI Platform 4.2 SP5 and time to test this feature. In case of writing an
updated version of Analysis Office – The Comprehensive Guide, I now have a BI Platform which fulfilled the conditions. According to SAP slides, the command looks like this:
&var[<data source alias>]<variable>=<value>
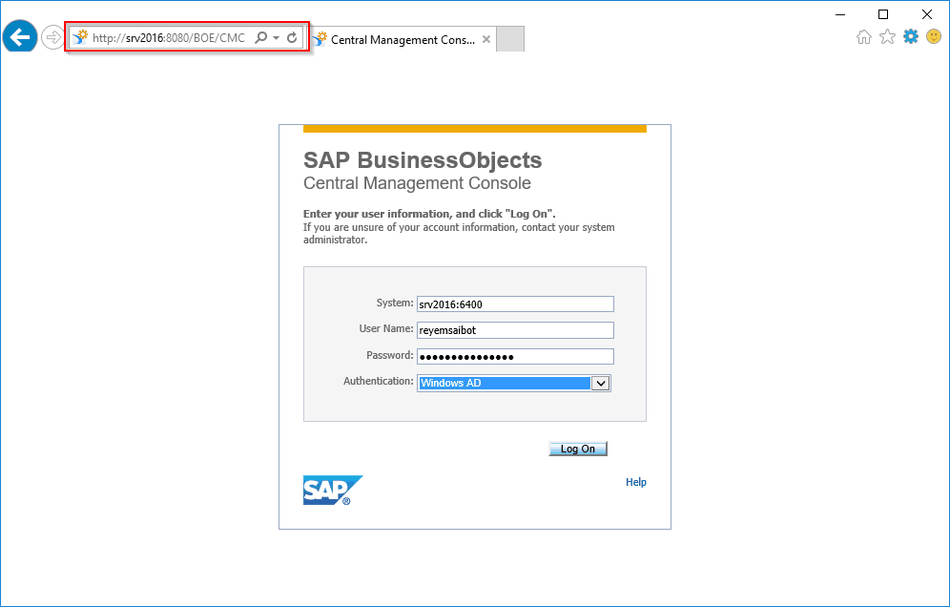
So I saved a workbook to my BI Platform and looked how it works. Here is my example where I pass the value of 0CALMONTH.
With this the data source is restricted from January 2017 to March 2017 and the commission number 8553780486. It is a cool feature but you definitely Single-Sign-On
because without SSO it doesn’t make fun.
I am Tobias, I write this blog since 2014, you can find me on twitter and youtube. If you want you can leave me a paypal coffee donation. You can also contact me directly if you want.
After we can log on to a BI platform with our .Net application, we want to open a document for
example a Analysis Office workbook. First we have to define several variables.
1
2
3
4
Dim boInfoStore as InfoStore
Dim boEnterpriseService as EnterpriseService
Dim boInfoObjects as InfoObjects
Dim boEnterpriseSession as EnterpriseSession
After we have now all variables, we expand our source code from the previous post. So if something isn’t clear, feel free to write a comment.
Now we connected the EnterpriseService with the InfoStore-Object, so we are able to execute SQL commands. You can find all objects inside the BI platform with SQL statements. You can reach the AdminTools via http://yourBIplatform:8080/AdminTools/ to test your SQL statements.
1
boInfoObjects = boInfoStore.Query("SELECT * from CI_INFOOBJECTS WHERE SI_KIND = 'AO.Workbook'")
This command makes a SQL Select Statement and delievers all Analysis Office Workbooks. You can now open or display all boInfoObjects. If there are any questions feel free to ask.
I am Tobias, I write this blog since 2014, you can find me on twitter and youtube. If you want you can leave me a paypal coffee donation. You can also contact me directly if you want.
First you have to install the BIP .Net SDK. You can download it from the SAP marketplace. Go to Installations and Upgrades >> By Alphabetical Index (A-Z) >> B >> SBOP BI Platform (former
SBOP Enterprise) >> SBOP BI Platform 4.2 >> Installation and Upgrade >> SBOP BI Platform 4.2 SP03 ENTER .NET SDK Runtime Windows. You need a S-User with download
credentials. For more information about the SDK commands you can look into the help file and the documentation.
So now start a new Visual Studio project and add the following dlls to your project.
CrystalDecisions.Enterprise.Framework
CrystalDecisions.Enterprise.InfoStore
After you added these two dlls, we can build a test application in Visual Studio. We need a new button, which test if we have a connection to the BI
platform. First we need a session manager.
1
Dim mySessionMgr as SessionMgr
We also need variables for user, password, url, port and authentication.
1
2
3
4
5
Dim user asStringDim password asStringDim url asStringDim port asStringDim auth asString
Now we have all variables which we need. So we can build our log on to the BI platform.
1
2
3
4
5
mySessionMgr =New SessionMgr
user = txt_username.Text
password = txt_password.Text
url = txt_url.Text
port = txt_port.Text
As authentication we can use between Enterprise or Windows Active Directory. But after we created the logon via Active Directory, we should use this authentication.
So now we have all information to build our logon.
1
2
3
4
5
If mySessionMgr.Logon(user, password, url &":"& port, auth) then
Messagebox.Show("Login was successful")
Else
Messagebox.Show("Login wasn't successful")
Endif
So now you can see if your logon is working or not. In the next article I write how to open a file on the BI platform (for this we need the dll CrystalDecisions.Enterprise.InfoStore). If you have
any questions, feel free to comment under this article.
I am Tobias, I write this blog since 2014, you can find me on twitter and youtube. If you want you can leave me a paypal coffee donation. You can also contact me directly if you want.
This week I want to test the integration of a BI Platform to my .Net program. So I want to
install a test version of the BIP, but my virtual machine hadn’t enough space. The first step was to extend the space of the disk. It is very easy in VirtualBox to extend the disk.
Open the Windows Console
Go to the path where you installed Virtual Box. (Default: C:Program FilesOracleVirtualBox)
Type VBoxManage.exe modifyhd „Path to the disk“ –resize 100000 (=100 GB)
Press Enter and your VirtualBox will be extended
After my VirtualBox was ready I could install the BIP. But the next issue was found very soon. I need a license key.
You can find on the support page of SAP the Emergency License Keys. With this emergency license keys you can install a trail version of the BI platform. After the installation was done, we have to set up the Windows Active
Directory, so that we can use Single sign-on (SSO).
In this article I will walk through step by step on setting up single sign-on with SAP BusinessObjects 4.2 SP3 and in my case a Windows Server 2012 R2. The Windows Server part is similar in other
Windows Server versions. The technical specifications used to accomplish single sign-on in this guide.
Domain Controller (DC): win2012.corp.reyemsaibot.com (Windows Server 2012 R2)
SAP BusinessObjects BI Platform: srv2016.corp.reyemsaibot.com (BusinessObjects 4.2 SP3 on the same server as the DC)
Domain: corp.reyemsaibot.com
SAP BusinessObjects Web Application Server: Tomcat
Service Account Name: bi_sso_service
Service Account Password: Reyemsaibot.com
Windows Active Directory Group: BI Platform Users
Test Account Name: reyemsaibot (is member of BI Platform User)
Test Account Password: HelloWorld!2016
Setup Windows Active Directory sign on
Step 1
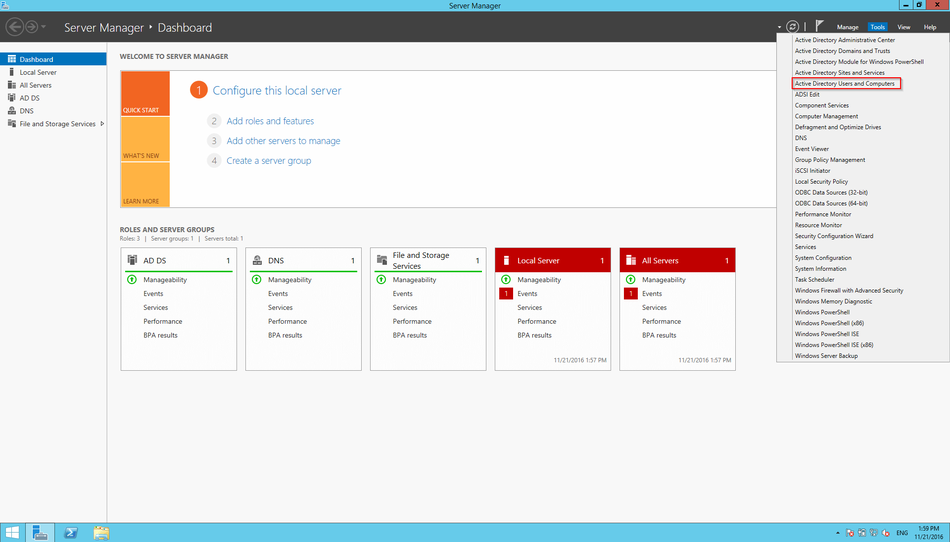
First we need a Active Directory service account. You have to create it in the Server Manager on the Domain Controller server.
Windows Server 2012 Open Server Manager
Open the Active directory Users and Computers management tool.
Windows Server Manager Active Directory Users and Computers
Create the service account that will handle the sign-on requests. Click right on the users folder, select new and then user. Use this informationen to create the user:
First Name: BI SSO
Last Name: Service
User Name: bi_sso_service
Password: Reyemsaibot.com
Active Directory add new user
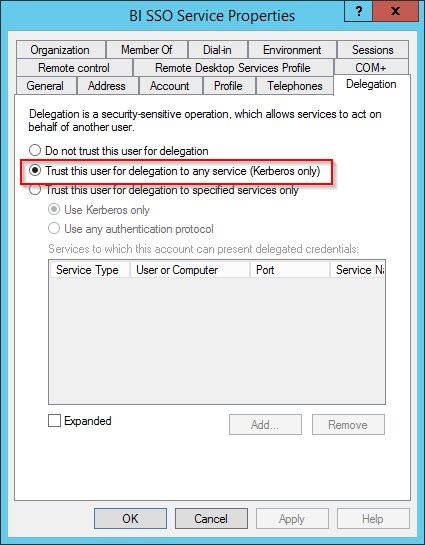
When the user bi_sso_service has been created, the delegation properties must be edited. Click right on the user bi_sso_service and select Properties. Select the Delegation tab and select the option Trust this user for delegation to any service (Kerberos only). The Delegation tab is only available when you set the SPN
first.
User Properties Define Delegation
Step 2
Now we need three Service Principal Names (SPN) for the service account bi_sso_service. This can either be done on the Domain Controller or on the BI platform server. Open the
command prompt. Type the following setspn commands so that it allows Tomcat to communicate with the Active Directory. The option -a means add a new SPN. The
first SPN will be called BICMS.
setspn -a BICMS/bi_sso_service.corp.reyemsaibot.com bi_sso_service
If it was successful, it wil display a message that is has registered the SPN and it has updated the object. Now we create the second SPN for Tomcat and link it to the new user account.
setspn -a HTTP/srv2008 bi_sso_service
And finally, we need to qualify the server address.
setspn -a HTTP/srv2008.corp.reyemsaibot.com bi_sso_service
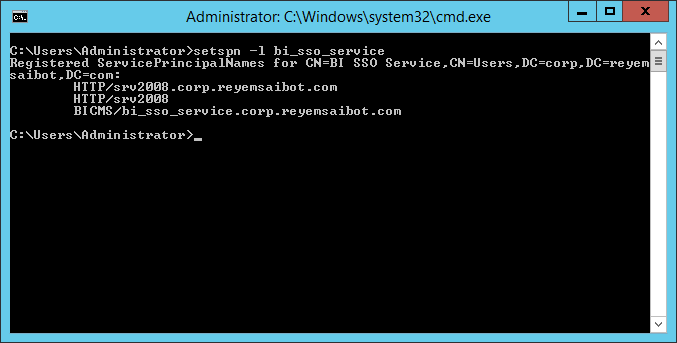
With the command „I“ we can verfiy that all SPN are created.
setspn -l bi_sso_service
Command Prompt setspn
Step 3
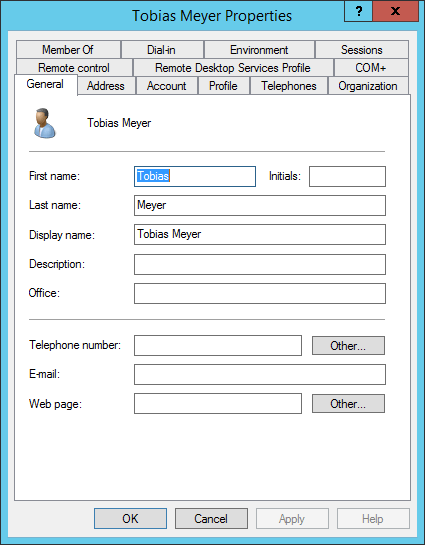
As next step we create a user and a user group that we will use for the Windows Active Directory authentication. Create on the Domain Controller a new user.
First Name: Tobias
Last Name: Meyer
User Name: reyemsaibot
Password: HelloWorld!2016
Active Directory create user
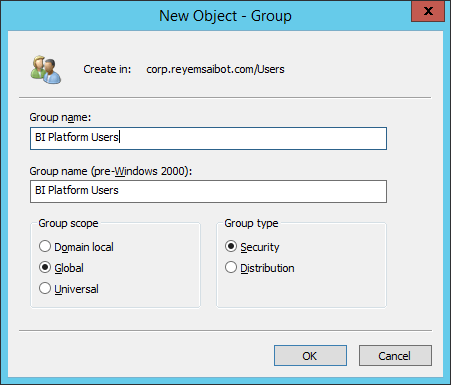
Create a new user group called BI Platform Users. Click right on the user folder, select New and then Group.
Active Directory create group
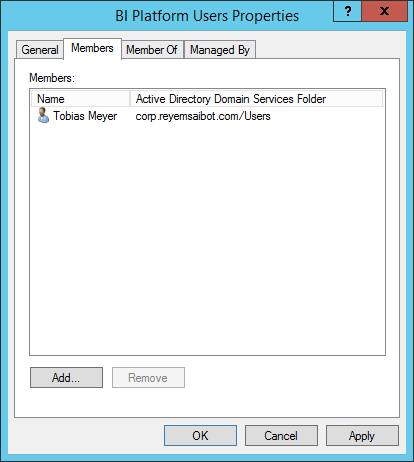
Add the user, which we created before to the user group by right clicking on the group, selecting Properties and then adding it from the Members tab.
Active Directory add user to group
Step 4
Now we will setup the Windows Active Directory authentication on the BusinessObjects server. You have to log into the CMC with a user that as administrator privileges. Then go to the Authentication area.
Central Management Console
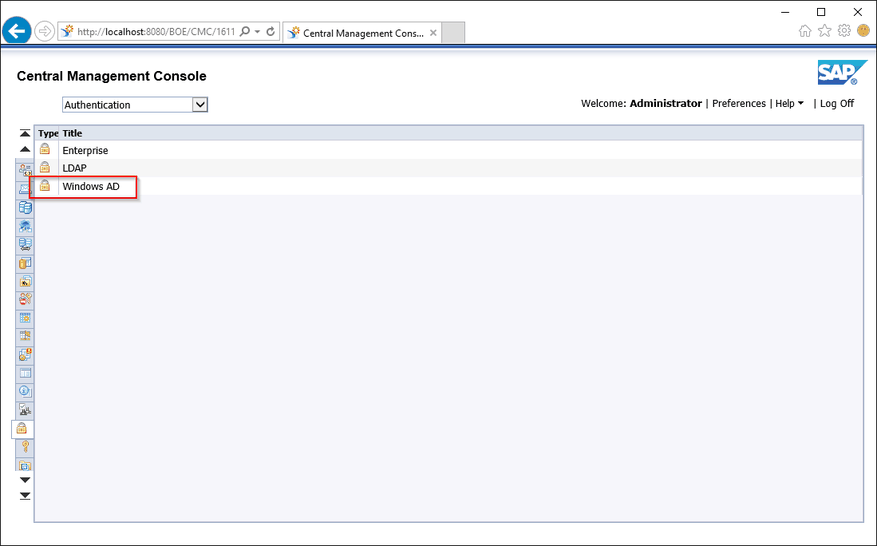
Click on Windows AD to open the authentication options for Windows Active Directory.
Central Management Console Authentication
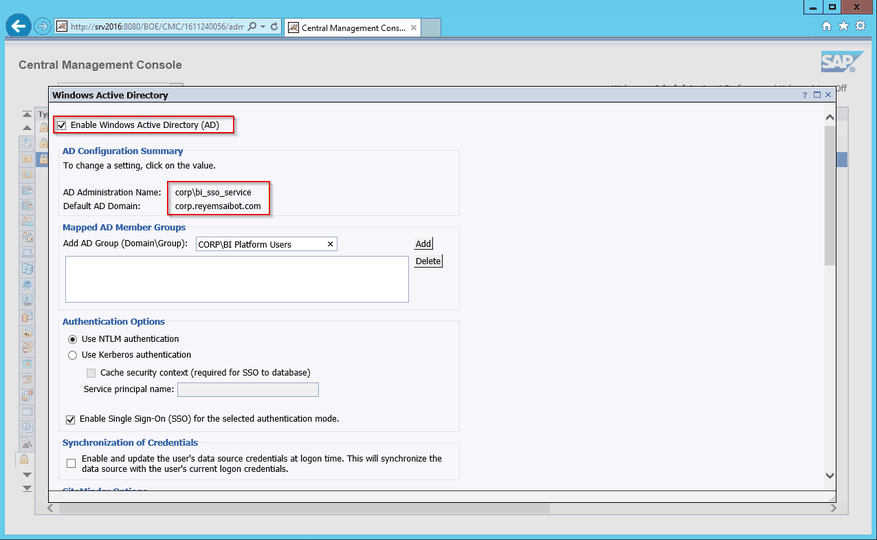
Select the checkbox Enable Windows Active Directory (AD) to enable this option.
Central Management Console Authentication Windows Active Directory
Click on the double quotes besides the AD Administration Name.
Enter the service account as well as the domain name. Note: The service account is bi_sso_service and the domain is corp.reyemsaibot.com.
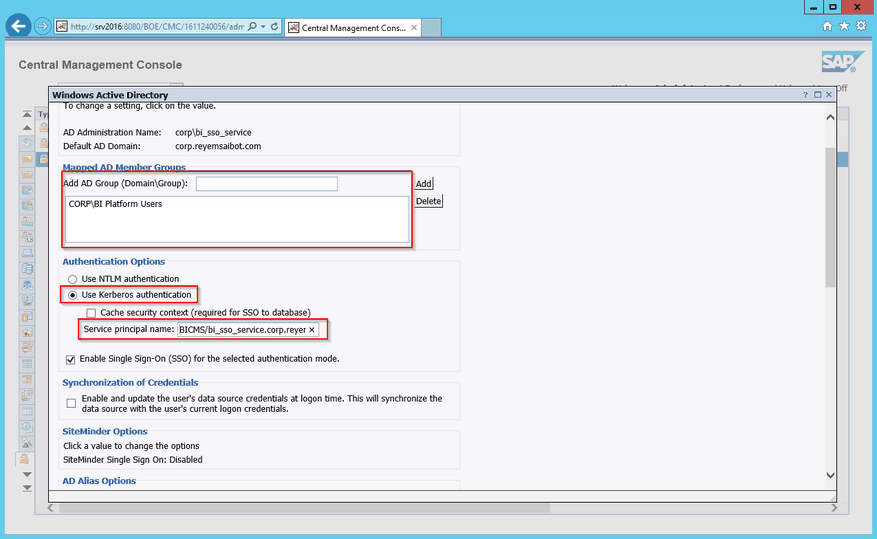
Now define the group you want to map. In this case it is corpBI Platform Users.
Under Authentication Options select Use Kerberos authentication and type as Service prinicpal name BICMS/bi_sso_service.corp.reyemsaibot.com (It is the SPN from Step 2). Select also the option Enable Single-Sign-On (SSO) for the selected authentication mode.
Central Management Console Authentication Options
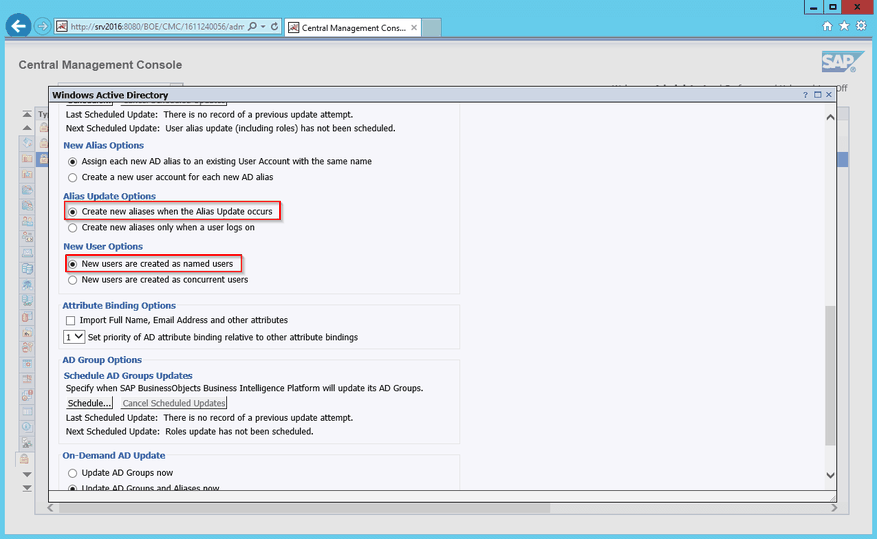
Under Alias Update Options select Create New Alias when the Alias Update occurs and under New Users Options, select New users are
created as named users. Now this is finished, click the Update button at the bottom of the window.
Central Management Console Authentication New User Options
Step 5
Now we are verifing that the group BI Platform Users and the test user reyemsaibot has been added to the BI platform. In the Central Management Console
(CMC) go to Users and Groups and you wll see that the user reyemsaibot has been added under User List and the group BI Platform
Users has been added unter the Group List.
Step 6
Before we can log in with the Windows Active Directory user, we have to configure the BusinessObjects server appropriately. On the BusinessObjects server, we
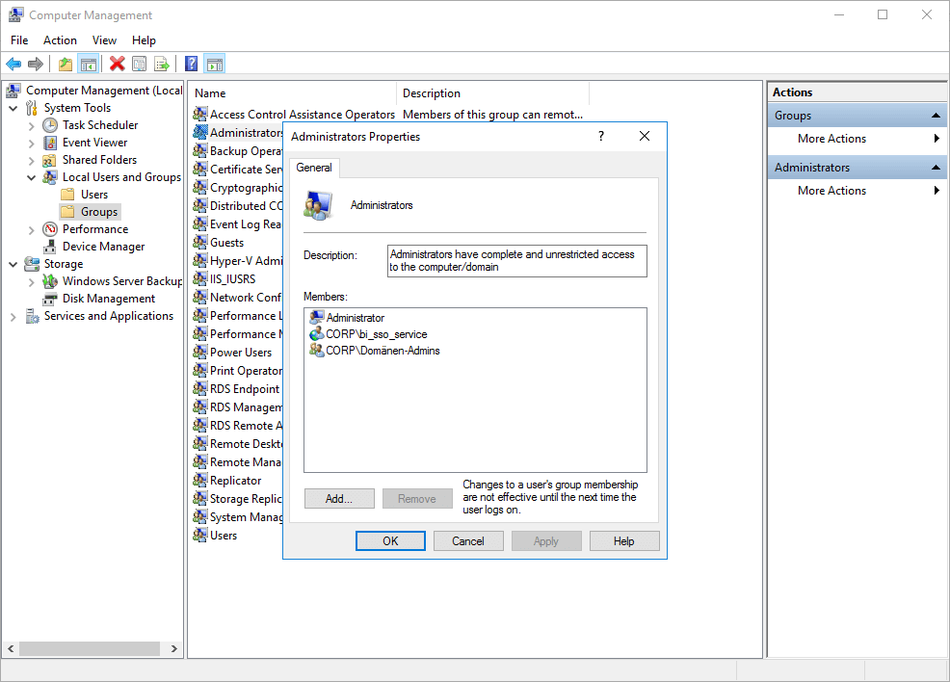
have to add the user to the Local Administrator Group. Select the Computer Management in the Server Manager.
Server Manager open Computer Management
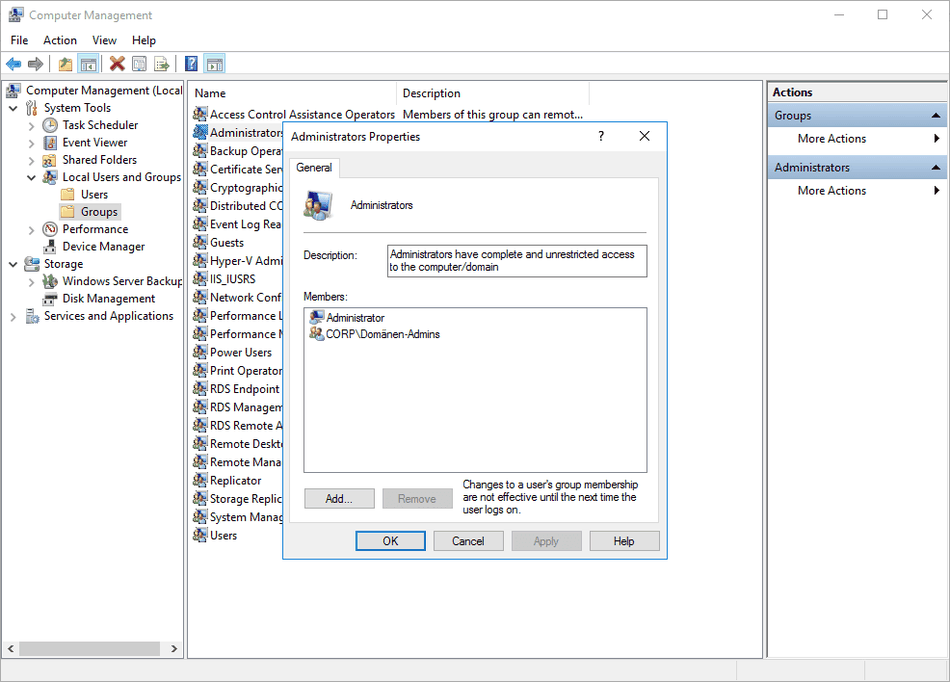
Select Local Users and Groups and then Groups. Double click on the Administrator Group and then click Add.
Computer Management Administrator Group
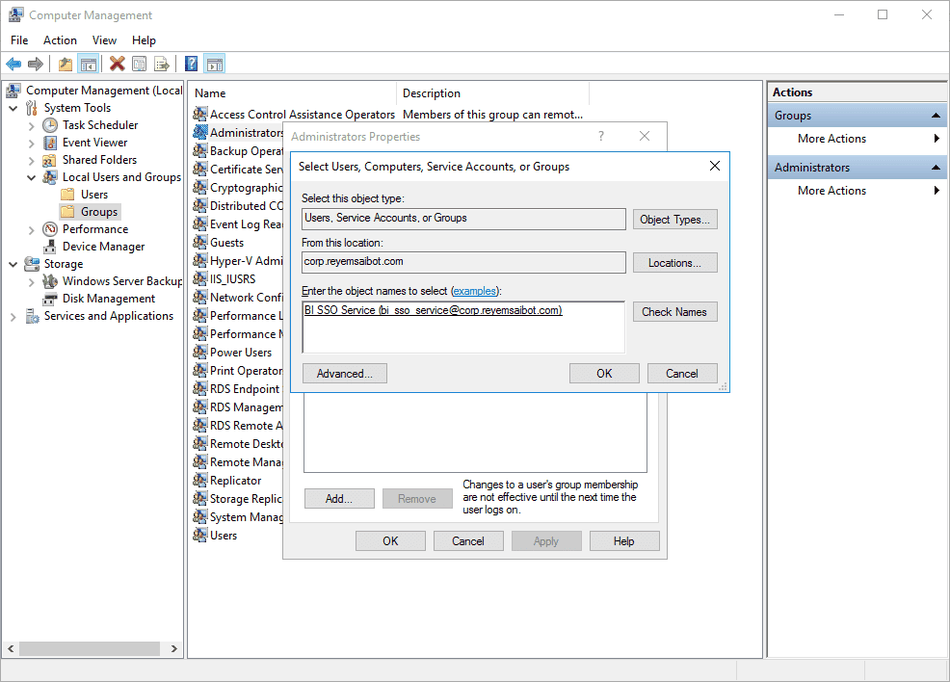
Enter the service account name bi_sso_service.
Computer Management add service user
Now you will see the service account in the local administrator group. Click Apply and then OK.
Computer Management Administrator Group
Step 7
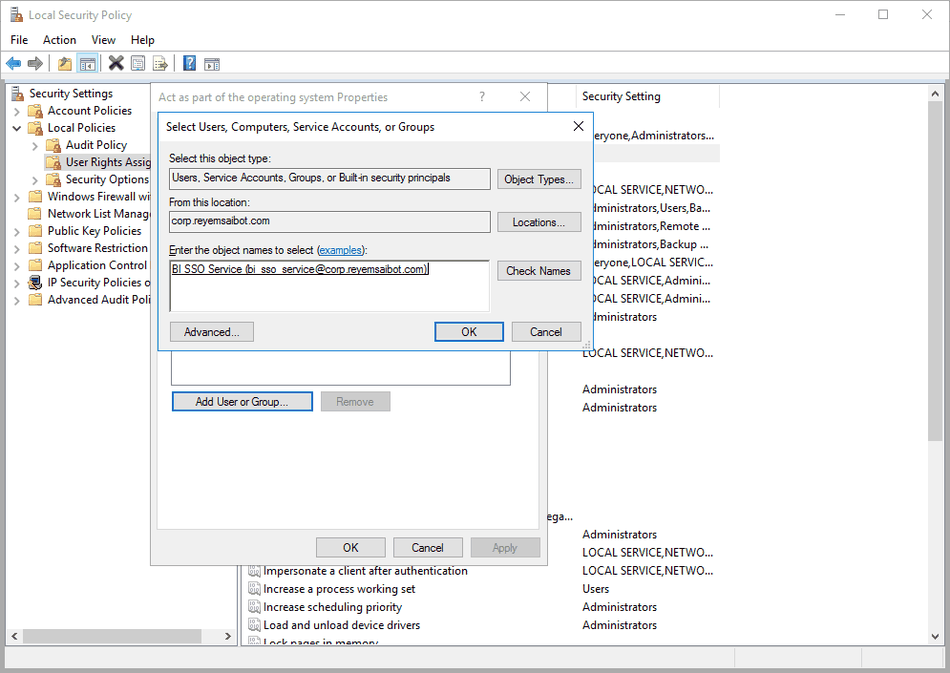
We need to edit the local policy for the service account on the BusinessObjects server. So open the Local Security Policy. Expand the Local Policies folder,
click on the User Rights Assignment folder and open the policy Act as part of the operating system.
Local Security Policy Act as part of the operating system
On the properties window, click on Add User or Group and enter the service account bi_sso_service.
Local Security Policy add service user
The service account is now part of the local policy. Close the window with Apply and OK.
Local Security Policy
Step 8
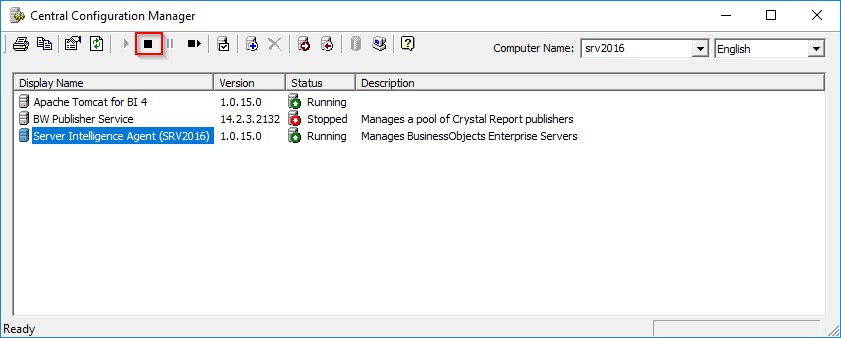
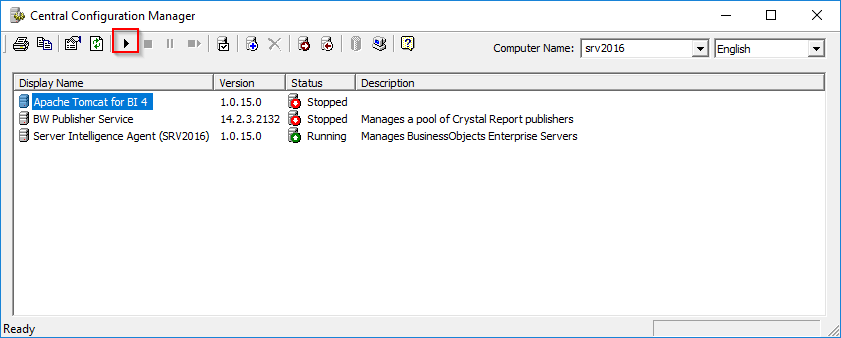
Our next step is to modify the Central Configuration Manager (CCM) so that the service account bi_sso_service is used. Open the Central Configuration
Manger (CCM) on the BusinessObjects server.
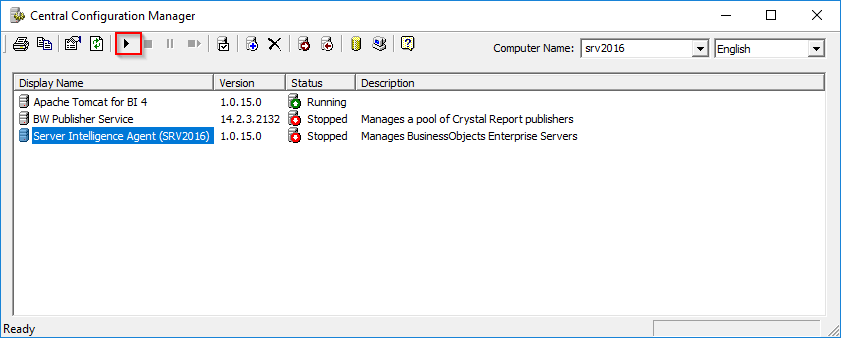
Server Intelligence Agent Stop Server
We need to stop the Server Intelligence Agent (SRV2016). Click on the Server Intelligence Agent (SRV2016) and click the stop button.
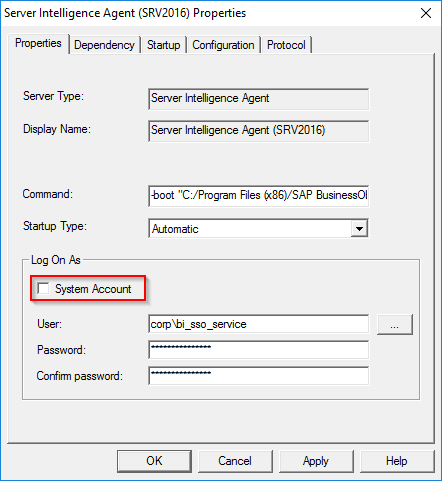
The server has to be running with the service account bi_sso_service. Under the Log On As section uncheck the box beside System Account and type
the service aaccount and password. Click Apply and Ok to save the changes.
Server Intelligence Agent Log On As
Start the Server Intelligence Agent (SRV2016) server again by pressing the start button.
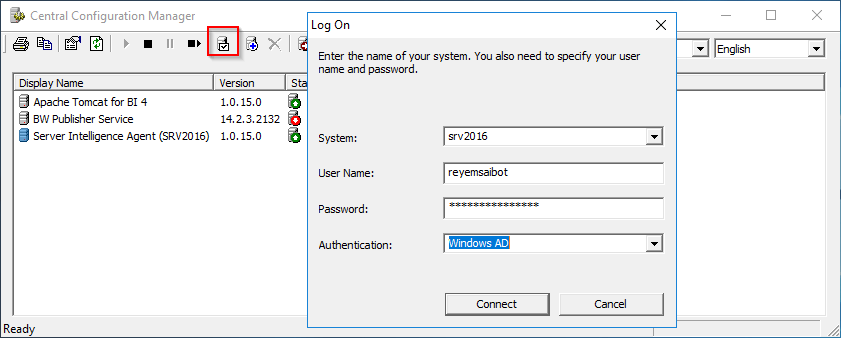
If the Windows Active Directory user reyemsaibot is working, click on Manage Servers. Login with this user account and make sure Windows AD is
selected for the Authentication type.
Central Configuration Manager Log On Test
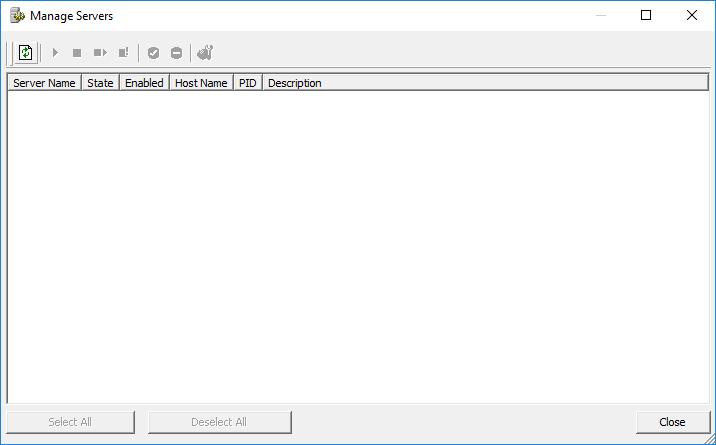
If you see an empty window, as long as you don’t get an error message it means taht the Windows Active Directory login is working.
Central Configuration Manager Manage Servers
Step 9
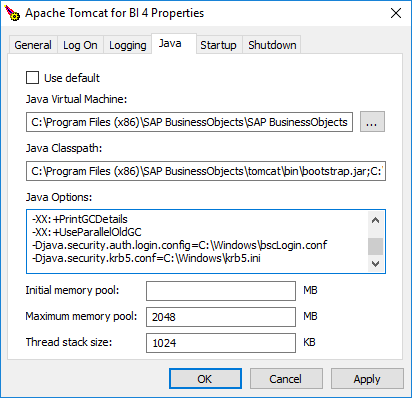
The penultimate step is to create two files (krb5.ini and bsclogin.conf) and configure Tomcat to read them during start up so that the BI
Launchpad and Central Management Console recognize Windows Active Directory logins. On the BusinessObjects sever, create a new file under C:Windows called bsclogin.conf. Edit it and insert the following code into it:
You can access the BI platform manually with a Windows Active Directory account.
BI Platform Logon with Windows Active Directory Account
Enter the correct login credentials for the user and make sure that you have selected Windows AD as authentication. If you can login successfully, your Windows Active Directory
authentication has been set up correctly. In Part 2 we setup the single sign-on so that users don’t have to log on manually every time.
I am Tobias, I write this blog since 2014, you can find me on twitter and youtube. If you want you can leave me a paypal coffee donation. You can also contact me directly if you want.
The topic came up yesterday as a collegue asked me if I know why he can’t save a workbook to the BI platform. The workbook was opened from a NetWeaver system and than the option save to BI Platform isn’t available.
So read this article if you have the same problem.
I am Tobias, I write this blog since 2014, you can find me on twitter and youtube. If you want you can leave me a paypal coffee donation. You can also contact me directly if you want.
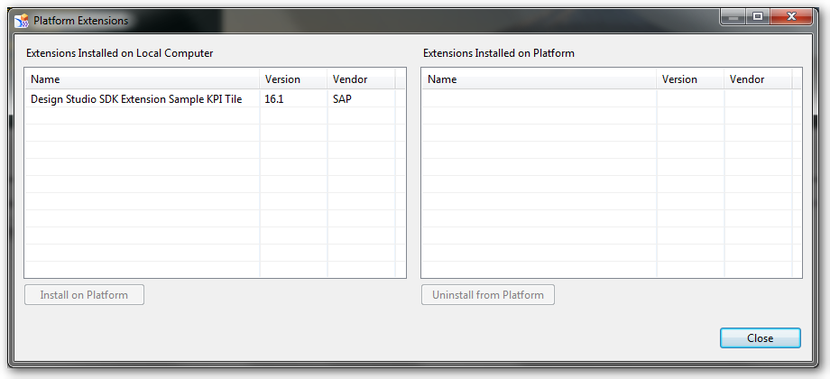
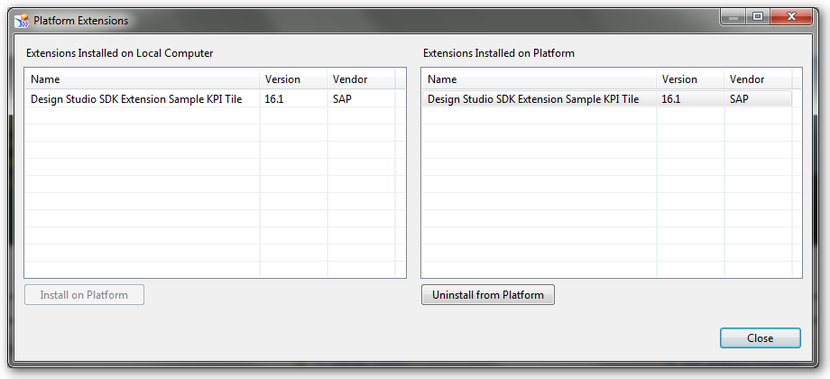
If you have developed your own extension with the SAP Design Studio SDK and want to publish this extension on the BI Platform, you have to click on Help >> Platform Extensions.
Now you see the following screen.
Platform Extensions
Select your lokal installed extension and click the Button „Install on Platform“.
Note: Only BI Platform Administrators or BI Platform Design Studio Administrators have the rights to install an extension.
Should your user not belong to any of these groups, ask your BI Platform Administrator to add you in one of these groups. After your BI Platform Administrator added you to one group, you don’t
need to restart the Design Studio.
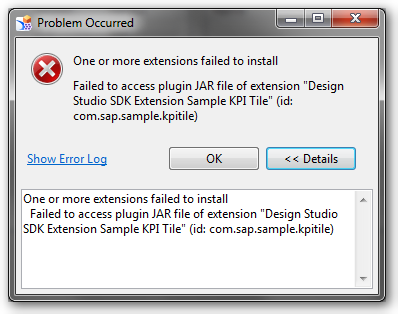
Maybe the installation of the extension throws an error like this „One or more extensions failed to install. Failed to access plugin JAR file of extension „Design Studio SDK Extension Sample KPI
Tile“. Unfortunately the Details-Button show no more information.
Design Studio Platform Extension Problem
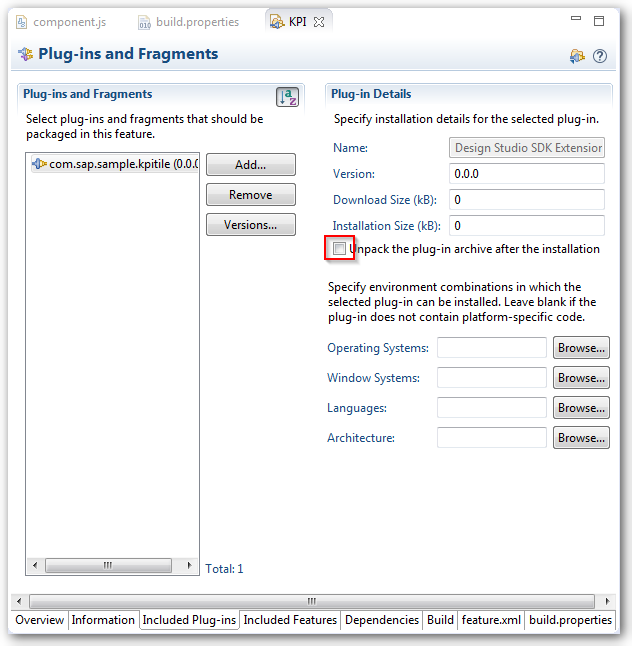
This error appears, when the *.jar file in the folder C:users<username>Analysis-configplugins is missing. Thus the extension can’t upload to the BI Platform. This error was the result
of the checkbox „Unpack the plugin-archive after installation“ from the file feature.xml in Eclipse. (More information look in the Developer Guide Point 3.3.2)
Plugin Development Eclipse
After you fix this, you have to uninstall the extension and possibly delete the above mentioned folder content and install the extension again. After this the upload to the BI Platform should
work.
I am Tobias, I write this blog since 2014, you can find me on twitter and youtube. If you want you can leave me a paypal coffee donation. You can also contact me directly if you want.