reyemsaibot

SAP BI Blog about SAP BW/4HANA, Analysis for Office and SAP HANA - by Tobias Meyer

Schlagwort: abap

  • Comparing of data flows through SAP Landscape

    It is quite a while since I published my last post. A lot happened since then. Analysis for Office 2.8 SP10 is now available, the summer and the vacation  are over. But in the meantime
    I developed some new ABAP tools, had quite some interesting exchange and took the SQL Script course by Jörg
    Brandeis
    . But in this blog post I want to share with you the latest tool I developed which compare transformations in SAP Business Warehouse systems through the landscape.


    Here is a short overview:

    The tool allows you to compare and check the following information:

    • Global Transformation Information
    • Global Routine
    • Field, Start, End and Expert routine
    • Mapping
    • Constants
    • Data Transfer Process Information
    • Data Transfer Process Filter (Fields and Coding)
    • Data Transfer Process Semantic Groups

    So you see on the first sight if something is different between your SAP landscape. You can also see on which transports are your transformation was and how the import status is.

    Conclusion

    This tool allows you to reduce the maintenance in your SAP landscape and display directly the differences. You can either start with a specific transformation or with a source or target, which
    means the complete data flow will be analyzed. If you have any ideas to extend this program, please let me know.

    author.


    Hi,

    I am Tobias, I write this blog since 2014, you can find me on Twitter,
    LinkedInFacebook and YouTube. I work as a Senior Business Warehouse Consultant. In 2016, I wrote the first edition of . If you want, you can leave me a PayPal coffee donation. You can also contact me directly if you want.


    You want to know SAP Analysis for Office in a perfect detail?
    You want to know how to build an Excel Dashboard with your Query in Analysis for Office? 
    You want to know how functions in SAP Analysis for Office works?


    Then you have to take a look into Analysis for Office  – The Comprehensive Guide. Either as a video course or as an e-book.


  • BW/4HANA Query Link Components

    In BW/4HANA SAP offers you the possibility to link restricted or calculated key figures across different Composite Providers. The advantage of the link components concept is that they can
    automatically synchronize whenever you make changes in the source or master component. If you are not familiar with this concept.


    SAP Help:

    A linked component can be automatically synchronized whenever changes are made to the corresponding source component.

    Example scenario: You have two highly similar InfoProviders, IP_A and IP_B. You have created the query Q_A for IP_A. You now want to create the query Q_B for
    InfoProvider IP_B. You want this query to be very similar to query Q_A and to be automatically adjusted whenever changes are made to query Q_A.

    To do this, you use the link component concept: You create the linked target query Q_B for source query Q_A. This is more than just a copy, as the system also
    retains the mapping information. This mapping information makes it possible to synchronize the queries.

    So the concept is really nice because you can ensure that your key figures with the same name has also the same configuration, e.g. your turnover is configured correctly on any Composite Provider
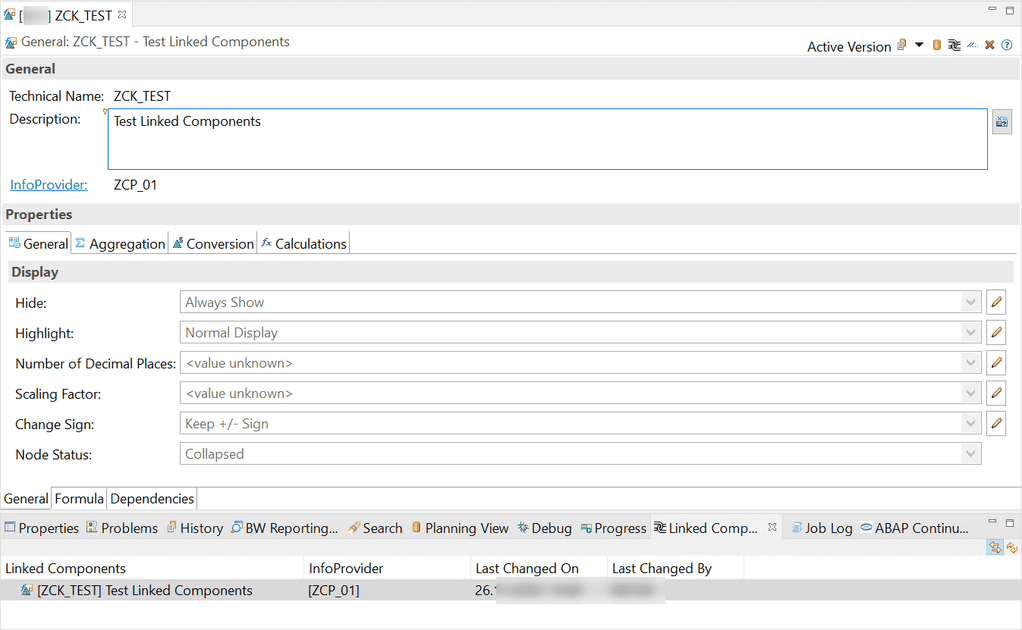
    in your system. Now let’s create a new link component. First we select a restricted key figure on our Composite Provider and goto „Linked Component“ view in Eclipse.

    New Keyfigure in Eclipse
    New Keyfigure in Eclipse

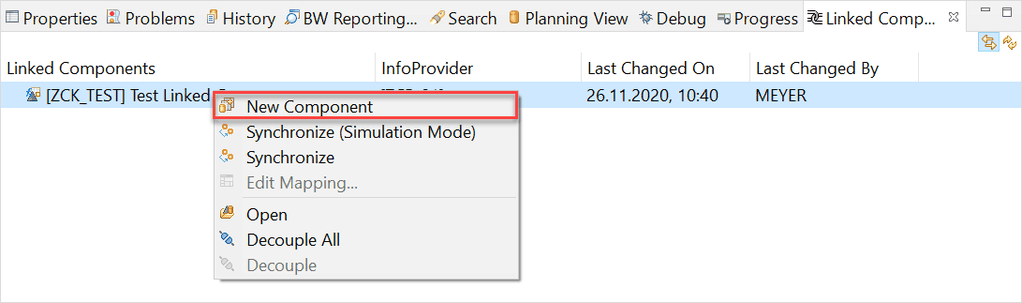
    Use the right click on the key figure in the „Linked Component“ view and select „New Component“

    New Query Link Component
    New Query Link Component

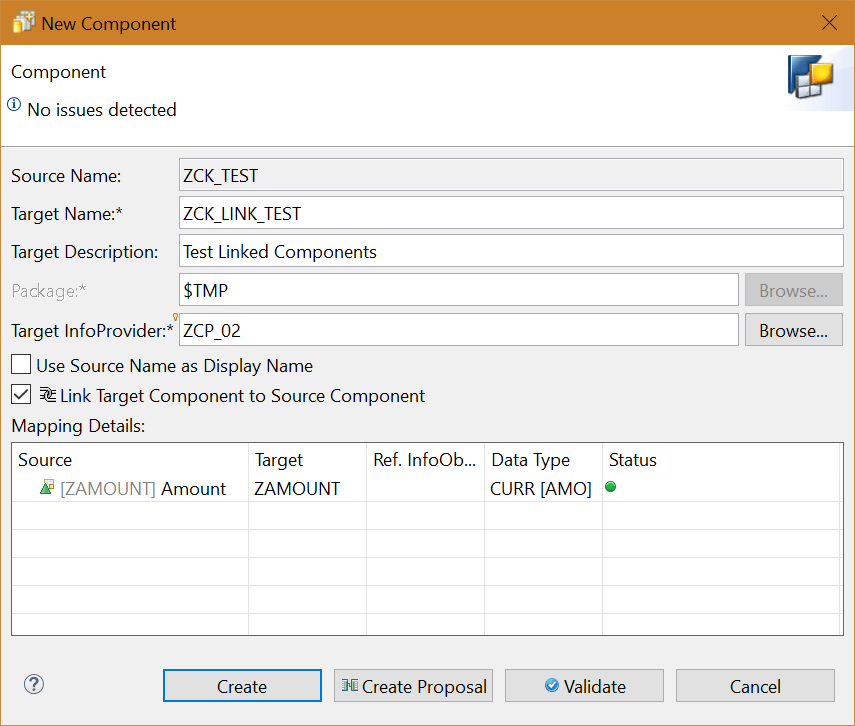
    A new dialog appears, which allows us to create a new linked key figure. First we have to define a Target Name and a Target InfoProvider. Now we can click on Create Proposal.

    Create new Query Link Component
    Create new Query Link Component

    After the status is green, we can create this new link component.

    Keyfigure with Link Component
    Keyfigure with Link Component

    So now let’s come to an issue what happen when you unlink your query components by mistake. Here the trouble begins. There is no function to link your broken query link component again to the
    original target. Which means you have to create a new link component and replace it in all your queries but for this I create a little tool called Query Link Component to link the components again.


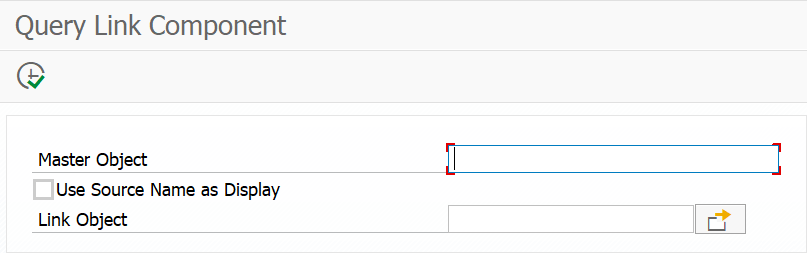
    Query Link Component Tool
    Query Link Component Tool

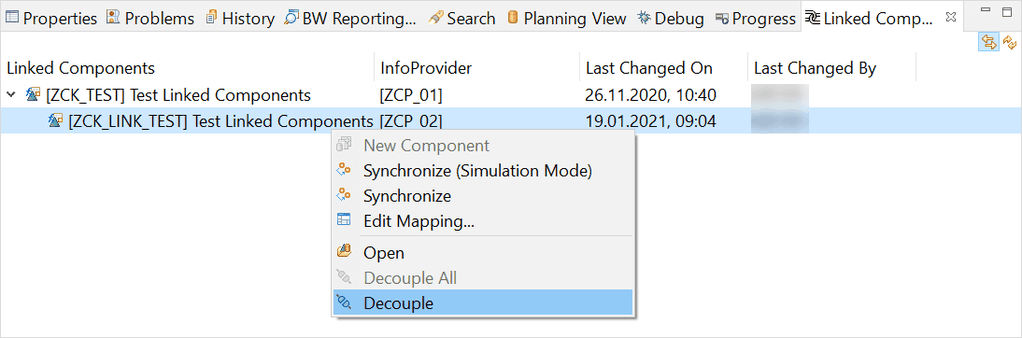
    So let’s make an example, we just decouple our created link component and link it afterwards again.

    Decouple an existing link component
    Decouple an existing link component
    Keyfigure without Link Component
    Keyfigure without Link Component

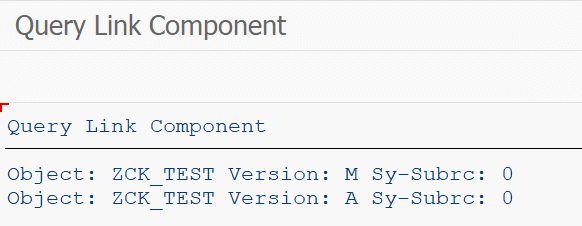
    Now we open the Query Link Component program and fill out all necessary information and link our key figure again.

    Create the Link Component again
    Create the Link Component again

    Click on Execute (F8)

    Linking was successful
    Linking was successful

    Now we close and reopen the key figure in Eclipse, and we will see the link component is back again.

    Query Link Component works again
    Query Link Component works again

    Conclusion

    I like the concept of linked components in BW/4HANA, but I don’t know why SAP has no such function to link a broken query component again. My little tool helps me to fix this issue and save me a
    lot of time. Do you use the Link Components Concept in your BW/4HANA?

    author.


    Hi,

    I am Tobias, I write this blog since 2014, you can find me on Twitter,
    LinkedInFacebook and YouTube. I work as a Senior Business Warehouse Consultant. In 2016, I wrote the first edition of . If you want, you can leave me a PayPal coffee donation. You can also contact me directly if you want.


  • BW/4HANA: Customer Exit Variable with dynamic assignment

    You have different ways to store the logic of your customer exit variables in SAP BW/4HANA. After my last post about Customer Exit Variables with an own enhancement spot I want to share another solution
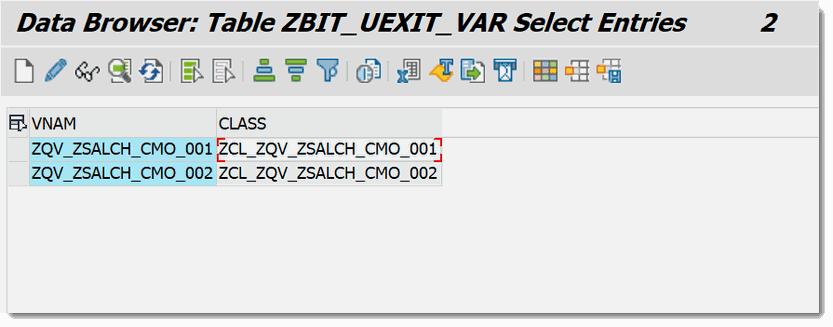
    with you. In this blog post I want to show you how you can implement a BAdI implementation with a Z-Table (Customer Table). In this table you find the assignment between the BEx variable and the corresponding class for the customer exit. This is how the table will look like:

    SAP BW/4HANA Customer Table with assignment between variable and class
    Customer Table with assignment between variable and class

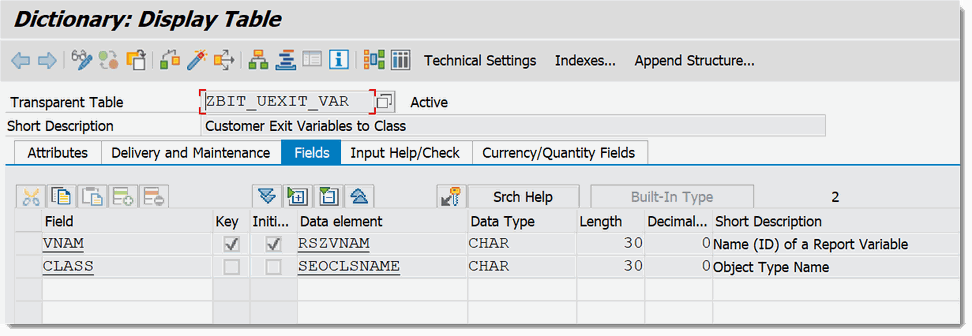
    We use this table to determine the corresponding class for our variable. The table structure is very simple. Just create this table in the transaction SE11. As you see the
    table has only two fields.

    SAP BW/4HANA Customer Table Structure
    Customer Table Structure

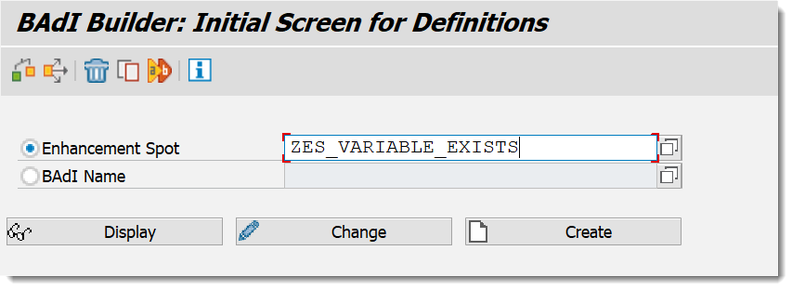
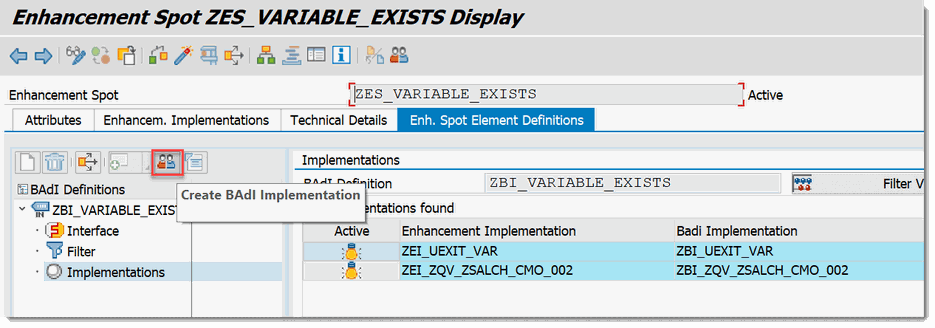
    After we have created the customer table in the transaction SE11 we go to the TA SE18 and open our own enhancement spot we created in „BW/4HANA 2.0 Customer Exit Variables with own enhancement spot„.

    SAP BW/4HANA Enhancement Spot
    Enhancement Spot

    There we create a new BAdI Implementation we will use for our dynamic assignment.

    SAP BW/4HANA Create BAdI Implementation
    Create BAdI Implementation

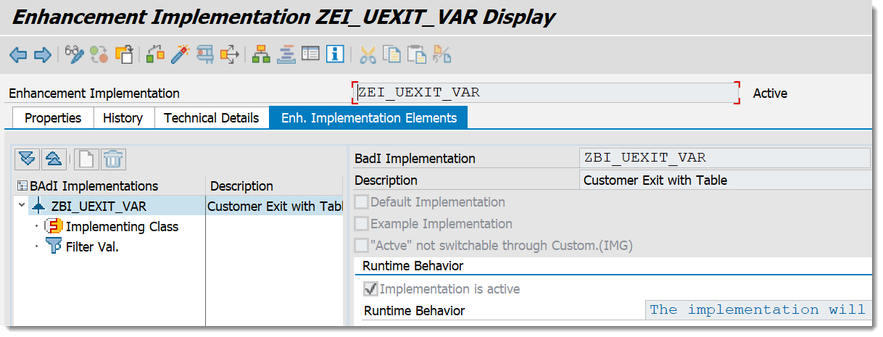
    In my case I give the name ZEI_UEXIT_VAR as Enhancement Implementation, ZBI_UEXIT_VAR as BAdI Implementation and ZCL_UEXIT_VAR as class.

    SAP BW/4HANA Enhancement Implementation ZEI_UEXIT_VAR with BAdI Implementation
    Enhancement Implementation ZEI_UEXIT_VAR with BAdI Implementation

    After we created the Enhancement Implementation, BAdI and class we now go to the transaction SE80 or to the Eclipse ADT and open our class. And add an attribute to the class.

    SAP BW/4HANA Add an attribute to our class
    Add an attribute to our class

    We add the attribute GV_VARIABLES_EXIT with the default value IF_RSROA_VARIABLES_EXIT_BADI to our class. After we have done this, we now implement the following code:


  • SAP Transport Dependency Check

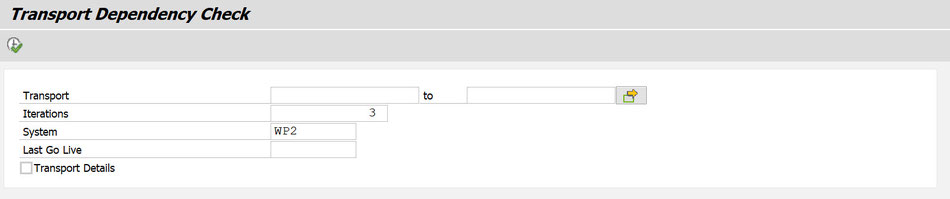
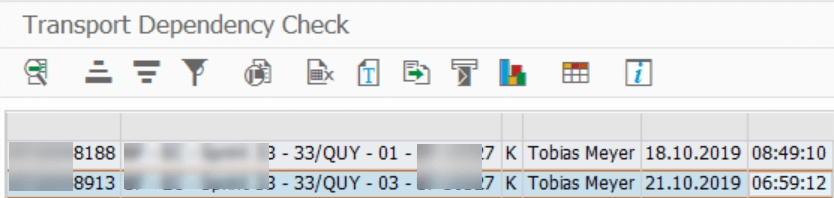
    The SAP Transport Dependency Check (TDC) is a little tool that helps you to find corresponding transport requests in your SAP NetWeaver Business Warehouse  which are not imported yet in your
    target system (e.g. production system). First you have to enter a transport request you want to check and also a target system and the last considered date (e.g. last go live).


    You can either have a look at a compressed view where you can only see the transport requests.

    Transport Dependency Check compact view
    Transport Dependency Check compact view

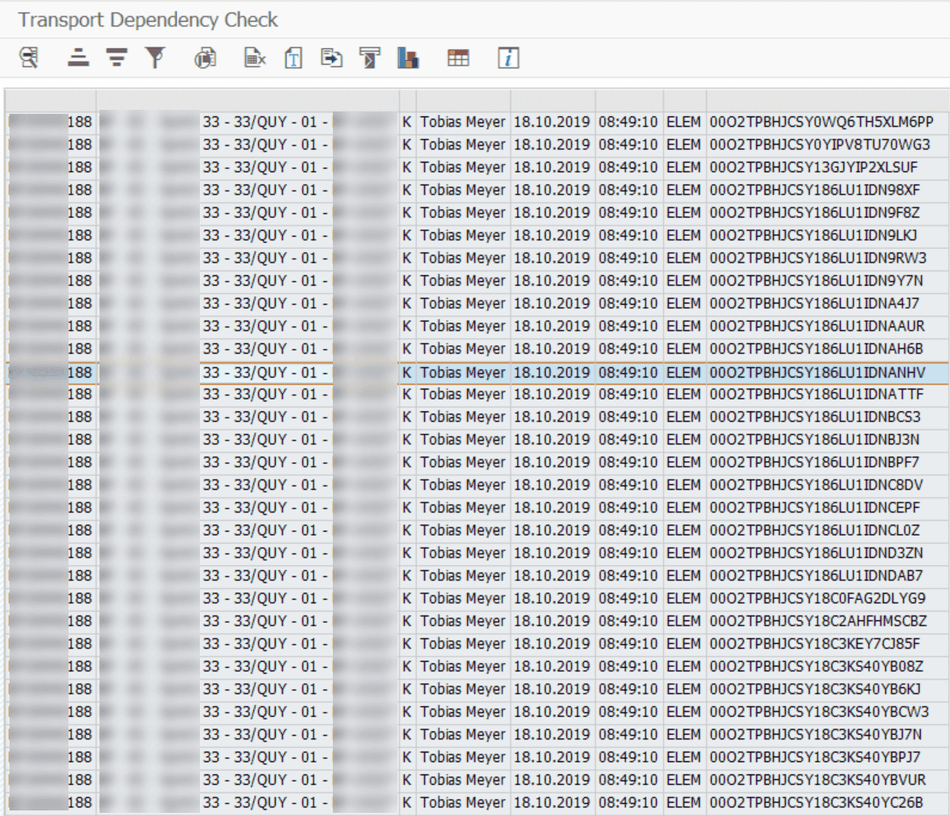
    Or you choose the detail view which allows you to see every object on the transport request.

    Transport Dependency Check detail view
    Transport Dependency Check detail view

    If you have the same problems as I do in some projects you will love this tool, because it makes your project day easier. If you have any questions feel free to contact me. You can get it in the
    online store and soon there will be other useful ABAP tools available.

  • SAP BW F4 BAdI to restrict hierarchy nodes

    In our current project we had to deal with the requirement that the enduser only want to show a certain node of a hierarchy to filter. So we used the F4 restriction from the transaction spro. You
    find the entry under Business Warehouse >> Enhancements >> BAdI: Restricting the Value Help in the Variables Screen. We implemented it in
    the method GET_RESTRICTION_NODE.


    At this time I had only experience with the method GET_RESTRICTION_FLAT and searched for implementation examples. I found a wiki entry on scn. In our case we had bookable nodes so we implemented it like
    this to get these node and all children of it.


    l_s_node-nodename = ‚NODE1‘.

    l_s_node-niobnjm      = ‚ZZ_IO‘.

    Append l_s_node to c_t_node.


    But it didn’t work out. The debugging showed no error, but the restriction always showed the complete hierarchy. After a little digging we found our mistake, it have to look like the follwing:


    l_s_node-nodename = ‚LEAF1‘.

    Append l_s_node to c_t_node.

    l_s_node-nodename = ‚LEAF2‘.

    Append l_s_node to c_t_node.


    And so on for all leafs. So we had to add all leafs and not the nodes. I didn’t found any good explanation so here is the short article about it. Thanks to my
    collegue who had the problem.

    author.


    I am Tobias, I write this blog since 2014, you can find me on twitter and youtube. If you want you can leave me a paypal coffee donation. You can also contact me directly if you want.

  • Customer exit variable to hide hierachy node

    In my current project we have the hide a position in a hierarchy, because it is a departmental requirement. The hierarchy is used by many departments so we cannot change it and we also don’t want
    to have the same hierarchy two times (except for the one position). So we first excluded the position in the query.

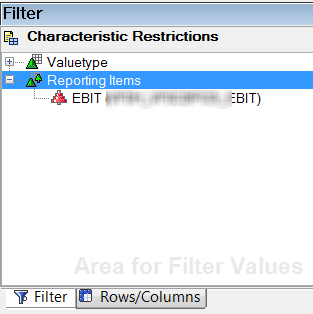
    Hide hierachy node in BEx Query Designer
    Hide hierachy node in BEx Query Designer

    But this didn’t worked.

    Only one position is left in the hierarchy
    Only one position is left in the hierarchy

    So we had to think what could we do to hide the specific position of the hierarchy. So we think how could we hide a specific position and the idea was to use a customer exit variable. You find
    the coding on Github. After I implemented the
    customer exit, only the position „EBIT“ is now hided.

    With the customer exit only EBIT position is hide
    With the customer exit only EBIT position is hide

    author.


    I am Tobias, I write this blog since 2014, you can find me on twitter and youtube. If you want you can leave me a paypal coffee donation. You can also contact me directly if you want.

  • SAP BW DTP Filter with ABAP Routine

    In my current project I have to filter data with a lot of logic. So I build some ABAP routines in a DTP filter to receive the necessary data.
    First you have to open the DataTransferProcess (DTP) in change mode and select the Filter button on the Extraction tab.

    DTP Extraction tab
    DTP Extraction tab

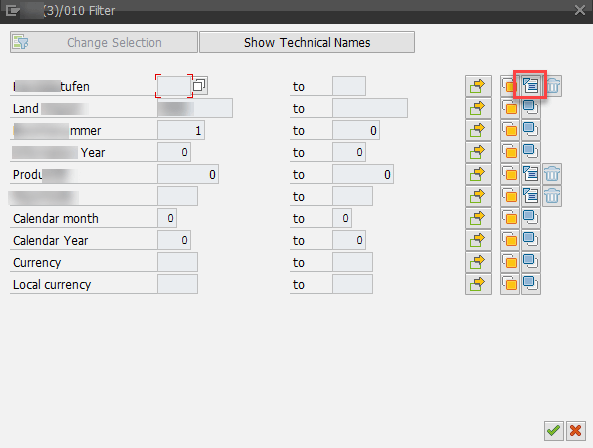
    Now a new window is opened. You see the selection for the DTP. If your field is not visible, click on Change Selection and select the necessary field. When you have the field you
    want to filter, use the small icon on the right to create a ABAP routine.

    DTP Filter
    DTP Filter

    Enter a name for the routine and you see the following screen.

    Create ABAP routine
    Create ABAP routine

    And now we have the full power of ABAP to build some really cool stuff. My example is we read a hierarchy and select all leaves under a node and set the DTP Filter with it. Or you read the
    attributes of an InfoObject and select all entries which are equal to the attributes and enter them into the filter.

     1
     2
     3
     4
     5
     6
     7
     8
     9
    10
    11
    12
    13
    14
    15
    16
    17
    18
    19
    20
    21
    22
    23
    24
    25
    26
    27
    28
    29
    30
    31
    32
    33
    34
    35
    36
    37
    CONSTANTS: lc_iobjnm_zsaleschannel TYPE rsiobjnm VALUE 'ZSALESCHANNEL'.
    
    DATA: ls_rssh_hiedir TYPE rshiedir,
          lt_rssh_hiedir TYPE rssh_t_hiedir,
          ls_subtreesel  TYPE rssh_s_nodebyname,
          lt_hierarchy   TYPE /bic/whzsaleschannel,
    
    FIELD-SYMBOLS: <ls_hierarchy> TYPE /bic/hzsaleschannel,
    
    "Get all hierarchies from the object
    CALL FUNCTION 'RSSH_HIER_OF_IOBJ_GET'
      EXPORTING
        i_objvers = rs_c_objvers-active
        i_iobjnm  = lc_iobjnm_zsaleschannel
        i_langu   = sy-langu
      IMPORTING
       e_t_rshiedir = lt_rssh_hiedir.
    
    "Get technical hierarchy id to hierarchy name
    CLEAR ls_rssh_hiedir.
    
    READ TABLE lt_rssh_hiedir INTO ls_rssh_hiedir WITH KEY hienm   = i_zsaleschannel_h
                                                           objvers = rs_c_objvers-active.
    
    "Sub-Tree to Note/Leaf
    CLEAR: ls_subtreesel.
    ls_subtreesel-iobjnm = lc_iobjnm_zsaleschannel
    ls_subtreesel-nodename = i_node.
    
    "Get Hierarchy Elements
    CALL METHOD cl_rssh_hierarchy_func=>get
      EXPORTING
       i_objvers      = rs_c_objvers-active
       i_hieid        = ls_rssh_hiedir-hieid
       i_s_subtreesel = ls_subtreesel
      IMPORTING
       e_t_hiestrucall = lt_hierachy
    

    After I have now all elements in an internal table, I can add them to the DTP Filter.

     1
     2
     3
     4
     5
     6
     7
     8
     9
    10
    11
    12
    13
    "Loop over the internal table and assign the value to the dtp filter
    LOOP AT lt_hierarchy ASSIGNING <ls_hierarchy>.
      l_t_range-fieldname = '/BIC/ZSALESCHANNEL'.
      l_t_range-iobjnm    = '/BIC/ZSALESCHANNEL'.
      l_t_range-sign      = 'I'.
      l_t_range-option    = 'EQ'.
      l_t_range-low       = <ls_hierarchy>-/bic/zsaleschannel.
      IF l_idx <> 0.
        MODIFY l_t_range INDEX l_idx.
      ELSE.
        APPEND l_t_range.
      ENDIF.
    ENDLOOP.
    

    After we saved our development and go back, we see a the little ABAP icon on the right (highlighted in red). If you want to remove a filter, click on the trashcan to remove the logic.

    DTP with active ABAP method
    DTP with active ABAP method

    Conclusion

    Sometimes it is necessary to filter your data. You could do this in different ways, but the most effiencient way is the DTP filter. Because the loading don’t touch the data you not select. If you
    remove the data via a start routine, all the data has to be catched from the database and you select more than you need at the end. 


    Besides ABAP routine you could also use variables to filter data. In SAP BW/4HANA the filter is a little bit different this will be covered in another post. 

    author.


    Hi,


    I am Tobias, I write this blog since 2014, you can find me on twitterfacebook and youtube. I work as a Senior Business
    Warehouse Consultant. In 2016 I wrote the first edition of . If you want you can leave me a paypal coffee
    donation. You can also contact me directly if you want.


  • SAP BW Decode String during Import

    In my current project I have a file to import, which only delivers me a string with a length of 1000. I also get a description what is in this file. Like the following points:

    • Customer from 1 to 10
    • City from 11 to 50

    The file looks like: 0000123456London………………………. So I have a file and a description how to decode this file. Now I need to find a way to separate this information into
    InfoObjects. I build a Z-Table which contains the decode information.

    Z-Table to decode information
    Z-Table to decode information

    The content look like the following example.

    Z-Table content
    Z-Table content

    After I filled all my necessary information into the table, I started to write my code in an expert routine. First I need some variables and internal tables.

    1
    2
    3
    4
    5
    6
    7
    DATA: lt_table0 TYPE TABLE OF z_dec,
          ls_table0 LIKE LINE OF lt_table0,
          lt_table1 TYPE TABLE OF z_dec,
          ls_table1 LIKE LINE OF lt_table1,
          lv_start  TYPE i.
    
    FIELD-SYMBOLS: <fv_source> TYPE any.
    

    After the variable declaration, we have to select our data and sort the internal tables.


    1
    2
    3
    4
    5
    SELECT * FROM z_dec INTO TABLE lt_table0 WHERE recordtype = 0.
    SELECT * FROM z_dec INTO TABLE lt_table1 WHERE recordtype = 1.
    
    SORT lt_table0 BY startfrom ASCENDING.
    SORT lt_table1 BY startfrom ASCENDING.
    

    Now we loop over the SOURCE_PACKAGE and loop over our internal table to assign all values.

     1
     2
     3
     4
     5
     6
     7
     8
     9
    10
    11
    12
    13
    14
    15
    16
    17
    18
    19
    20
    21
    22
    23
    24
    25
    26
    LOOP AT SOURCE_PACKAGE ASSIGNING <source_fields>.
      IF <source_fields>-field1(1) = 0.
       LOOP AT lt_table0 INTO ls_table0.
       "First I need to find the start of my information
         lv_start = ls_table0-startfrom - 1.
         "Now I assign the infoobject to my result structure
         ASSIGN COMPONENT ls_table0-infoobject OF STRUCTURE RESULT_FIELDS TO <fv_source>.
         "Here I write the value of string into the corresponding infoobject
         <fv_source> = <source_fields>-field1+lv_start(ls_table0-length).
       ENDLOOP.
    
       "Here we append the RESULT_FIELDS to the RESULT_PACKAGE.
       APPEND RESULT_FIELDS TO RESULT_PACKAGE.
      ELSEIF <source_fields>-field1(1) = 1.
        LOOP AT lt_table1 INTO ls_table1.
          "First I need to find the start of my information
          lv_start = ls_table1-startfrom - 1.
          "Now I assign the infoobject to my result structure
          ASSIGN COMPONENT ls_table1-infoobject OF STRUCTURE RESULT_FIELDS TO <fv_source>.
          "Here I write the value of string into the corresponding infoobject
          <fv_source> = <source_fields>-field1+lv_start(ls_table1-length).
        ENDLOOP.
        "Here we append the RESULT_FIELDS to the RESULT_PACKAGE.
        APPEND RESULT_FIELDS TO RESULT_PACKAGE.
      ENDIF.
    ENDLOOP.
    

    So when we now see the import file, which looks like the following.

    Import File
    Import File

    The result looks like the a normal import.

    Result after import
    Result after import

    You can download the whole source code from github. If
    you have questions, feel free to ask.

    author.


    I am Tobias, I write this blog since 2014, you can find me on twitter and youtube. If you want you can leave me a paypal coffee donation. You can also contact me directly if you want.

  • SAP BW Create own reversal entry

    Lately, all my posts started with „In my current project“, so now something else, even if it was developed in the current project. The problem we are facing with is that we get a data extraction
    which deliver us only the new data records, not the reverse data record.

    Old booked value
    Old booked value
    New booked value
    New booked value


    So we need to build your „own reversal entry“ to set the values of a record to 0. For this we write our ADSO in itself with a formula which delivers the negative value.

    SAP BW Negative formula
    SAP BW Negative formula

    I build a transformation which the formula above and the magic will be done in the DTP filter. First, let me briefly explain our data model. We use the following layers:

    • Acquisition Layer
    • Propagation Layer
    • Transformation Layer

    But back to the magic. The routine is writen in the DTP Transformation Layer in Transformation Layer.

    Write an Advanced DSO in itself
    Write an Advanced DSO in itself

    First I determine all requests from the Acquistion Layer DSO. 

    1
    2
    "Determine all requests from source DSO
    SELECT DISTINCT ( reqtsn ) FROM /bic/avf0aperia1 INTO TABLE lt_requests.


    After I have all requests in my internal table, I sort it descending to get the right order.

    1
    2
    "Sort Table descending
    SORT lt_requests DESCENDING BY request.


    Now I select the first request. It is the newst.

    1
    2
    3
    4
    LOOP AT lt_requests INTO ls_requests FROM 1 TO 1.
      "Puffer last request
      lv_last_request = ls_requests-request.
    ENDLOOP.


    Now we know the right request and select all data from the advanced DSO (Aquisition Layer).

    1
    SELECT DISTINCT field1 field2 calyear field3 FROM DSO_AL INTO TABLE lt_new_data WHERE reqtsn = lv_last_request.


    After we now have all necessary information in our internal table, we have to fill the DTP filter.

     1
     2
     3
     4
     5
     6
     7
     8
     9
    10
    11
    12
    13
    14
    15
    16
    DATA: l_idx LIKE sy-tabix.
    
    READ TABLE l_t_range WITH KEY fieldname = 'field2'.
    l_idx = sy-tabix.
    LOOP AT lt_new_data ASSIGNING <fs_new_data>.
      l_t_range-fieldname = 'field2'.
      l_t_range-iobjnm    = 'field2'.
      l_t_range-sign      = 'I'.
      l_t_range-option    = 'EQ'.
      l_t_range-low       = <fs_new_data>-field2.
      IF l_idx <> 0.
        MODIFY l_t_range INDEX l_idx.
      ELSE.
        APPEND l_t_range.
      ENDIF.
    ENDLOOP. 
    

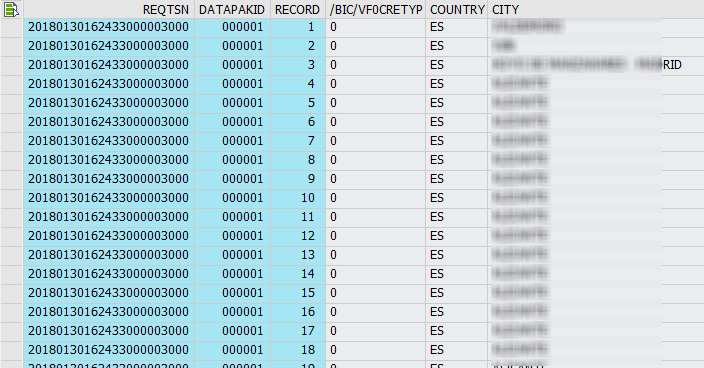
    After I execute the DTP and activate the request in the transformation layer advanced DSO you see there are only 18 entries which are corrected.

    Number of entries which are false
    Number of entries which are false

    When you now look into the active table of the advanced DSO, you see all values which are shown above are now 0.

    Active table values
    Active table values

    The changelog also show the new, the before and the after image for the entries. So you can understand what was booked.

    Changelog View
    Changelog View

    And when we now execute all DTPs to write the data from the Acquistion Layer to the Tranformation Layer, we see that there are only 18 entries which are new.

    Requests of the advanced DSO
    Requests of the advanced DSO

    And also the new booked values are the same we have above in our second extract.

    New values in advanced DSO
    New values in advanced DSO

    As you can see it is very easy to create your own reversal entry if the source system don’t deliver one. I hope someone can need it.

    author.


    I am Tobias, I write this blog since 2014, you can find me on twitter and youtube. If you want you can leave me a paypal coffee donation. You can also contact me directly if you want.

  • SAP BW: Keyfigure to Account Model

    In my current project we have a lots of source systems which delivers our data in a key figure model. In a normal case is this not a problem. But we need the values of the key figures in a
    hierarchy. So there are two ways to realize it. First way would be we build a structure with restricted key figures and get our hierarchy. Here is the problem, the customer will need different
    queries to realize his needs. If there is a change, we need to adjust different queries (each has a light different hierarchy) and the maintainace is immense.

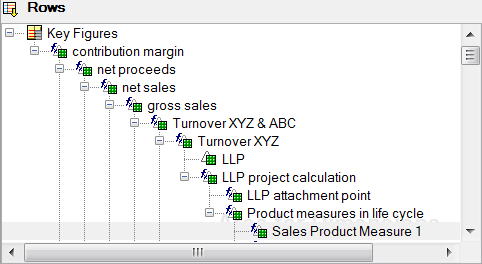
    Query Hierarchy Structure
    Query Hierarchy Structure

    Another way is to use an account model. Here is your first Problem, we only get a key figure model and it is not so easy to use rule groups or a simply routine, because we get around 100 key
    figures. So it isn’t easy as Denis wrote in his post (this post is in German). But I found, really I can’t belive I found an article on the former SCN. This post decribes how to transform
    a key figure based model to an account based model with some ABAP coding and an expert routine. So I think that must be the answer to my problem, but it isn’t so well writen that I could use it.
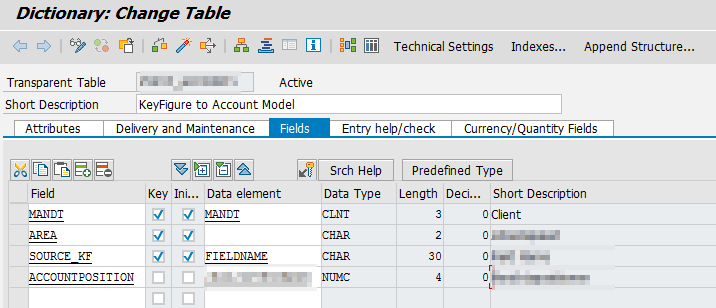
    But the start was done. I need a Z-Table and some ABAP. First I created my Z-Table with four fields:

    • MANDT
    • AREA
    • SOURCE_KF
    • ACCOUNTPOSITION

    AREA is necessary to use this table in different deparments, SOURCE_KF represents the source key figure for example /BIC/ZGROSSVAL and the
    ACCOUNTPOSITION is the technical key of the account model, for example 15.

    Z-Table for Mapping Keyfigure to Account
    Z-Table for Mapping Keyfigure to Account

    This was the easy part. Now I need some ABAP and here I had some struggle.

     1
     2
     3
     4
     5
     6
     7
     8
     9
    10
    11
    12
    13
    14
    15
    16
    Data: lt_account        type HASHED TABLE OF z_account WITH UNIQUE KEY source_kf,
          ls_account        like LINE OF lt_account.
    
    FIELD-SYMBOLS: <fv_source> type any.
    
    Select * from z_account into table lt_account WHERE area = 'SOMETHING'.
    
    LOOP AT SOURCE_PACKAGE ASSIGNING <source_fields>.
      MOVE-CORRESPONDING <source_fields> to RESULT_FIELDS.
      Loop at lt_account into ls_account.
        RESULT_FIELDS-/BIC/VF0CBPOS = ls_account-berichtsposition.
        ASSIGN COMPONENT ls_account-source_kf of STRUCTURE <source_fields> to <fv_source>.
        RESULT_FIELDS-/bic/vf0kbehw = <fv_source>.
        Append RESULT_FIELDS TO RESULT_PACKAGE.
      Endloop.
    Endloop.
    

    The Problem was the ASSIGN COMPONENT part, which I didn’t know how to work, but a colleague helped me here. So that’s it. The Z-Table can be modified to fulfill your needs, but the basic code
    should help you to realize a solution.

    author.


    I am Tobias, I write this blog since 2014, you can find me on twitter and youtube. If you want you can leave me a paypal coffee donation. You can also contact me directly if you want.