reyemsaibot

SAP BI Blog about SAP BW/4HANA, Analysis for Office and SAP HANA - by Tobias Meyer

Schlagwort: VBA

  • Custom Slide Shows in Microsoft PowerPoint

    It has been a while since I wrote the last blog post. But there happened a lot in the last two months. We had our Deep Dives about Self Service with SAP Data Analytics Cloud Architecture and I
    had also some weeks of vacation. Now I am back from my vacation, and now I want to share some ideas I had in the last months.


    This post is about Microsoft PowerPoint and how I use it to create a master PowerPoint file for different purposes. The idea was to have one place for all my SAP Data Warehouse Cloud slides and
    use them in different customer scenarios.


    Therefore, I search a little what I can do. If you have Microsoft Office 365, PowerPoint has the option of Custom Slide Shows under the tab Slide Show.

    Custom Slide Show in Microsoft PowerPoint
    Custom Slide Show in Microsoft PowerPoint

    This is nice, but not very handy. Because you have to add and sort all slides manually and also when a new slide is added you have to move it in the right position. Another problem is that when
    you have page numbers on your slide, in all presentations the slides have the page number, which is the slide number in your main presentation.


    For example, you use in a custom show slide the slide 1, 4 and 6 your page numbers in the show will not be 1,2 and 3 instead it will be 1, 4 and 6. This does not look right when you present it to
    a customer. So I wrote a little VBA macro to adjust the page numbers based on the custom slide show I choose.


    This is the code:

    Sub OnSlideShowPageChange(ByVal SSW As SlideShowWindow)
        
    Dim slideshow As String
    
        If SSW.View.CurrentShowPosition = SSW.Presentation.SlideShowSettings.StartingSlide Then
                  
            slideshow = ActivePresentation.SlideShowSettings.SlideShowName
            Call delete_page_numbers(slideshow)
            Call create_page_numbers(slideshow)       
        End If
    End Sub
    

    The code is triggered by a simple user form and delete first all page numbers (because some slides are used in different custom slide shows) and then create new page numbers for all pages of the
    custom slide show.


    The deletion code is this :

    Sub delete_page_numbers(slideshow As String)
    
    Dim idOfSlide As Variant
    Dim currentSlide As Slide
    
    For Each idOfSlide In ActivePresentation.SlideShowSettings.NamedSlideShows(slideshow).SlideIDs
    If idOfSlide <> 0 Then
        Set currentSlide = ActivePresentation.Slides.FindBySlideID(idOfSlide)
        On Error Resume Next
        Set tb = getTextBox("pageNumber", currentSlide.SlideIndex)
        tb.delete
    End If
    Next
    End Sub
    

    And the creation code is this:

    Sub create_page_numbers(slideshow As String)
    
    Dim number_of_slides As Integer
    
    Dim idOfSlide As Variant
    Dim currentSlide As Slide
    Dim page_number As Integer
    
    page_number = 1
    
    For Each idOfSlide In ActivePresentation.SlideShowSettings.NamedSlideShows(slideshow).SlideIDs
    
    If idOfSlide <> 0 Then
    
    Set currentSlide = ActivePresentation.Slides.FindBySlideID(idOfSlide)
        ' Master Slides without page number
        
        If currentSlide.CustomLayout.Name = "Einfache Seite" Or _
           currentSlide.CustomLayout.Name = "Agenda" Or _
           currentSlide.CustomLayout.Name = "Neuer Abschnitt" Or _
           currentSlide.CustomLayout.Name = "Deckblatt" Then
            page_number = page_number + 1
        Else
        
            With currentSlide
            ' Create a text box and add a page number in it.
                Dim PgNumShape As Shape
                Set PgNumShape = .Shapes.AddTextbox(msoTextOrientationHorizontal, 0, 254.5, 38, 28.75)
            
                ' Apply the formatting used for the slide number placeholder
                ' to the text box you just created.
                PgNumShape.Apply
            
                With PgNumShape
                    '.Fill.Visible = msoTrue
                    .Fill.ForeColor.RGB = RGB(255, 255, 255)
                    
                    'Font
                    With .TextFrame.TextRange.Font
                        .Name = "Segoe UI (Body)"
                        .Size = "12"
                        .Color = RGB(197, 197, 197)
                        
                    End With
                    
                    ' Textbox Properties
                    With .TextFrame
                        .MarginBottom = 3.6
                        .MarginTop = 3.6
                        .MarginRight = 7.2
                        .MarginLeft = 7.2
                        .AutoSize = ppAutoSizeNone
                        .VerticalAnchor = msoAnchorMiddle
                        .TextRange.Paragraphs.ParagraphFormat.Alignment = ppAlignRight
                   
                    End With
                    
                    .Name = "pageNumber"
                    
                End With
            
                ' Add the page number text to the text box.
                PgNumShape.TextFrame.TextRange = page_number
                page_number = page_number + 1
            
            End With
        
        End If
    
    End If
    
    Next
    
    End Sub
    

    As you see I only set page numbers on specific types of slides (not on the agenda, overview and so on) with a specific color and size.


    This is really cool and adds the missing function to my Custom Slide Show, which is not provided by Microsoft PowerPoint.


    I know this is not a specific SAP topic, but I think this could be interesting for other users which have to present sometimes. If you have any ideas what I can improve, please share it in the
    comments. Here is a short gif how it works:
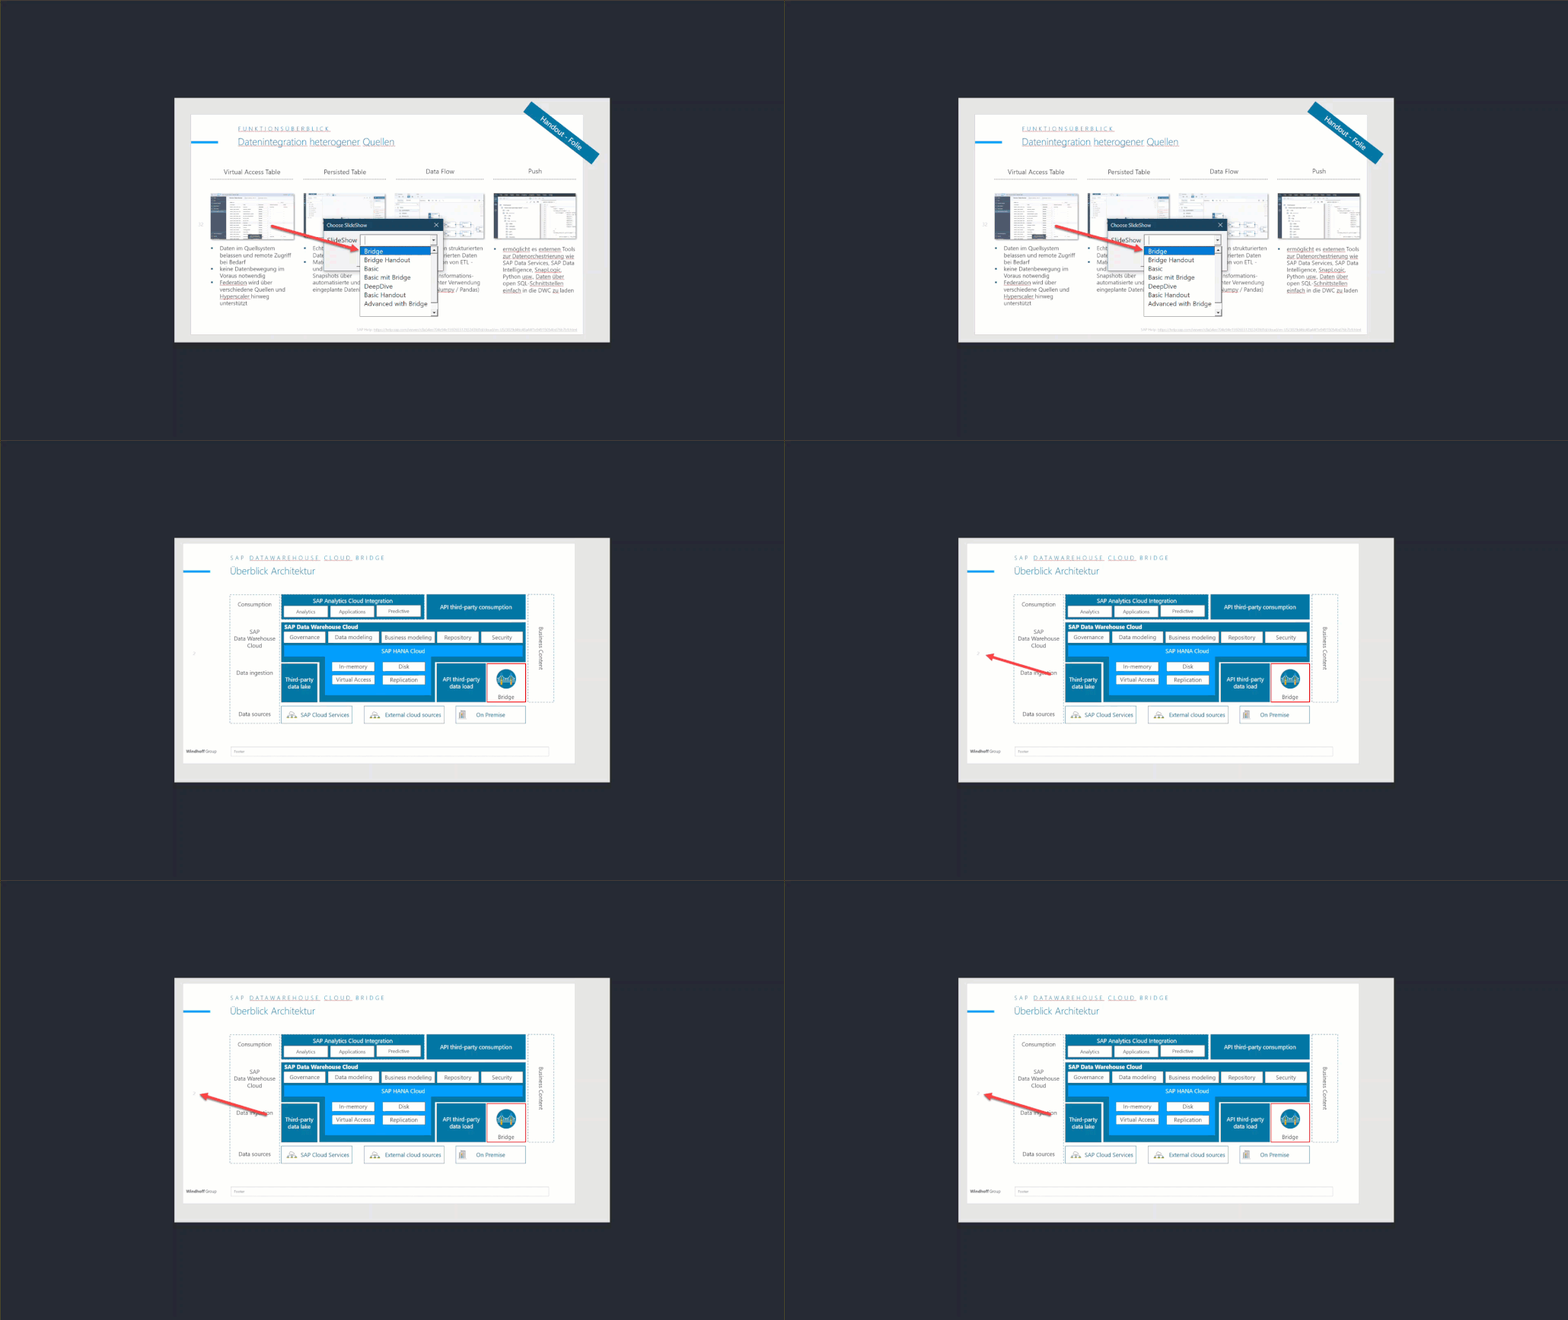
    Page number adjusted on a custom slide show
    Page number adjusted on a custom slide show

    Conclusion

    I worked a lot in the last few months with PowerPoint and created a lot of presentation material. I wanted to make my presentation life easier, and so I created one master PowerPoint file and
    this one can have different slide shows based on the topic. So every change is only made in one file and all presentations which are referring to the slide have the same information on it.

    author.


    Hi,

    I am Tobias, I write this blog since 2014, you can find me on Twitter,
    LinkedInFacebook and YouTube. I work as a Senior Business Warehouse Consultant. In 2016, I wrote the first edition of . If you want, you can leave me a PayPal coffee donation. You can also contact me directly if you want.


  • Analysis Office Get Calendar Week for SAPSetFilter

    A few weeks ago, a colleague of mine, ask me how he can get the calendar week to use it in the Analysis Office API SAPSetFilter. I developed a short macro which defines the calendar week to use it in 0CALWEEK. Maybe someone has another
    solution for this.

    First we need different variables:

    1
    2
    3
    4
    Dim lresult As Long
    Dim week As Integer
    Dim today As Date
    Dim yearCalWeek As String


    After this, I needed the actual date and year, so I used the DateValue-function.

    1
    2
    today = DateValue(Now)
    yearCalWeek = year(today)


    Now I need the week, for this I used the WorksheetFunction IsoWeekNum.

    1
    week = Application.WorksheetFunction.IsoWeekNum(today)


    So I calculated the week and the year and now we have to put it into the SAPSetFilter.

    1
    lresult = Application.Run("SAPSetFilter", "DS_1", "0CALWEEK", week & yearCalWeek, "INPUT_STRING")


     As you can see it is very easy to get the week from the actual date. Here is the complete source code:

     1
     2
     3
     4
     5
     6
     7
     8
     9
    10
    11
    12
    13
    14
    Sub GetCalendarWeekForSAPSetFilter()
      Dim lresult As Long
      Dim week As Integer
      Dim today As Date
      Dim yearCalWeek As String
      
      today = DateValue(Now)
      yearCalWeek = year(today)
    
      week = Application.WorksheetFunction.IsoWeekNum(today)
    
      lresult = Application.Run("SAPSetFilter", "DS_1", "0CALWEEK", week & yearCalWeek, "INPUT_STRING")
    
    End Sub
    

    I hope this idea helps someone to build a dynamic report.

    author.


    I am Tobias, I write this blog since 2014, you can find me on twitter and youtube. If you want you can leave me a paypal coffee donation. You can also contact me directly if you want.

  • Analysis Office Insert Product Image

    In the comments of this blogpost on blogs.sap.com, Stephen Hobbs showed his idea of insert a product
    Image besides the crosstab in combination with the new Customize User Interface function. So I make my
    own thoughts how I can realize a thing like this.

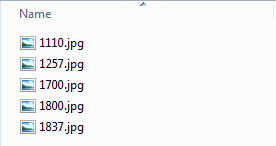
    My first thought was, where can I store the pictures and how can I get a product number and the picture together. The solution is very easy, I created a folder on my hard drive and put the
    pictures in it. The name of the pictures are the same like the product numbers.

    SAP Analysis for Office Crosstab without Product Images
    SAP Analysis for Office Crosstab without Product Images
    Windows Explorer Images of the products
    Windows Explorer Images of the products


    The next step is to write the corresponding VBA code, so that the pictures are insert into a cell. Open the Visual Basic Editor (ALT + F11) and
    insert a new module. After we have to define serveral variables.

    1
    2
    3
    4
    5
    6
    7
    8
    9
    Dim material As String
    Dim i As Integer
    Dim picturePath As String
    Dim rowMax As Long
    Dim picture As Object
    Dim t As Double
    Dim l As Double
    Dim w As Double
    Dim h As Double
    

    Now we have to find out, how many rows our crosstab has.

    1
    2
    'Number of rows
    rowMax = Range("SAPCrosstab1").Rows.Count
    

    Now we can add our pictures.

     1
     2
     3
     4
     5
     6
     7
     8
     9
    10
    11
    12
    13
    14
    15
    16
    17
    18
    19
    20
    21
    22
    23
    24
    25
    26
    27
    28
    For i = 5 To rowMax
    
      'Set height for each row
      Rows(i & ":" & i).RowHeight = 100
      'Material
      material = Sheet3.Cells(i, 3).Value
      'Define Picture Path
      picturePath = "U: 40 Analysis Office Workbookspics" & material & ".jpg" 
      
      Set picture = ActiveSheet.Pictures.Insert(picturePath)
      'Get size of the Picture Cell
      With Range("B" & i & ":" & "B" & i)
        t = .Top
        l = .Left
        w = .Offset(0, .Columns.Count).Left - .Left
        h = .Offset(.Rows.Count, 0).Top - .Top
      End With
    
      'Format Picture into the right size
      With picture
        .Top = t
        .Left = l
        .Width = w
        .Height = h
      End With
      Set p = Nothing
    
    Next
    

    The pictures are added on the left side of the crosstab. If you want to add your pictures automatically you can use the callback AfterRedisplay.

    SAP Analysis for Office Crosstab with Product Images
    SAP Analysis for Office Crosstab with Product Images

    It is just an example what you can do. So If you have any suggestions for other examples, post them into the comments.

    author.


    I am Tobias, I write this blog since 2014, you can find me on twitter and youtube. If you want you can leave me a paypal coffee donation. You can also contact me directly if you want.

  • Analysis Office SAPInsertLine

    The API command SAPInsertLine is available since version 2.2 SP3 of Analysis for Office. With this function you can insert a new line into a crosstab. There are five input-parameters available:

    • RuleID
    • Data Source Alias
    • Position
    • PositionBy
    • PositionBy parameters

    You can define the RuleID, if you do not define an ID, the system generates one automatically. As Data Source Alias, you have to enter the data source alias,
    e.g. DS_1. As Position you can choose between Before, After, BelowHeader or BesideHeader. For PositionBy you can enter one of the following
    elements:

    • Dimension
    • DimensionResult
    • DimensionGroup
    • DimensionMember
    • HierarchyNode
    • Tuple

    Here is an example code, more detail information can be found in my book. This code insert a new
    line after the dimension 0Material.


    1
    2
    Dim ret As String
    ret = Application.Run("SAPInsertLine", "NewLine1", "DS_1", "After", "DIMENSION", "0MATERIAL")
    
    Analysis for Office SAPInsertLine After Dimension
    Analysis for Office SAPInsertLine After Dimension

    This example code insert a new line before the dimension 0Material.


    1
    2
    Dim ret As String
    ret = Application.Run("SAPInsertLine", "NewLine1", "DS_1", "Before", "DIMENSION", "0MATERIAL")
    
    Analysis for Office SAPInsertLine Before Dimension
    Analysis for Office SAPInsertLine Before Dimension

    More examples can detailed information can be found in my book SAP Analysis for Office – The
    Comprehensive Guide
    .

    author.


    I am Tobias, I write this blog since 2014, you can find me on twitter and youtube. If you want you can leave me a paypal coffee donation. You can also contact me directly if you want.

  • Using SAPGetVariable with VBA

    At the moment I am working very hard to get my book done, so this is only a short blog post how to use SAPGetVariable with VBA. The Analysis Office help provides no example so here it is:

    1
    2
    Dim ret As Variant
    ret = Application.Run("SAPGetVariable", "DS_1", "0S_CUS", "INPUT_STRING_AS_ARRAY")
    

    So the command need the data source and the variable, in my example DS_1 and 0S_CUS. It is very simple, but at the moment there is no example in the Analysis Office user guide.

    author.


    I am Tobias, I write this blog since 2014, you can find me on twitter and youtube. If you want you can leave me a paypal coffee donation. You can also contact me directly if you want.

  • Analysis Office Table Design, API and Design Rules

    Since Analysis for Office 2.0 you have the option Table Design. You can now create new empty rows and columns.

    SAP Analysis for Office Table Design
    SAP Analysis for Office Table Design

    So you were able to use own Excel formulas in a Crosstab. But in Analysis for Office 2.0 the formulas disappeared when you refreshed a query. Since Analysis for Office 2.2 the Excel formulas
    survive a refresh. This is a really nice function. You can read this in the post „Analysis for
    Office: How to work with Excel formulas
    „.


    Now in Analysis for Office 2.2 SP3 the Table Design API got new rather advanced features like
    SAPSetText or SAPInsertLine. SAPInsertLine has now two new options for the parameter PositionBy:

    • DimensionGroup
    • Tuple

    With SAPInsertLine you can add a new row or column via VBA. For Example:

    Dim RuleId as String

    RuleId = Application.Run(„SAPInsertLine“, „NewLine1“, „DS_1“, „After“, „Dimension“, „0CALYEAR“)

    With this command you add a new columns after the dimension 0CALYEAR. Be careful the Help file declares lResult as Long but this is wrong! To explain all SAPInsertLine parameter
    I will write an own post.


    You can use SAPSetText to add texts to inserted cells. You can also rename measures in the crosstab. At the moment I haven’t got any more information about this function. In Analysis for Office 2.3 you get a new feature, called Design Rules tab. You find the Design Rules on the 4th tab of the
    Design Panel.

    SAP Analysis for Office Design Panel
    SAP Analysis for Office Design Panel

    On the Design Rules tab you can see and edit the rules created with Table Design. The rules are displayed per DataSource and rule type. First you select the DataSource and then the rule type. You
    can actually choose between four rule types:

    • Format
    • Formula
    • Text
    • New Lines

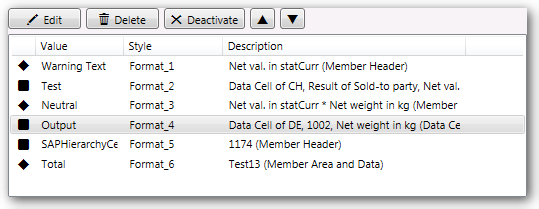
    The accessible rule types are displayed in a Dropdown Box for the selected DataSource. The first column show you if the rule is active or deactivated. If you see a square the rule is active, if
    you see a diamond the rule is deactivated. If you deactivate a NewLine-Ruletype the line disappear from the table design.

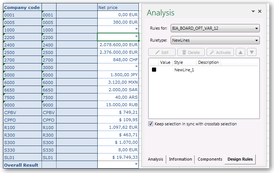
    Analysis Office Design Rules Active Rule
    Active Rule
    Analysis Office Design Rules Deactivate Rule
    Deactivate Rule


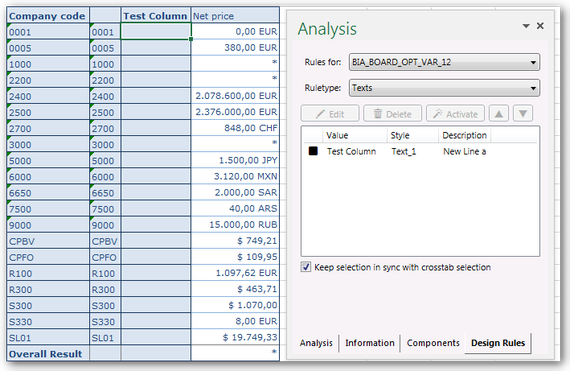
    The value column show for example the content of a text rule.

    SAP Analysis for Office Design Rules Ruletype Text
    SAP Analysis for Office Design Rules Ruletype Text

    The style is an ID that is unique for each rule. The description is automatically set by the Analysis for Office for formats, formulas and texts. NewLines haven’t got a description.


    The priority of a rule can be changed by the arrows above the list. You can easily move the rules up and down.

    SAP Analysis for Office Design Rules Move Rule
    SAP Analysis for Office Design Rules Move Rule

    You can edit only formats and new line-rules directly from the Design Rules tab. The other rules can only be deleted, activate or deactivate in the Design Rules tab.


    Note: You can only edit new line rules after you change the height of a new line once manually.


    If you have a large report with many design rules you love the feature „Keep selection in synch with crosstab selection“ because if you select a cell in the crosstab, the associated rule is
    highlighted in the text.


    Note: It is highlighted only if you are in the right list. For example if you click on a formula, but your list is on new line, nothing happened.


    If you want to remove all Table Design modifications, switch to the components tab and choose Reset Data Source in the context menu.

    author.


    I am Tobias, I write this blog since 2014, you can find me on twitter and youtube. If you want you can leave me a paypal coffee donation. You can also contact me directly if you want.

  • Analysis Office SAPOpenWorkbook

    A new feature of Analysis for Office 2.3 is a macro called SAPOpenWorkbook. Some of you maybe know
    the old sapbex.xla!SAPBExReadWorkbook or the BExAnalyzer.xla!runWorkbook command.


    The user guide explanation for this macro is:


    You can use this API method to open an Analysis workbook. The workbook that should be opened can be stored on a SAP NetWeaver server or on a BI platform.

    The workbook is opened in the same Microsoft Excel instance. After the command execution, the opened workbook is active.


    As you know the sapbex.xla!SAPBExReadWorkbook respectively BExAnalyzer.xla!runWorkbook command needed either an established connection from the addin or you
    created your own connection with the following code:

     1
     2
     3
     4
     5
     6
     7
     8
     9
    10
    11
    12
    13
    14
    15
    Dim R3 As Object 'Connection Object
    Set R3 = CreateObject("SAP.Functions")
    With R3.Connection .system = "ABC" 'system
      .client = "001" 'client
      .user = "reyemsaibot" 'user
      .Password = "4711" 'password
      .Language = "EN" 'language
      .systemnumber = "00" 'systemnumber
      .hostname = "172.23.13.70" 'hostname
    End With
    
    'Test Connection
    If R3.Connection.logon(0, True) <> True Then
      Exit Function
    End If
    

    In Analysis for Office the macro SAPOpenWorkbook use the connection of an existing DataSource. So you can’t
    define your own connection with a super user or something like that.


    Here is an example code:

    1
    2
    3
    4
    Sub OpenWorkbookViaAPI()
      Dim lresult As Long
      lresult = Application.Run("SAPOpenWorkbook", "DEMO_5", "DS_1", "ZCOUNTRY_VAR_02", "AT", "0I_FPER", "001.2011 - 004.2011")
    End Sub
    

    The name Demo_5 is the technical name of the workbook from a SAP NetWeaver server. If you want to use a document, which is
    stored on a BI Platform, you need the CUID.


    The connection parameters will be used from the DataSource DS_1. This parameter is mandatory if you have several connections in a workbook. If you have only one connection, it is
    optional. The target workbook will be opened from the referenced connection of DS_1.


    The variable parameter for ZCOUNTRY_VAR_02 is optional, but if you have a mandatory variable you have to assign a value, like the 0I_FPER variable.


    If you want to refresh your workbook on opening, you have to set the parameter “Refresh Workbook on Opening”. You also need an established connection or you see the logon popup.

    Analysis Office Logon Netweaver
    Analysis Office Logon Netweaver

    New is the feature that you can predefine your variable value for the new workbook. This is nice but it is still not the same as in BEx Analyzer,
    because you have to use the connection from a existing DataSource. I hope SAP will provide us more in the future.

    author.


    I am Tobias, I write this blog since 2014, you can find me on twitter and youtube. If you want you can leave me a paypal coffee donation. You can also contact me directly if you want.

  • SAP Analysis Office Logoff via VBA

    After SAP still doesn’t provide a native button in Analysis for Office 2.2 SP2 to log off from a system, I decided to
    make a short instruction from my article „Analysis for Office 2.1 Logoff via VBA„. Have fun.

    author.


    I am Tobias, I write this blog since 2014, you can find me on twitter and youtube. If you want you can leave me a paypal coffee donation. You can also contact me directly if you want.

  • Analysis Office: Best Practice Connection

    After the article „Connecting error in Analysis for Office via VBA“ is often read, I would like to
    publish a few tips and tricks about working with Analysis for Office.


    The most important thing when you are working with VBA in Analysis for Office, is the refresh of the DataSource(s). Otherwise nothing works. Once
    a connection to the Business Warehouse is established, each DataSource needs to be refreshed.


    If you have only one DataSource, that is the source code:


    1
    Call Application.Run("SAPExecuteCommand", "Refresh", "DS_1")


    If you have more than one DataSource, this is the source code:


    1
    Call Application.Run("SAPExecuteCommand", "Refresh")


    So that you know if the refresh was successful, you should use the following source code:


    1
    2
    Dim lResult As Long
    lResult= Application.Run("SAPExecuteCommand", "Refresh")


    or


    1
    2
    Dim lResult As Long
    lResult= Application.Run("SAPExecuteCommand", "Refresh", "DS_1") 


    Therefore you can check lResult to 1 or 0. If you refresh the DataSource(s) each time, a lot of time is wasted. To counteract this, there is the following source code:

    1
    Call Application.Run("SAPGetProperty", "IsDataSourceActive", "DS_1")


    This command checks if the DataSource is already active. Here an example source code:

     1
     2
     3
     4
     5
     6
     7
     8
     9
    10
    11
    12
    13
    14
    15
    16
    17
    Sub AnalysisOfficeStart()
      Dim lResult As Long
      'Connection is running?
      If Application.Run("SAPGetProperty", "IsConnected", "DS_1") Then
        'Active DataSource?
        If Not Application.Run("SAPGetProperty", "IsDataSourceActive", "DS_1") Then
          'Refresh DataSource
          lResult = Application.Run("SAPExecuteCommand", "Refresh", "DS_1")
        Else
          'Show Prompts
          lResult = Application.Run("SAPExecuteCommand", "ShowPrompts", "DS_1")
        End If
      Else
        lResult = Application.Run("SAPLogon", "DS_1", "Client", "User", "Password")
        lResult = Application.Run("SAPExecuteCommand", "Refresh", "DS_1")
      End If
    End Sub


    After this you can excute your own code.

    author.


    I am Tobias, I write this blog since 2014, you can find me on twitter and youtube. If you want you can leave me a paypal coffee donation. You can also contact me directly if you want.

  • Analysis Office 2.1 Logoff via VBA

    Since version 2.1 Analysis for Office is now finally a VBA command to log out
    of the current system.


    So far is nothing in the help file, but it is called in the SCN Forum under „Whats new in
    Analysis for Office 2.1
    „.


    The command is:

    1
    2
    3
    Public Sub Logoff()
      Call Application.Run("SAPLogoff",Parameter)
    End Sub


    Parameter:

    • True: With this value, the connection is restarted the system
    • False: With this value the connection will not restart the system

    Result:

    • 0: faulty execution
    • 1: Successful execution
    SAP Analysis for Office: Parameter False
    Parameter: False
    SAP Analysis for Office: Parameter True
    Parameter: True

    author.


    I am Tobias, I write this blog since 2014, you can find me on twitter and youtube. If you want you can leave me a paypal coffee donation. You can also contact me directly if you want.