In this thread on blogs.sap.com, Michael Hamm asked how to hide or deactivate the Customize User Interface button. At first, at the moment SAP doesn’t offer any checkbox which you can
check and uncheck in the settings.
But there is a solution how you can hide or deactivate the Customize User Interface button. It is called MinorVersion. The official admin guide define MinorVersion like this:
You use this setting to specify the minor version that should be used.The default value is the integer value of the installed version, for example value 3 for version 2.3. If you change the value to 1, version 2.1 will be used.
The setting can only be maintained by an administrator and you find it in the file system under C:ProgramDataSAPCof. If you set the value to 3, you can see
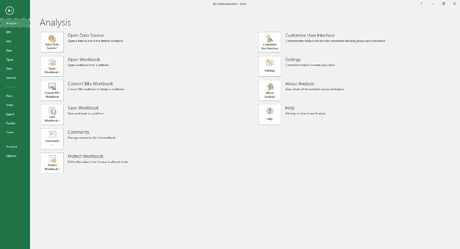
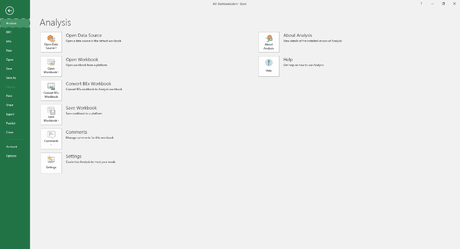
how the Analysis Office Menu Change.
Analysis Office Menu without MinorVersion
Analysis Office Menu with MinorVersion
As you can see the Customize User Interface is gone but also the Protect Workbook functionality. So you have to decide if you need the protection or not. At my first review
I didn’t found other functions which are not available any more. I hope SAP will release parameters for the file system, so everybody can decide what the user can see and what not.
I am Tobias, I write this blog since 2014, you can find me on twitter and youtube. If you want you can leave me a paypal coffee donation. You can also contact me directly if you want.
In my current project, we have a copy of the productive system as a maintenance system, because we made huge changes in
the development system in case of the project. So if there is an error in the production, we can easily repair it.
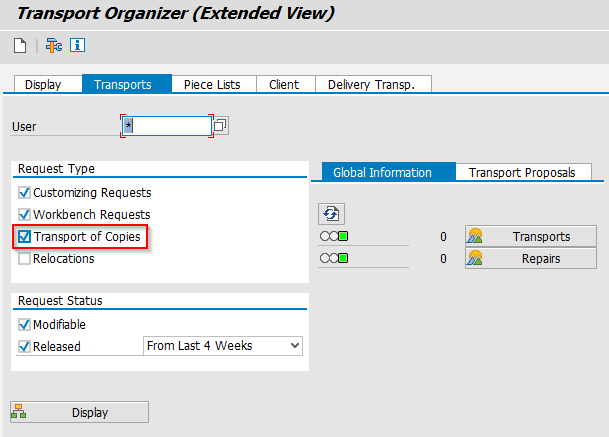
Some changes have also be transported into the development system, so we have the same state and our future request can be transported into production. For this we use the functionality Transport of Copies. All objects of the originally request are still locked. If you want to create a transport of copies, open the transaction SE01. Check the
option “Transport of Copies” and click on Display.
SAP BW Transport Organizer
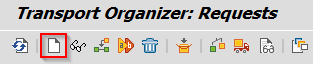
Create a new transport via icon or F6.
Create new transport
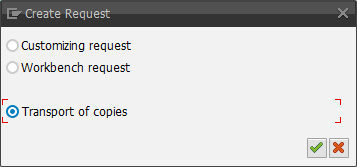
Choose the request type Transport of copies.
Create transport of copies
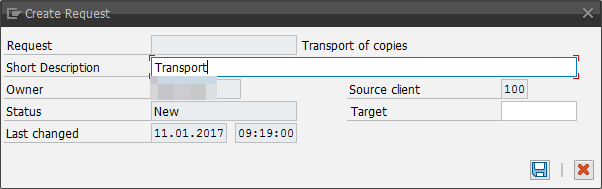
Define a short description and a target system.
Define transport of copies
The request is now created. Now we can add our objects we need to transport. We copy all objects of the original request into our new request. It is important to take task after task, because a
request can contain more than one task.
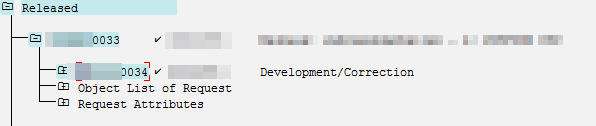
Copy original request/task
Select the request id with CTRL + Y and copy it with CTRL + C. Now select the transport of copies request and click on Include Objects (CTRL + F11).
Include Objects
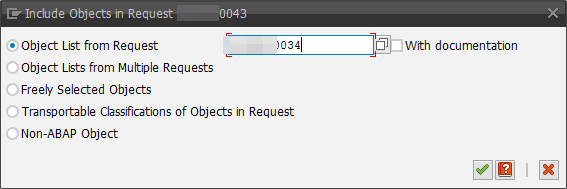
Choose the Object List from Request and paste the original request id.
Include Objects into transport of copies
Now all objects of the original request are in your copy and you can continue with your normal transport management.
I am Tobias, I write this blog since 2014, you can find me on twitter and youtube. If you want you can leave me a paypal coffee donation. You can also contact me directly if you want.
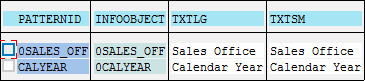
After we created in Part 1 the transparent tables and in Part 2 all BAdI implementation, we can now maintain and create our SPO. First we have to fill our table ZSPOPATTERN with a PATTERNID and a corresponding INFOOBJECT. Go to the se16 and create a new table entry. As PATTERNID enter a unique id for
example CALYEAR and as INFOOBJECT0CALYEAR. For TXTLG and TXTSM enter a useful text. Depending on how many InfoObject are used for a partition, create the other
pattern.
Table ZSPOPATTERN
After we filled ZSPOPATTERN, we can now fill ZSPOINFOPROV. As SPONAME enter the technical Name of the SPO. As PATTERNID1 to PATTERNID4 enter your previous created pattern. For example Y_TM as SPONAME and CALYEAR as PATTERNID1.
Table ZSPOINFOPROV
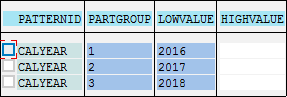
The next table is ZSPOCRITERIA. Enter the previous created PATTERNID, a PARTGROUP, a LOWVALUE and if necessary a HIGHVALUE. For example:
PATTERNID – CALYEAR
PARTGROUP – 1
LOWVALUE – 2016
For 2017 use PARTGROUP 2, for more explanation see the screenshot below.
Table ZSPOCRITERIA
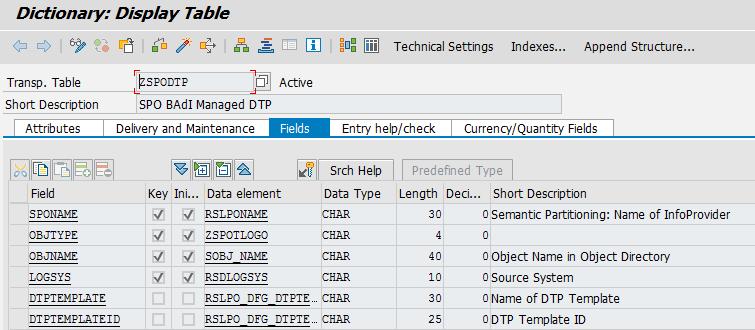
The last table is ZSPODTP. Enter a SPONAME, OBJTYPE, LOGSYS, DTPTEMPLATE and DTPTEMPLATEID.
The DTPTEMPLATEID can be found in table RSLPO_DFG_DTPTPL. For example:
SPONAME – Y_TM
OBJTYPE – ODSO
OBJNAME – YTM01
LOGSYS – T04CLNT100
DTPTEMPLATE – DSO FULL
DTPTEMPLATEID – 00O2TGUDQNX7RY71D737H5IZ2
Table ZSPODTP
After the initial maintenance is done, we can go to the transaction RSA1. We can either maintain our SPO directly or under Administration you find the Mass Activation of BAdI SPOs. The first new partion will be created directly and the second and third under Mass Activation of BAdI SPOs. When you start from scretch you
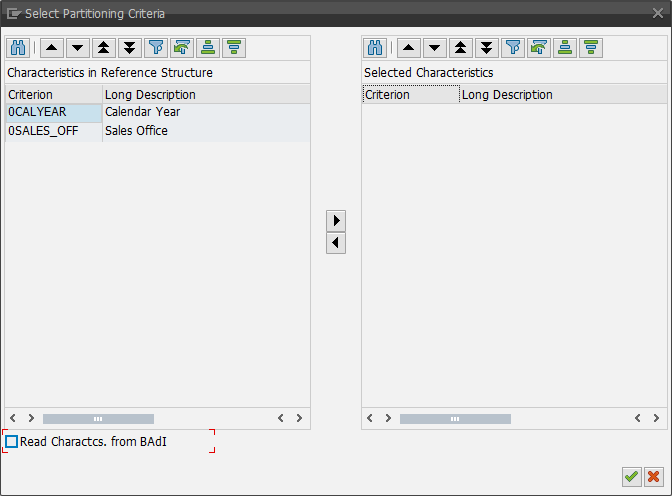
click on Change Partitions to create your new partitions. Now you can choose your criteria.
SPO: Select Partitioning Criteria
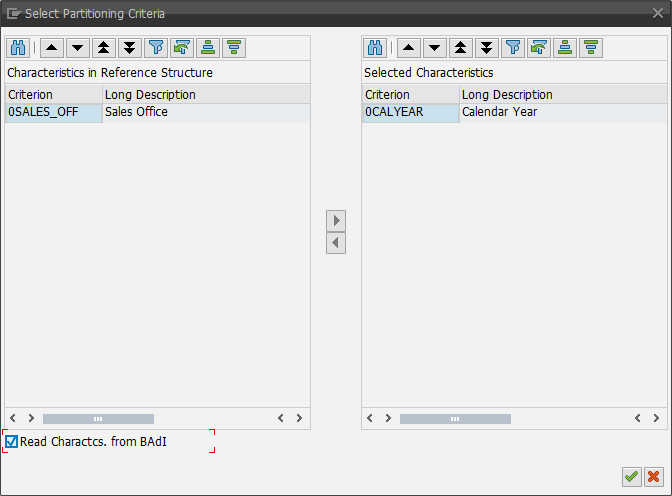
As you can see on the screenshot below, when you select Read Charactcs. from BAdI, the InfoObject 0CALYEAR is automatically add as criteria.
SPO: Select Partitioning Criteria via BAdI
In the screenshot below you see the partition 1 is automatically added with the year 2016.
SPO: Partition created by BAdI
Now we can activate our SPO and see, that the partition 1 is created. You can now add your new partitions either by clicking on Build Version From or via Mass Activation
of BAdI SPOs. I choose the second way to show you how can activate multiple SPOs at once. Goto Administration >> Mass Activation of BAdI SPOs.
SPO: Mass Activation of BAdI SPOs
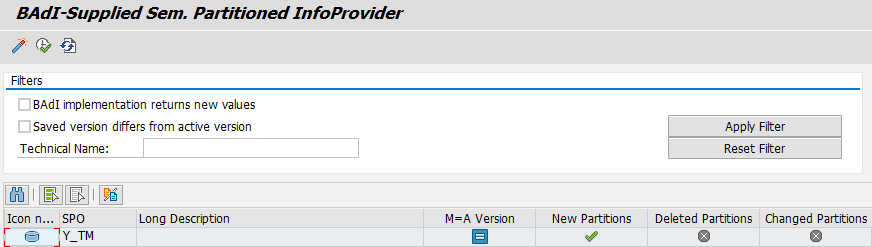
As you can see in the screeshot above, our SPO find new partitions. With the function Version Comparison you can compare the actual version with the new.
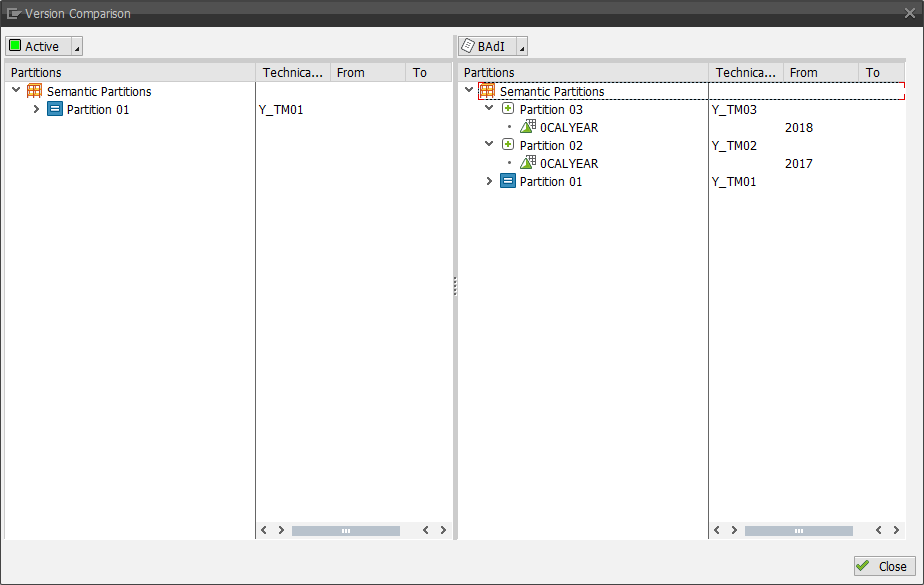
SPO: Version Comparison
As you see, the two new partitions for 2017 and 2018 will be created. By click on Activate, the partitions are created.
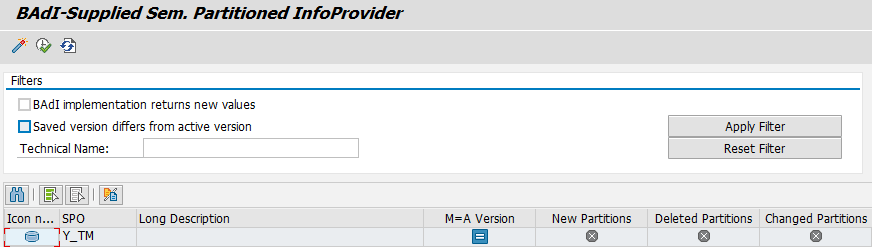
SPO: New partitions are created via Mass Activation
Now our SPO is up to date and all partitions are created. If you need for example 2019, you have to maintain the table ZSPOCRITERIA and go back to the Mass Activation of BAdI
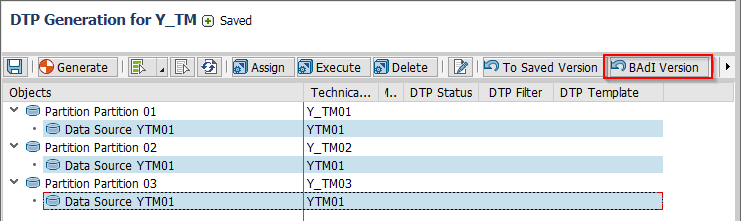
SPOs. The last part is now to create the DTPs. Go to the SPO and open it in change mode. Click on Create Data Transfer Processes. You will see the following screen.
SPO: Create DTP for SPO
Select your partitions and click on the button BAdI Version.
SPO: Create DTP for SPO via BAdI
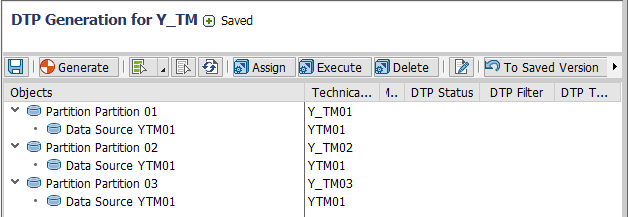
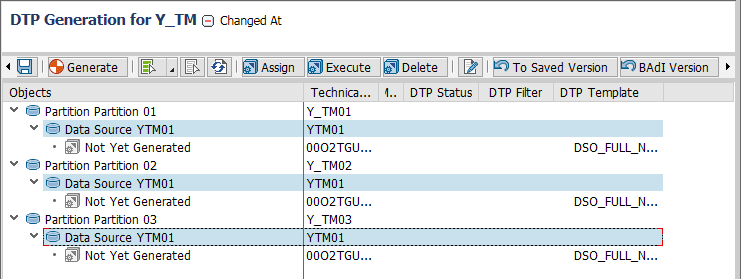
The DTPs automatically appear and you only have to generate them.
SPO: DTP created via BAdI
That’s it. Your SPO and associated DTPS can be created via BAdI. I tested it with a Business Warehouse 7.31 SP18, maybe it is a little bit
different in a higher release.
I am Tobias, I write this blog since 2014, you can find me on twitter and youtube. If you want you can leave me a paypal coffee donation. You can also contact me directly if you want.
After we created in part 1 all tables and objects, we can now create a new BAdI to generate the partitions. Go to
the transaction se19 and create a new implementation with the Name RSLPO_BADI_PARTITIONING.
BAdI Builder: Create Implementation
Give the enhancement implementation a name and a short text.
Create Enhancement Implementation
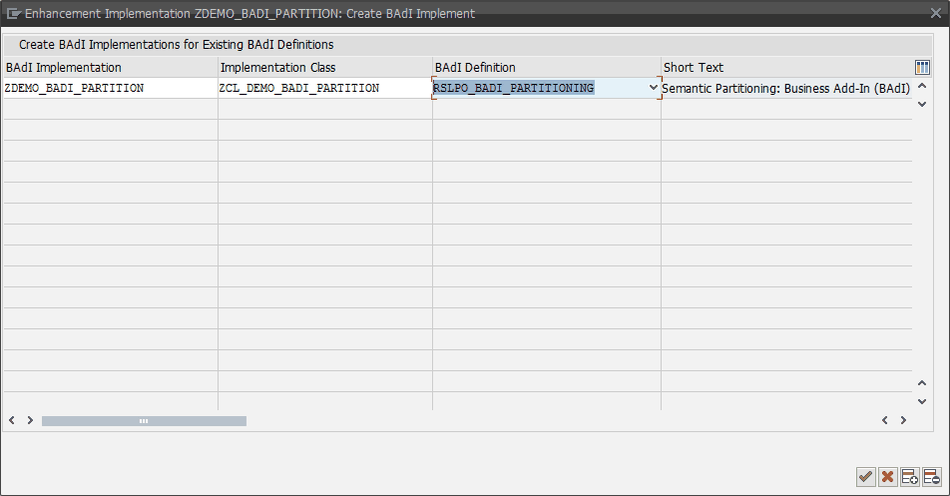
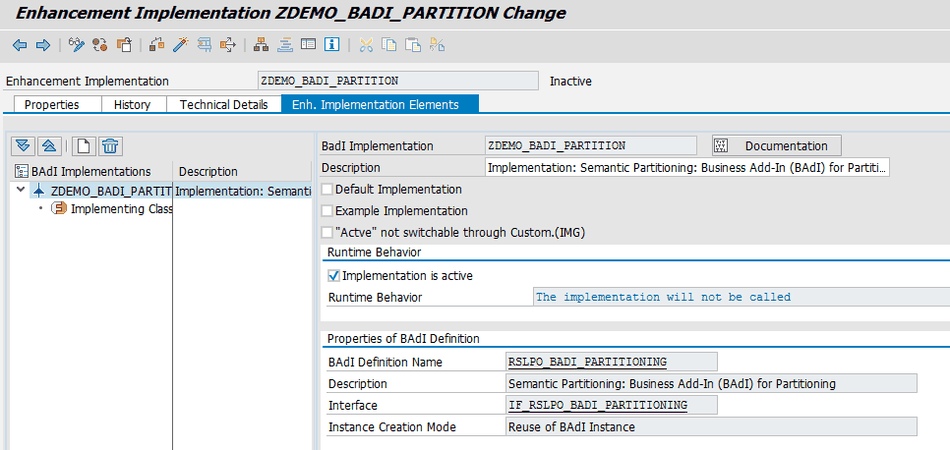
Click continue and save. Now specify the BAdI implementation name, the implementation class and the BAdI
definition. Select for the BAdI Definition RSLPO_BADI_PARTITIONING, click continue and save.
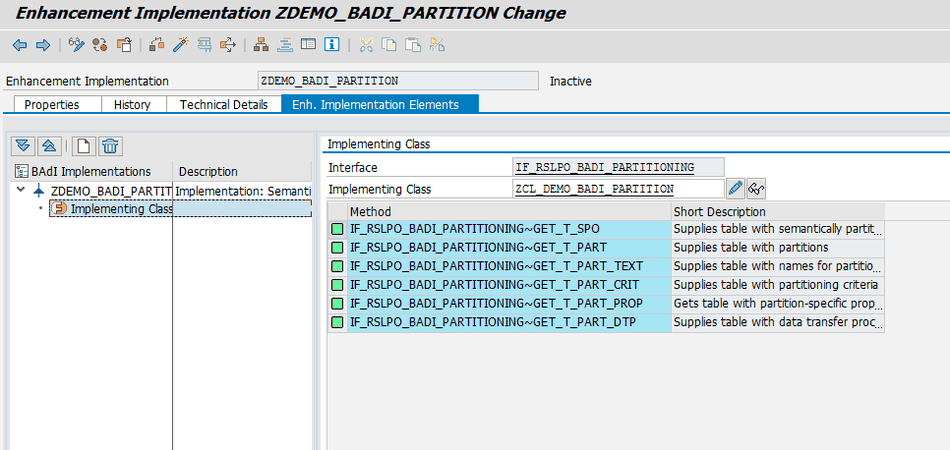
Double click the implementation class and the following screen appears. The 6 methods of the class ZCL_DEMO_BADI_PARTITION which we use to define the partitions are displayed in the right panel.
GET_T_SPO
GET_T_PART
GET_T_PART_TEXT
GET_T_PART_CRIT
GET_T_PART_PROP
GET_T_PART_DTP
Each method has a specific role, which you can see under the short description. Double click the method IF_RSLPO_BADI_PARTITIONING~GET_T_SPO.
Enhancement Implementation: Implementing Class
First we have to implement the name of the Semantic Partitioning Object (SPO).
1
2
3
4
5
6
7
8
methodIF_RSLPO_BADI_PARTITIONING~GET_T_SPO.
DATA: l_spoTYPErslponame.
"Return a table with names of supported BAdI SPOs.SELECTSPONAMEfromZSPOINFOPROVintol_spo.
APPENDl_spoTOr_t_spo.
ENDSELECT.
endmethod.
Save and activate the method and the class. Now implement the
IF_RSLPO_BADI_PARTITIONING~GET_T_PART_TEXT specifies the text for each partition. The problem is, the customer normally named the partitions after his own mind, so I just
implemented a comment, so it would be initialized. The comment is necessary.
1
"Coding will follow later
Now we implement the IF_RSLPO_BADI_PARTITIONING~GET_T_PART_CRIT. This implementation specifies the partition criteria.
After all methods are implemented, activate the Enhancement Implementation. Now we are able to create a Semantic Partitioning Object (SPO). What we need to maintain will be described in Part 3 of this series.
I am Tobias, I write this blog since 2014, you can find me on twitter and youtube. If you want you can leave me a paypal coffee donation. You can also contact me directly if you want.
At my current project I needed a way to create Semantic Partitioning Object (SPO) via BAdI to reduce the end-of-year work. After a little search via Google (you cannot find anything on the new SAP Community Page), I found these threads.
Both were not perfect, so I build a solution between them. I also put everything via control tables, so it would be easier for the users to manage them. So let’s get started.
Create own data dictionary objects
The following domains have to be implemented:
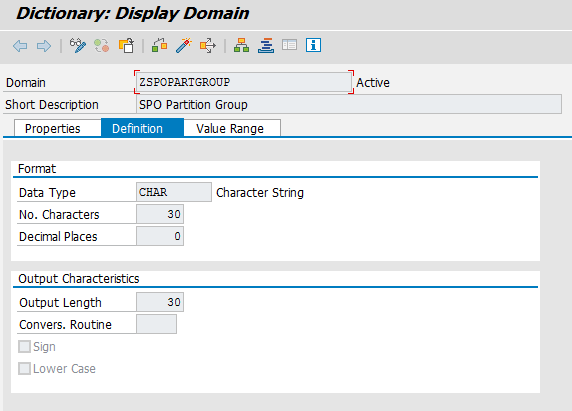
ZSPOPARTGROUP – SPO Partition Group
ZSPOPATTERNID – SPO Partitioning Pattern
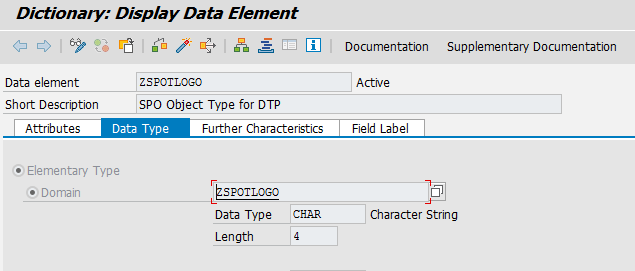
ZSPOTLOGO – SPO Object Type for DTP
SPO Partition Group
Domain: ZSPOPARTGROUP
SPO Partitioning Pattern
Domain: ZSPOPATTERNID
SPO Object Type for DTP
Domain: ZSPOTLOGO
Domain: ZSPOTLOGO Value Range
After we created the domains, we have to create the following data elements:
ZSPOPARTGROUP – SPO Partition Group
ZSPOPATTERNID – SPO Partitioning Pattern
ZSPOPATTERNID1 – SPO Partitioning Pattern 1
ZSPOPATTERNID2 – SPO Partitioning Pattern 2
ZSPOPATTERNID3 – SPO Partitioning Pattern 3
ZSPOPATTERNID4 – SPO Partitioning Pattern 4
ZSPOTLOGO – SPO Object Type for DTP
SPO Partition Group
Data Element: ZSPOPARTGROUP
SPO Partitioning Pattern
Data Element: ZSPOPATTERNID
Note: The data elements ZSPOPATTERNID1, ZSPOPATTERNID2, ZSPOPATTERNID3 and ZSPOPATTERNID4 are defined like the ZSPOPATTERNID.
SPO Object Type for DTP
Data Element: ZSPOTLOGO
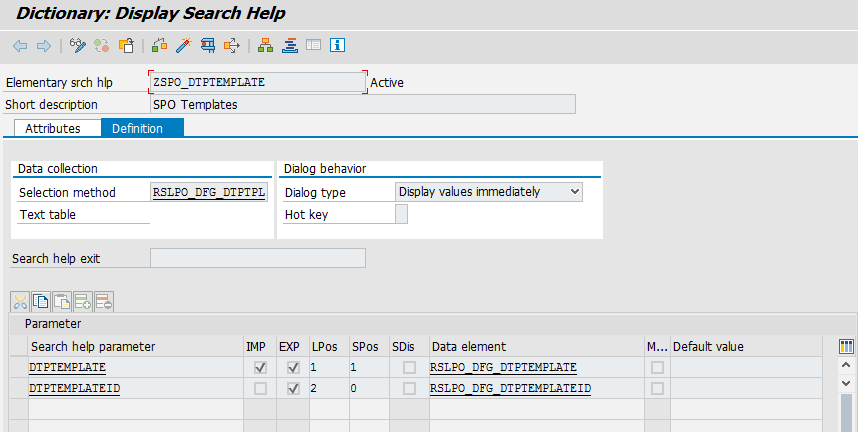
We also implement a search help ZSPO_DTPTEMPLATE – SPO Templates
SPO Templates
Search Help: ZSPO_DTPTEMPLATE
Create Transparent Tables
After all these elements are created, we can now create the following transparent tables:
ZSPOINFOPROV – SPO BAdI Managed InfoProvider
ZSPOPATTERN – SPO Authorized Partition Pattern
ZSPOPATTERNT – SPO Authorized Partition Pattern Text
ZSPOCRITERIA – SPO Pattern Partition Criteria
ZSPODTP – SPO BAdI Managed DTP
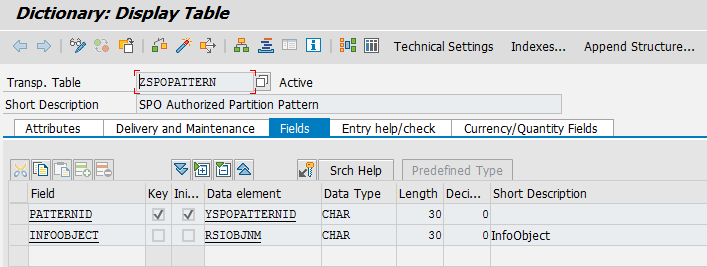
Table ZSPOPATTERN
The following fields have to be implemented:
PATTERNID
INFOOBJECT
Table ZSPOPATTERN Fields
This entry helps and checks have to be implemented:
Table ZSPOPATTERN Entry help/check
Table ZSPOPATTERN Foreign Key
Table ZSPOPATTERNT
The following fields have to be implemented:
LANGU
PATTERNID
TXTLG
TXTSM
Table ZSPOPATTERNT Fields
This entry helps and checks have to be implemented:
Table ZSPOPATTERNT Entry help/check
Table ZSPOPATTERNT Foreign Key
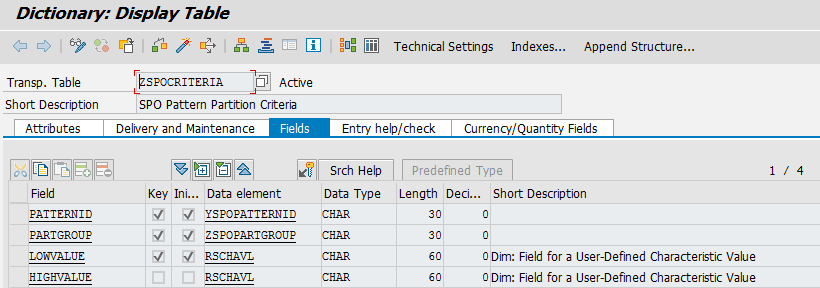
Table ZSPOCRITERIA
The following fields have to be implemented:
PATTERNID
PARTGROUP
LOWVALUE
HIGHVALUE
Table ZSPOCRITERIA Fields
This entry helps and checks have to be implemented:
Table ZSPOCRITERIA Entry help/check
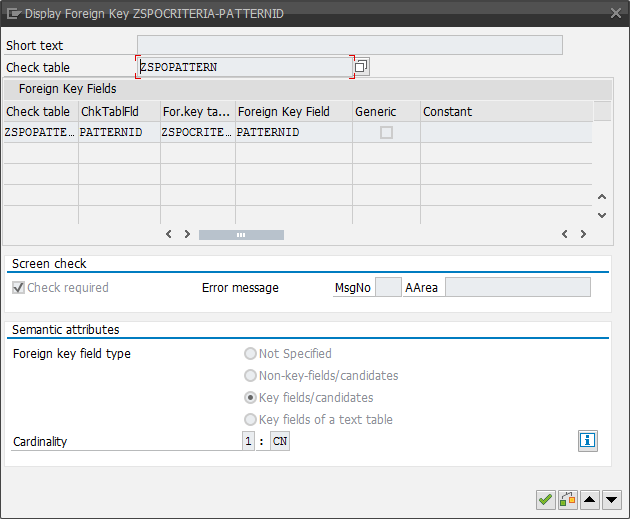
Table ZSPOCRITERIA Foreign Key
Table ZSPOINFOPROV
The following fields have to be implemented:
SPONAME
PATTERNID1
PATTERNID2
PATTERNID3
PATTERNID4
Table ZSPOINFOPROV Fields
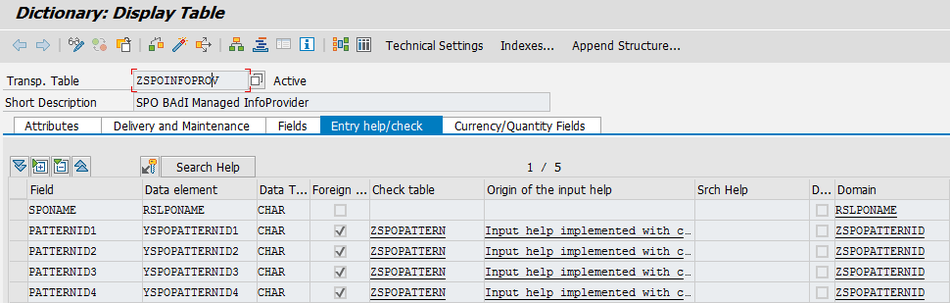
This entry helps and checks have to be implemented:
Table ZSPOINFOPROV Entry help/check
Table ZSPOINFOPROV Foreign Key
Table ZSPODTP
The following fields have to be implemented:
SPONAME
OBJTYPE
OBJNAME
LOGSYS
DTPTEMPLATE
DTPTEMPLATEID
Table ZSPODTP Fields
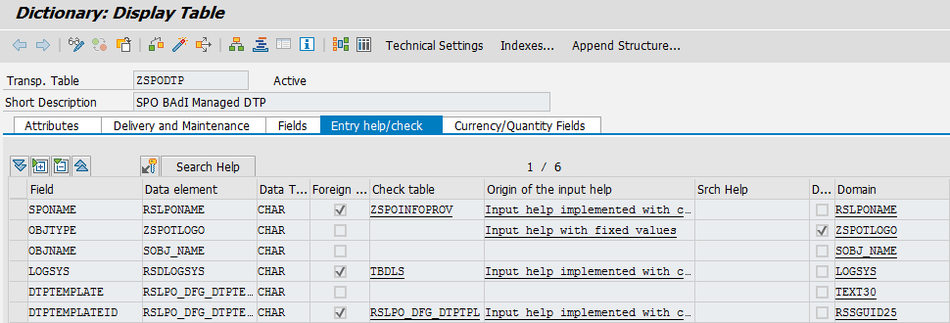
This entry helps and checks have to be implemented:
Table ZSPODTP Entry help/check
Table ZSPODTP Foreign Key ZSPOINFOPROV
Table ZSPODTP Foreign Key TBDLS
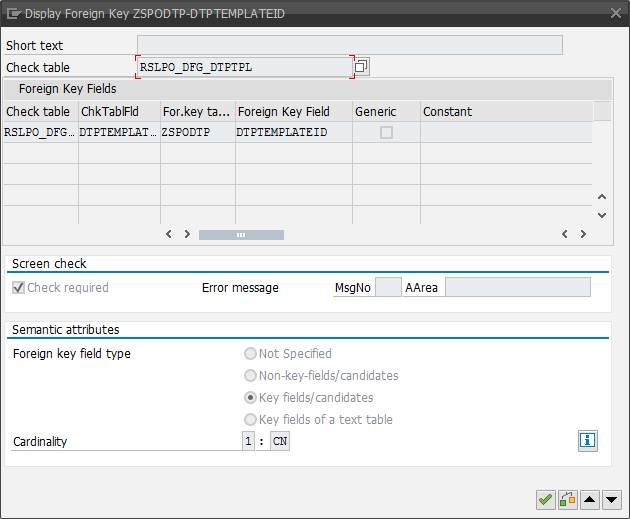
Table ZSPODTP Foreign Key RSLPO_DFG_DTPTPL
After we created all control tables, we can now create an implementation of BAdI RSLPO_BADI_PARTITIONING. How this works, can be read in Part 2.
I am Tobias, I write this blog since 2014, you can find me on twitter and youtube. If you want you can leave me a paypal coffee donation. You can also contact me directly if you want.
So after I read a lot about BW/4HANA, I decided to create a own SAP BW/4HANA 1.0 [Developer Edition] instance on my Amazon AWS account. First I had to extend my normal AWS account with a IAM
user. For this you choose under Security, Identity & Compliance >> IAM. Under Users you click on Add user.
Amazon AWS add user
You have to give the user a name, in my example bw4hana and as access type I choose Programmatic access. Next step is to set the permissions. I only attach
existing policies directly, because it is only a test user. The following policies are needed:
AmazonEC2FullAccess
AmazonVPCFullAccess
ReadOnlyAccess
AWSAccountUsageReportAccess
After you created the user, you have save your access key id and secret access key. These are required for the set up on the page cal.sap.com. After you logon you can choose the SAP BW/4HANA 1.0 [Developer Edition] easily by click on Create Instance. Now
you need the access key id and the secret access key to set up your instance. The costs are:
1,31 USD per hour when the system is active and you use it
23,00 USD per month when the system is suspended
So you can see you don’t have to spend a lot of money to test the new technology. The setup process takes about 60 minutes.
Note: The interesting part is you don’t need a S-User, you can also use a P-User.
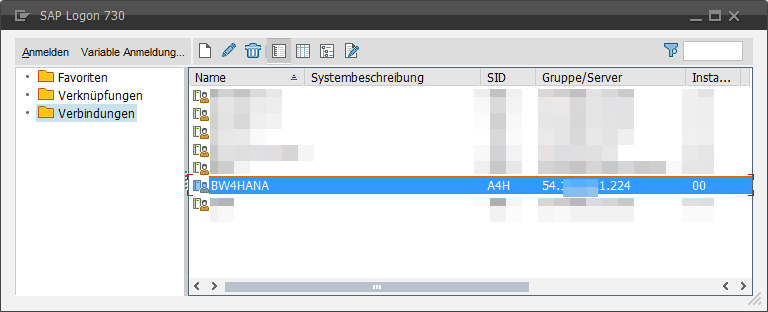
SAP Logon Pad with BW/4HANA
After the setup is done, you can access the systems via RDP oder directly through a SAP Logon Pad. I used the SAP Logon Pad, because on my machine is also Analysis Office, Design Studio and the BW Modeling Tools
installed. So I ran into my first issue, there is no RSA1 anymore. You have to use the BW Modeling Tools. Which is in some places hard to use, I hope they will fix some stuff there.
After a little bit playing with new objects and load some sample data my first test ended here. So stay tuned. If there are any questions post them down here in the comments.
I am Tobias, I write this blog since 2014, you can find me on twitter and youtube. If you want you can leave me a paypal coffee donation. You can also contact me directly if you want.
This week I want to test the integration of a BI Platform to my .Net program. So I want to
install a test version of the BIP, but my virtual machine hadn’t enough space. The first step was to extend the space of the disk. It is very easy in VirtualBox to extend the disk.
Open the Windows Console
Go to the path where you installed Virtual Box. (Default: C:Program FilesOracleVirtualBox)
Type VBoxManage.exe modifyhd „Path to the disk“ –resize 100000 (=100 GB)
Press Enter and your VirtualBox will be extended
After my VirtualBox was ready I could install the BIP. But the next issue was found very soon. I need a license key.
You can find on the support page of SAP the Emergency License Keys. With this emergency license keys you can install a trail version of the BI platform. After the installation was done, we have to set up the Windows Active
Directory, so that we can use Single sign-on (SSO).
In this article I will walk through step by step on setting up single sign-on with SAP BusinessObjects 4.2 SP3 and in my case a Windows Server 2012 R2. The Windows Server part is similar in other
Windows Server versions. The technical specifications used to accomplish single sign-on in this guide.
Domain Controller (DC): win2012.corp.reyemsaibot.com (Windows Server 2012 R2)
SAP BusinessObjects BI Platform: srv2016.corp.reyemsaibot.com (BusinessObjects 4.2 SP3 on the same server as the DC)
Domain: corp.reyemsaibot.com
SAP BusinessObjects Web Application Server: Tomcat
Service Account Name: bi_sso_service
Service Account Password: Reyemsaibot.com
Windows Active Directory Group: BI Platform Users
Test Account Name: reyemsaibot (is member of BI Platform User)
Test Account Password: HelloWorld!2016
Setup Windows Active Directory sign on
Step 1
First we need a Active Directory service account. You have to create it in the Server Manager on the Domain Controller server.
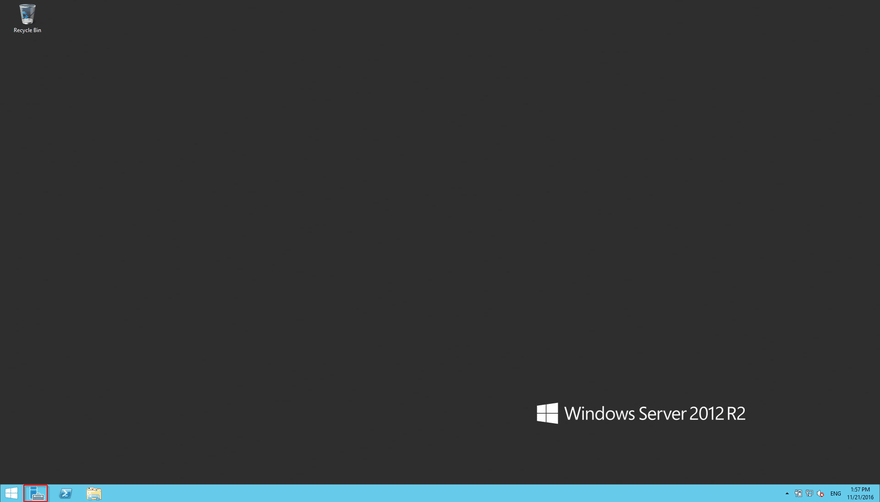
Windows Server 2012 Open Server Manager
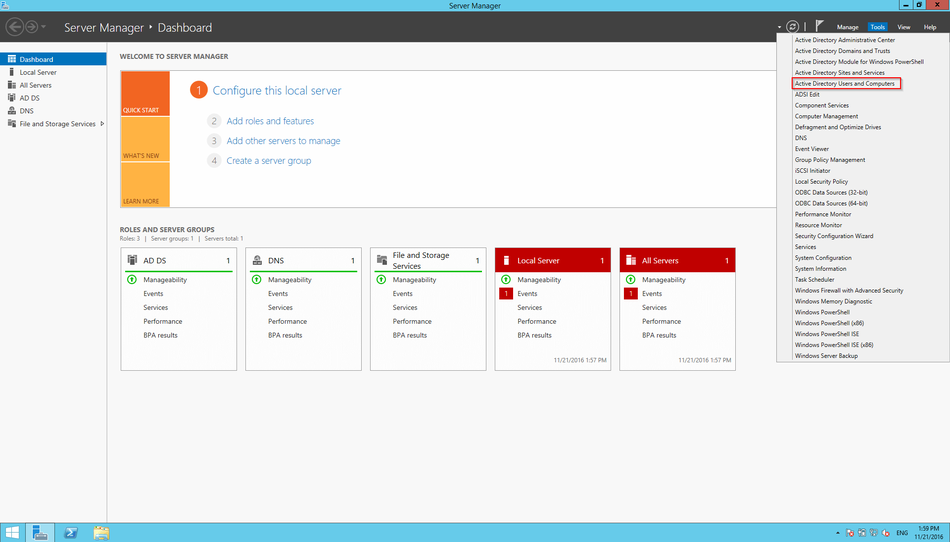
Open the Active directory Users and Computers management tool.
Windows Server Manager Active Directory Users and Computers
Create the service account that will handle the sign-on requests. Click right on the users folder, select new and then user. Use this informationen to create the user:
First Name: BI SSO
Last Name: Service
User Name: bi_sso_service
Password: Reyemsaibot.com
Active Directory add new user
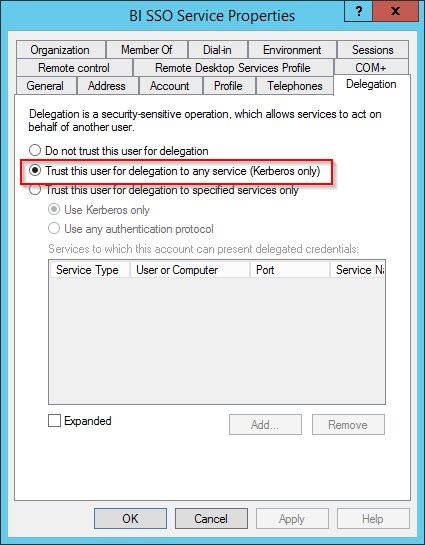
When the user bi_sso_service has been created, the delegation properties must be edited. Click right on the user bi_sso_service and select Properties. Select the Delegation tab and select the option Trust this user for delegation to any service (Kerberos only). The Delegation tab is only available when you set the SPN
first.
User Properties Define Delegation
Step 2
Now we need three Service Principal Names (SPN) for the service account bi_sso_service. This can either be done on the Domain Controller or on the BI platform server. Open the
command prompt. Type the following setspn commands so that it allows Tomcat to communicate with the Active Directory. The option -a means add a new SPN. The
first SPN will be called BICMS.
setspn -a BICMS/bi_sso_service.corp.reyemsaibot.com bi_sso_service
If it was successful, it wil display a message that is has registered the SPN and it has updated the object. Now we create the second SPN for Tomcat and link it to the new user account.
setspn -a HTTP/srv2008 bi_sso_service
And finally, we need to qualify the server address.
setspn -a HTTP/srv2008.corp.reyemsaibot.com bi_sso_service
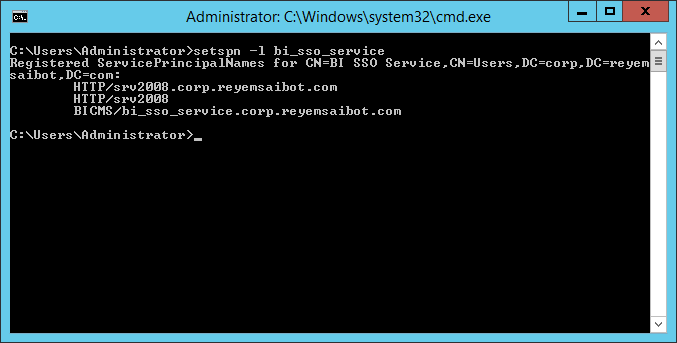
With the command „I“ we can verfiy that all SPN are created.
setspn -l bi_sso_service
Command Prompt setspn
Step 3
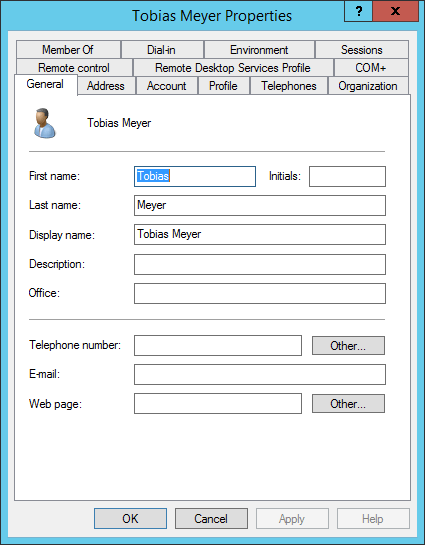
As next step we create a user and a user group that we will use for the Windows Active Directory authentication. Create on the Domain Controller a new user.
First Name: Tobias
Last Name: Meyer
User Name: reyemsaibot
Password: HelloWorld!2016
Active Directory create user
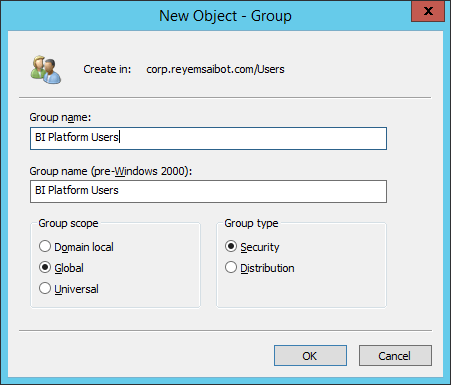
Create a new user group called BI Platform Users. Click right on the user folder, select New and then Group.
Active Directory create group
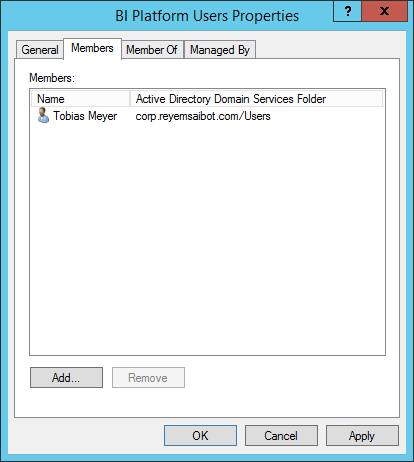
Add the user, which we created before to the user group by right clicking on the group, selecting Properties and then adding it from the Members tab.
Active Directory add user to group
Step 4
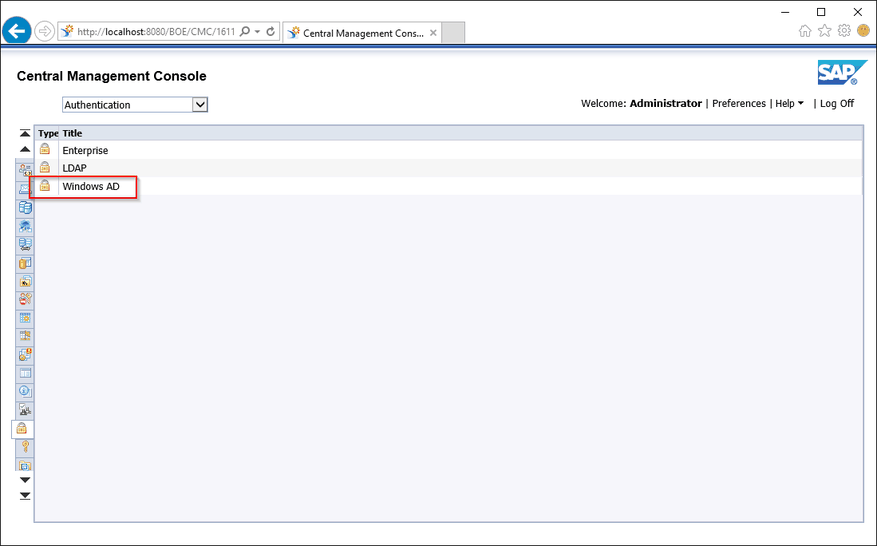
Now we will setup the Windows Active Directory authentication on the BusinessObjects server. You have to log into the CMC with a user that as administrator privileges. Then go to the Authentication area.
Central Management Console
Click on Windows AD to open the authentication options for Windows Active Directory.
Central Management Console Authentication
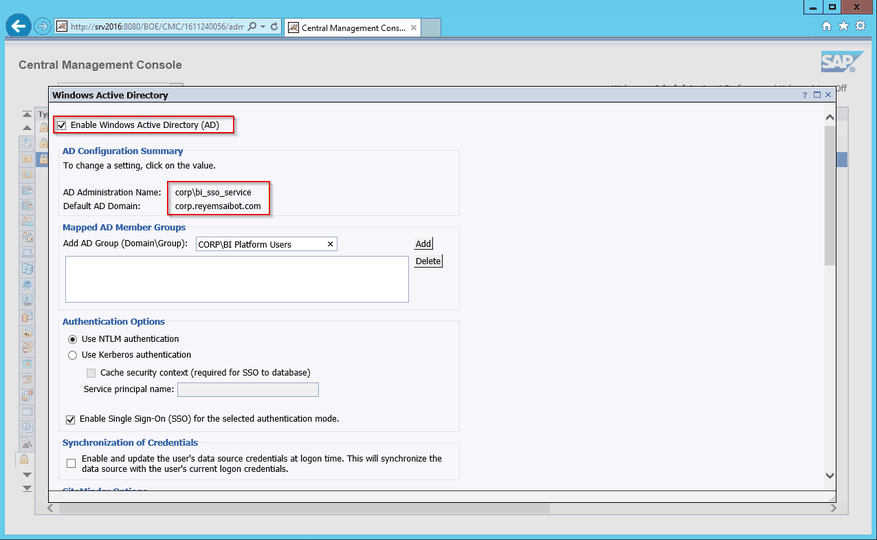
Select the checkbox Enable Windows Active Directory (AD) to enable this option.
Central Management Console Authentication Windows Active Directory
Click on the double quotes besides the AD Administration Name.
Enter the service account as well as the domain name. Note: The service account is bi_sso_service and the domain is corp.reyemsaibot.com.
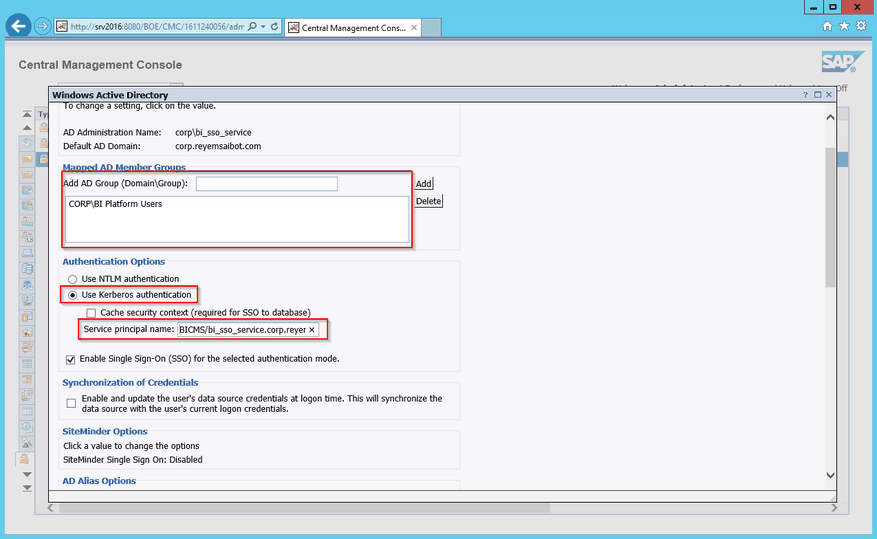
Now define the group you want to map. In this case it is corpBI Platform Users.
Under Authentication Options select Use Kerberos authentication and type as Service prinicpal name BICMS/bi_sso_service.corp.reyemsaibot.com (It is the SPN from Step 2). Select also the option Enable Single-Sign-On (SSO) for the selected authentication mode.
Central Management Console Authentication Options
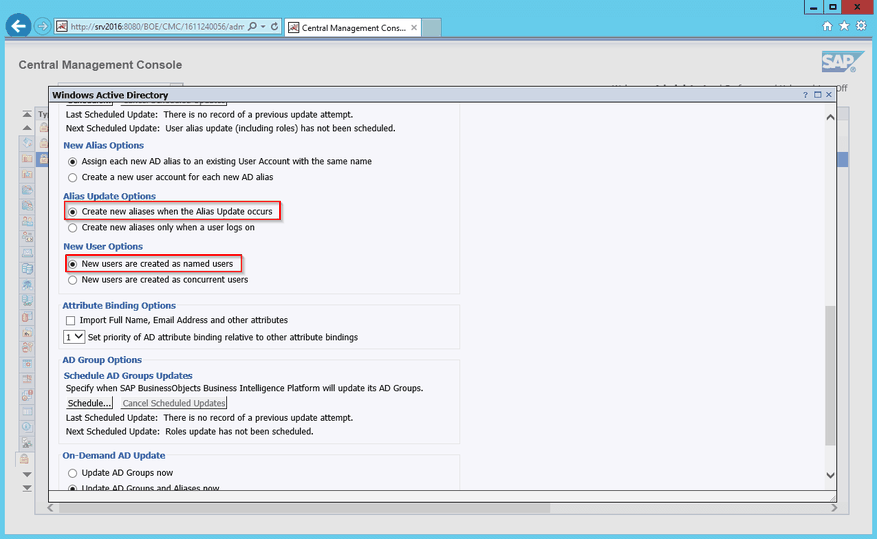
Under Alias Update Options select Create New Alias when the Alias Update occurs and under New Users Options, select New users are
created as named users. Now this is finished, click the Update button at the bottom of the window.
Central Management Console Authentication New User Options
Step 5
Now we are verifing that the group BI Platform Users and the test user reyemsaibot has been added to the BI platform. In the Central Management Console
(CMC) go to Users and Groups and you wll see that the user reyemsaibot has been added under User List and the group BI Platform
Users has been added unter the Group List.
Step 6
Before we can log in with the Windows Active Directory user, we have to configure the BusinessObjects server appropriately. On the BusinessObjects server, we
have to add the user to the Local Administrator Group. Select the Computer Management in the Server Manager.
Server Manager open Computer Management
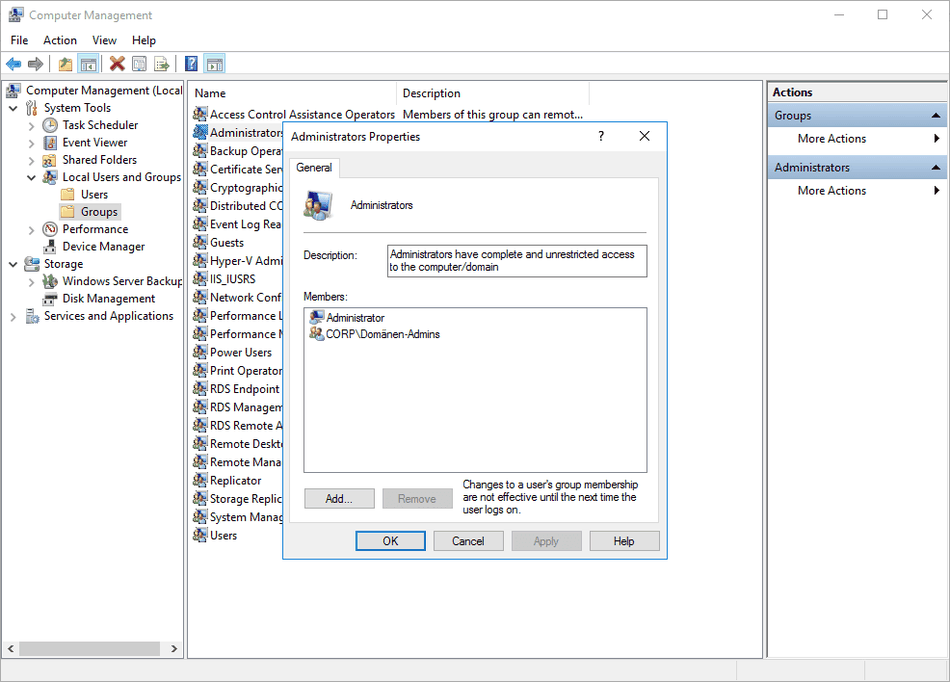
Select Local Users and Groups and then Groups. Double click on the Administrator Group and then click Add.
Computer Management Administrator Group
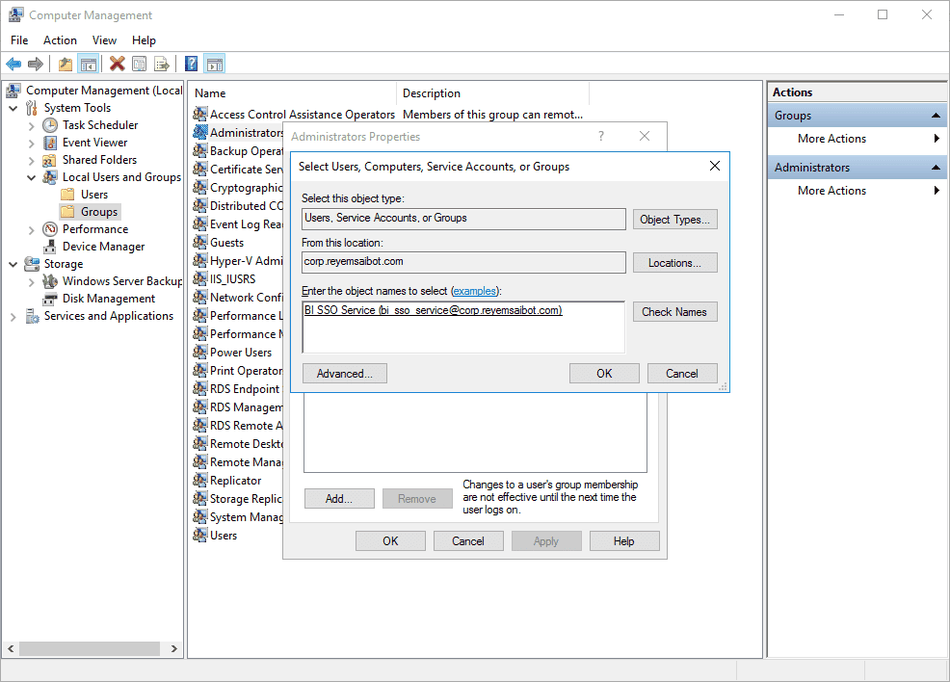
Enter the service account name bi_sso_service.
Computer Management add service user
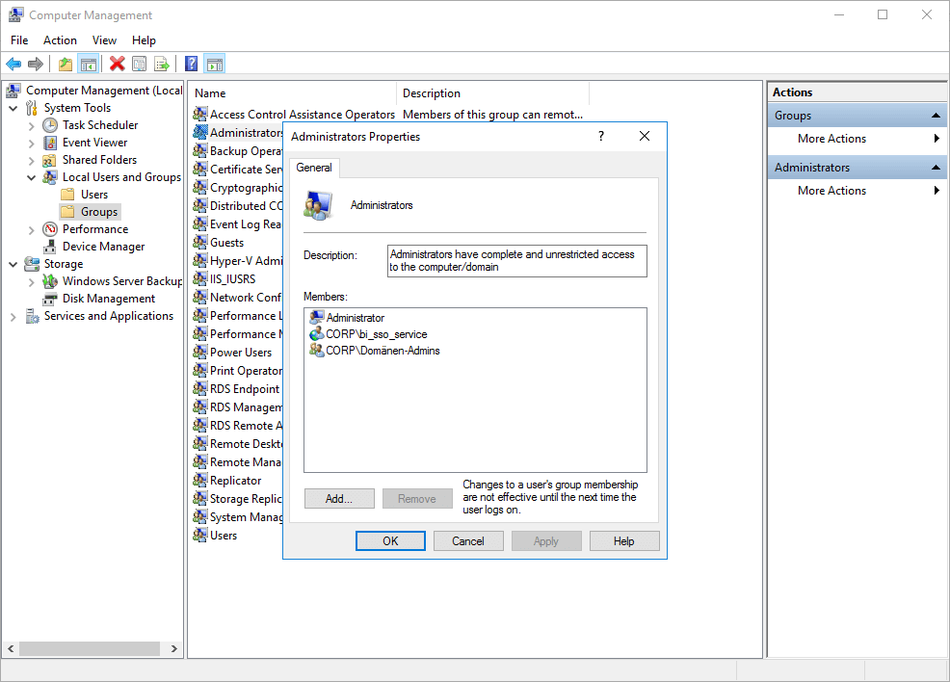
Now you will see the service account in the local administrator group. Click Apply and then OK.
Computer Management Administrator Group
Step 7
We need to edit the local policy for the service account on the BusinessObjects server. So open the Local Security Policy. Expand the Local Policies folder,
click on the User Rights Assignment folder and open the policy Act as part of the operating system.
Local Security Policy Act as part of the operating system
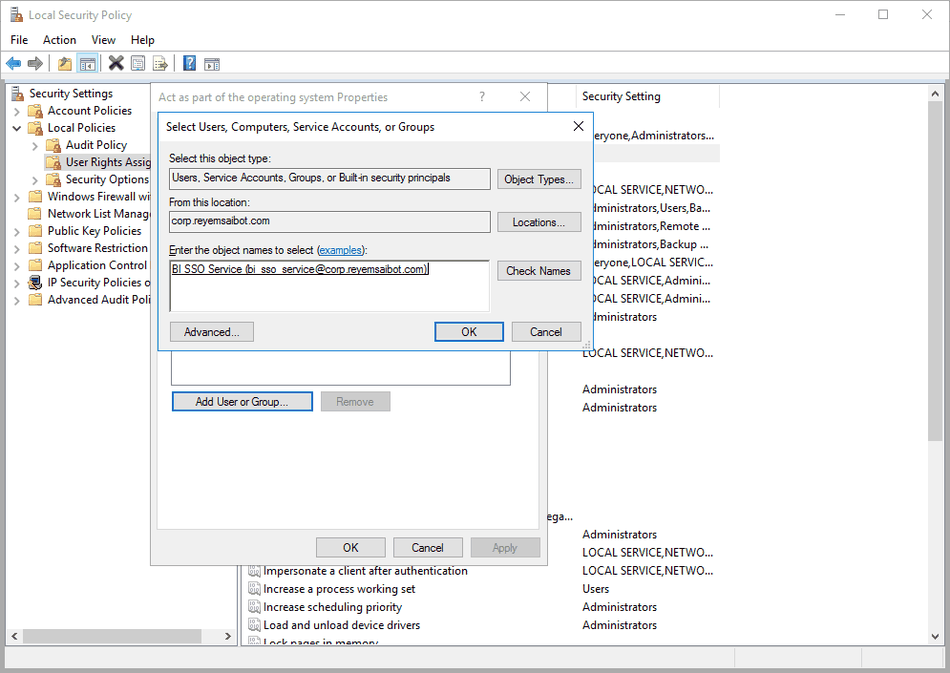
On the properties window, click on Add User or Group and enter the service account bi_sso_service.
Local Security Policy add service user
The service account is now part of the local policy. Close the window with Apply and OK.
Local Security Policy
Step 8
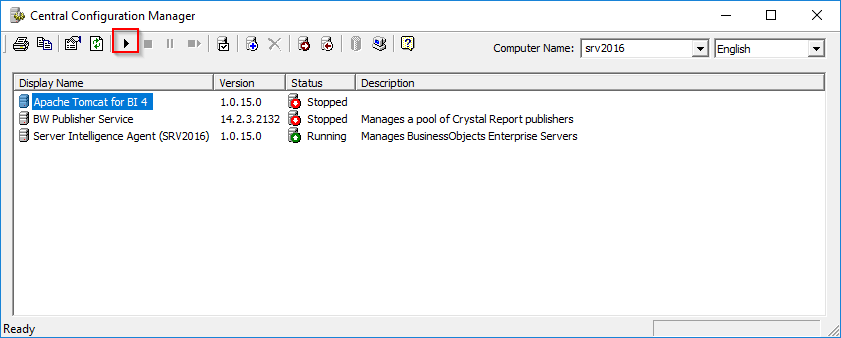
Our next step is to modify the Central Configuration Manager (CCM) so that the service account bi_sso_service is used. Open the Central Configuration
Manger (CCM) on the BusinessObjects server.
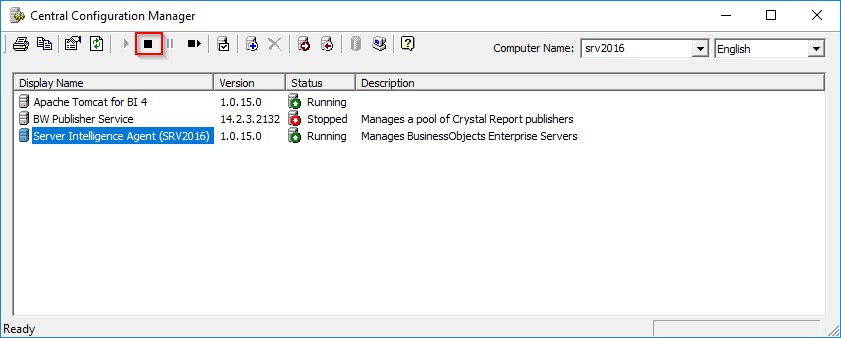
Server Intelligence Agent Stop Server
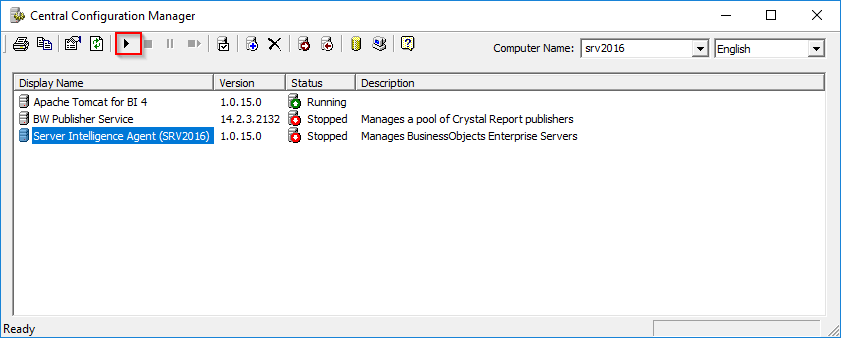
We need to stop the Server Intelligence Agent (SRV2016). Click on the Server Intelligence Agent (SRV2016) and click the stop button.
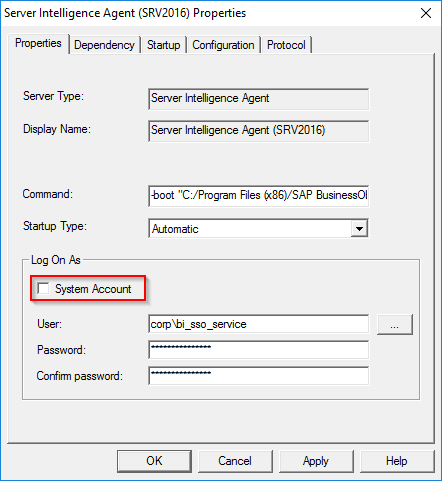
The server has to be running with the service account bi_sso_service. Under the Log On As section uncheck the box beside System Account and type
the service aaccount and password. Click Apply and Ok to save the changes.
Server Intelligence Agent Log On As
Start the Server Intelligence Agent (SRV2016) server again by pressing the start button.
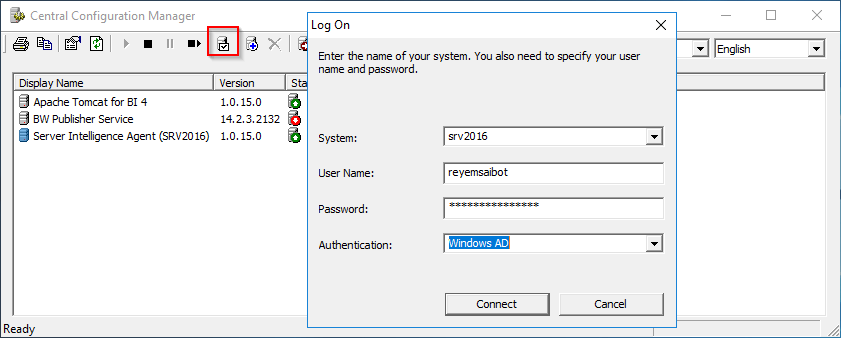
If the Windows Active Directory user reyemsaibot is working, click on Manage Servers. Login with this user account and make sure Windows AD is
selected for the Authentication type.
Central Configuration Manager Log On Test
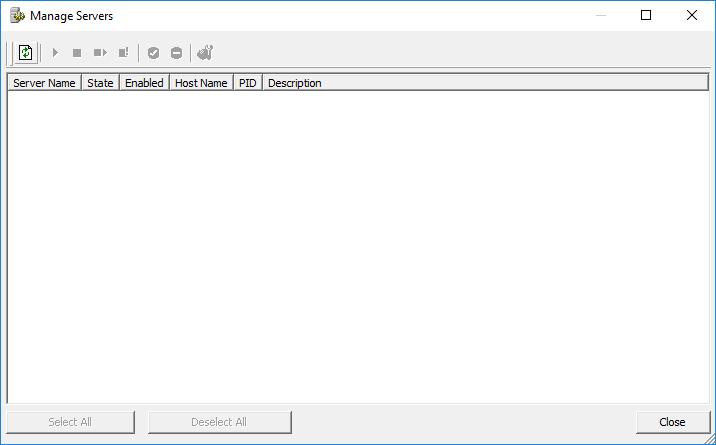
If you see an empty window, as long as you don’t get an error message it means taht the Windows Active Directory login is working.
Central Configuration Manager Manage Servers
Step 9
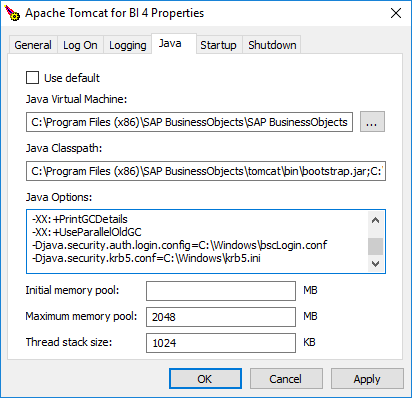
The penultimate step is to create two files (krb5.ini and bsclogin.conf) and configure Tomcat to read them during start up so that the BI
Launchpad and Central Management Console recognize Windows Active Directory logins. On the BusinessObjects sever, create a new file under C:Windows called bsclogin.conf. Edit it and insert the following code into it:
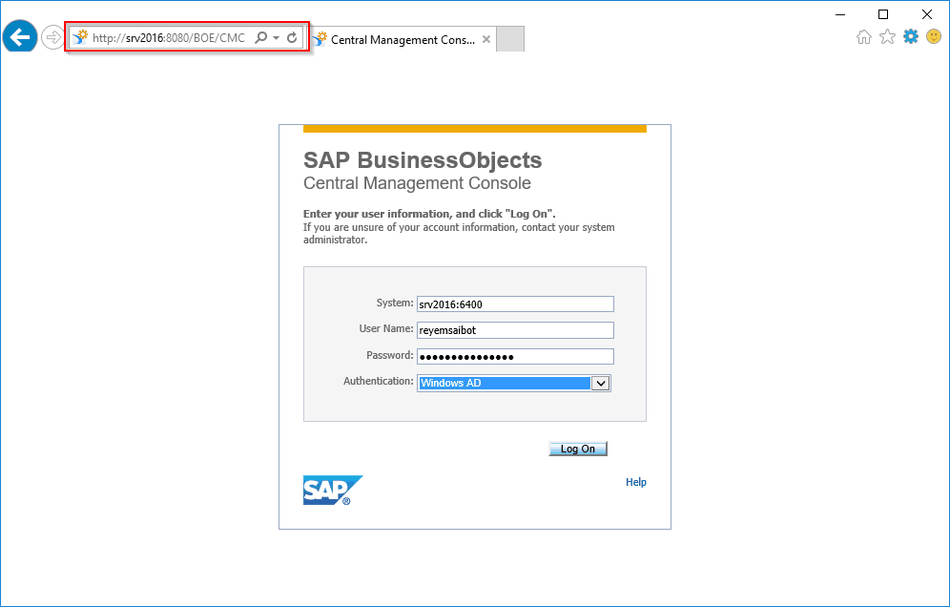
You can access the BI platform manually with a Windows Active Directory account.
BI Platform Logon with Windows Active Directory Account
Enter the correct login credentials for the user and make sure that you have selected Windows AD as authentication. If you can login successfully, your Windows Active Directory
authentication has been set up correctly. In Part 2 we setup the single sign-on so that users don’t have to log on manually every time.
I am Tobias, I write this blog since 2014, you can find me on twitter and youtube. If you want you can leave me a paypal coffee donation. You can also contact me directly if you want.
In Analysis for Office 2.2 SP3 some new interesting parameter for Ao_app.config were delivered. The following parameter are
interesting and in some case maybe very useful.
MaxNumberOfParallelThreads
Use this setting to define the maximum number of parallel threads that can be used to open the SAP HANA DataSources of a workbook. This only works with SAP HANA.
Use this setting to specify whether the logon dialog box should be displayed when using SSO with the BI platform. This maybe is interesting, if you want to change the logon language.
CancelPopupDelay
Since Analysis for Office 2.3 it is possible to cancel a query execution. This parameter defines how long the cancel dialog should be displayed. I think this is a really nice option of
Analysis for Office.
There are a lot of more settings for Ao_app.config in the Admin Guide of Analysis Office. Like for
example:
I am Tobias, I write this blog since 2014, you can find me on twitter and youtube. If you want you can leave me a paypal coffee donation. You can also contact me directly if you want.
Since Analysis for Office 2.0 the administrative settings are moved from the registry to the file system. These settings are now maintained in a XML file. As in my article “Analysis for Office 2.2 SP2”
mentioned the Ao_app.config is repeatedly expanded and sometimes there are new commands available.
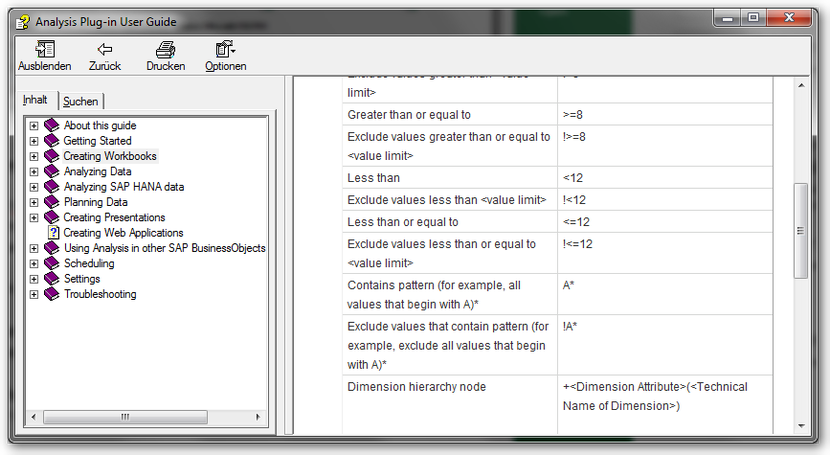
In this context the admin guide is always very useful. On this Topic there is also a SAP Note 1920589. To use “Contains Pattern” as it is described in the
Analysis for Office Help under “Syntax for Entering Values”, it must be activated in the Ao_user_roaming.config file.
Analysis for Office User Guide
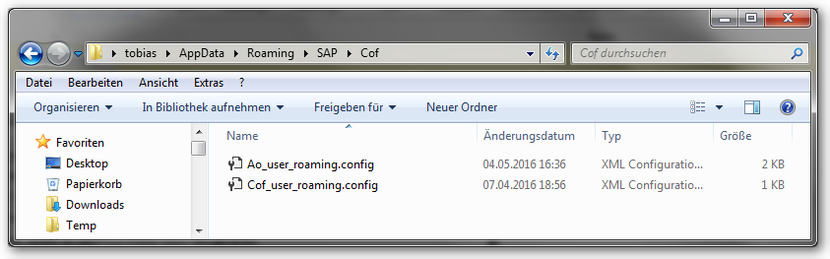
The file is located in the user folder AppDataRoamingSAPCof (%AppData%SAPCof).
AppdataRoamingSAPCof
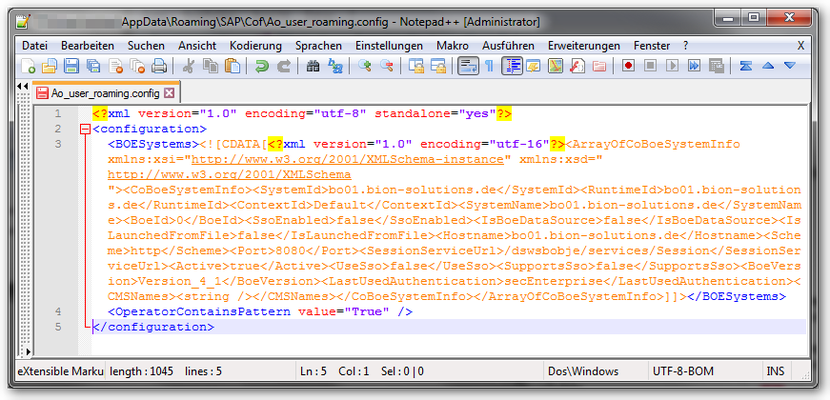
In this file you have to add the parameter <OperatorContainsPattern value=“True“ />.
Ao_user_roaming.config OperatorContainsPattern
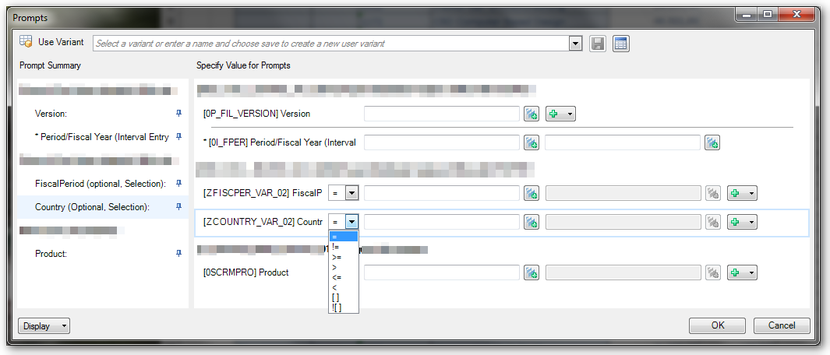
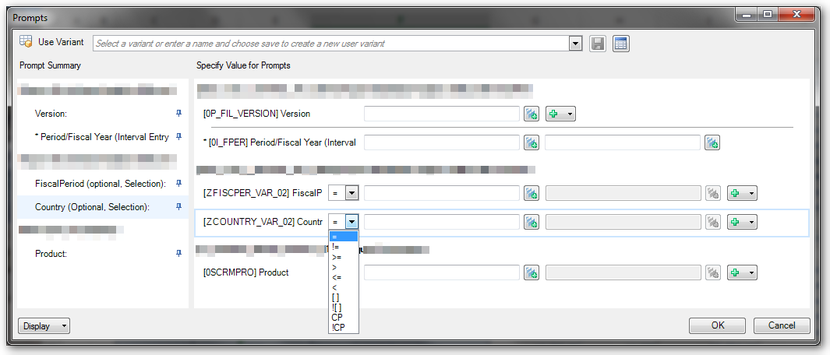
If you now use a variable, which supports pattern, your variables prompt should look like this.
Analysis Office Prompt with Pattern
Note: Until Analysis for Office 2.3 ContainsPattern only works if your variable is in Characteristic Restrictions. If your variable is in Default Values, you don’t see the ContainsPattern
option.
I am Tobias, I write this blog since 2014, you can find me on twitter and youtube. If you want you can leave me a paypal coffee donation. You can also contact me directly if you want.
I just got access to a NetWeaver 7.5 SP2 and I want to test it with Analysis for Office 2.3. So I open Excel and insert a query. And here we go first error: „unable to open data
source“, so I thought maybe the query is broken and I developed a new query and insert it. Here we go, same error. Maybe queries don’t work, so I insert a InfoCube directly. Same error…
Now I refresh the insert query and got an Analysis for Office message: Error while executing function module: BICS_PROV_OPEN
In the explanation was one line with the hint „wrong parameter type in an rfc call“, so I looked into st22 and saw a dump which the message: CALL_FUNCTION_ILLEGAL_P_TYPE
The explanation of this dump is „This error appears if parameters submitted incorrectly in a Remote Function Call.“
I searched but found nothing which should help me. After a longer research I found in the SCN this thread and the simple solution is:
Delete all contents in C:Users<your_user>AppDataRoamingSAP AGSAP BusinessObjects Advanced Analysiscache
After deleting the content, close Analysis for Office and it works. Either the Analysis for Office message or the BW dump explain the solution. But maybe someone has the same issue, this is the solution.
I am Tobias, I write this blog since 2014, you can find me on twitter and youtube. If you want you can leave me a paypal coffee donation. You can also contact me directly if you want.