reyemsaibot

SAP BI Blog about SAP BW/4HANA, Analysis for Office and SAP HANA - by Tobias Meyer

Schlagwort: sapbw

  • SAP BW Analysis Process Designer (APD)

    At the moment I had to deal with a special problem. I have data in a SPO from two different sources and the goal
    was to find the corresponding two data lines and make one out of it. This line should marked with a special character. So I decided to build an Analysis Process (APD).

    Data in InfoCubes before Analysis Process (APD)
    Data in InfoCubes before Analysis Process (APD)

    Open the transaction rsanwb and create a new Analysis Process. Now you can choose between different data sources for example Multiprovider, Query, Flatfile or
    Database Table. In my case I choose a Query that delivers me the last loaded request, so that I don’t have to read the whole SPO. If this works in the future we will see, but the first developer
    test were successful.

    After the query receive the data, I build an aggregation with the function Aggregate Data. So, I made out of two records one record. Which record is from which source, I add the
    same query again as source and restrict the data to one source system. Now I use the Join Data function to join the source system with the aggregated data. I did the same
    with the other source and joined it again with my data from the aggregation. 

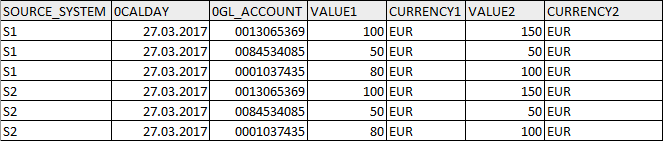
    So now I have my data in the following format:

    Data after Analysis Process
    Data after Analysis Process

    So now I can check with a formula if both (SOURCE_SYSTEM1 and SOURCE_SYSTEM2) is filled or only one. If both are filled, I add another column (SOURCE_SYSTEM3) with S3 or I filled in one of the
    values of SOURCE_SYSTEM1 or SOURCE_SYSTEM2. It looks like this now:

    Data after checking of source system
    Data after checking of source system

    Now I can hide the two columns (SOURCE_SYSTEM1 and SOURCE_SYSTEM2) and have only left the necessary columns for my DataStoreObject. So I find a corresponding record I can reduce my data amount
    but still keep the granularity of the data. Maybe there are different options to do this procedure. If you have any suggestions, feel free to use the comments.

    author.


    I am Tobias, I write this blog since 2014, you can find me on twitter and youtube. If you want you can leave me a paypal coffee donation. You can also contact me directly if you want.

  • SAP BW Check your data model

    Sometimes it is necessary to check your data model if it still fit your needs. For this you can use the transaction rsrv. Select there under All Elementary Tests >>
    Database >> Database information about InfoProvider tables
    .

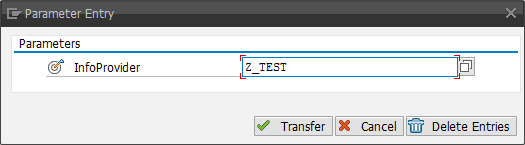
    Now you can enter one InfoCube and choose Transfer. Now you can add more tests or click Execute to run the test.

    Enter Parameter Entry for database information
    Enter Parameter Entry for database information

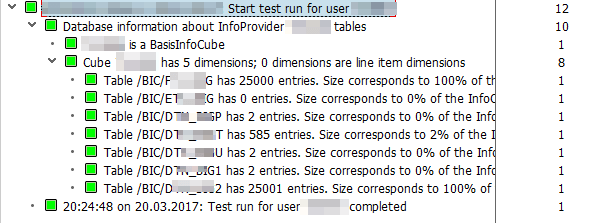
    After you click execute, you will see the log.

    Log about the test
    Log about the test

    As you can see, the design of dimension 2 is very bad. It contains 100% of the entries of the f-table. So now we can plan our redesign. You can also check your cube design with the report
    SAP_INFOCUBE_DESIGNS. How important a good InfoCube design is, will I show you in a futher post.

    author.


    I am Tobias, I write this blog since 2014, you can find me on twitter and youtube. If you want you can leave me a paypal coffee donation. You can also contact me directly if you want.

  • SAP BW find meta chain

    In my current project I had to clean up the existing process chains. A lot of process chains were created via SPOs and not really used in the system. First I had to check, if one is used in a another process chain or in which one they are used.

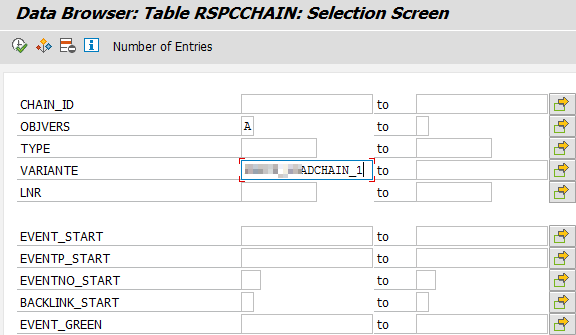
    In the transaction SE16 open table RSPCCHAIN and insert into VARIANTE the technical name of your process chain.

    Table RSPCCHAIN find variante
    Table RSPCCHAIN find variante

    The column CHAIN_ID shows you the corresponding meta-chain.

    Table RSPCCHAIN
    Table RSPCCHAIN

    author.


    I am Tobias, I write this blog since 2014, you can find me on twitter and youtube. If you want you can leave me a paypal coffee donation. You can also contact me directly if you want.
  • SAP BW Change Object Directory Entries

    In my current project we have to transport from a maintenance system to our development system. The problem is when you now transport the objects into quality system, you have to check the option
    „Overwrite Originals“ so that your transport is working. But you have to put this flag on every transport you make in the future from your development system to quality.

    Nobody will remember this after a huge project, so every request has to be transported twice and this is annoying. So we have to find a solution for this. I found a thread on the SCN which describes a solution that worked for me. Yes I found a link which is
    still working after the redesign of the SCN. I was surprised. Here is the solution:

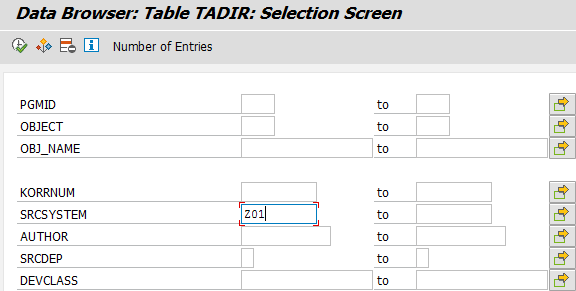
    First you can check in the transaction SE16 the table TADIR how many objects are not correct. You can filter with the field SRCSYSTEM. In my
    case I looked for the SRCSYSTEM Z01.

    SE16 Table TADIR
    SE16 Table TADIR

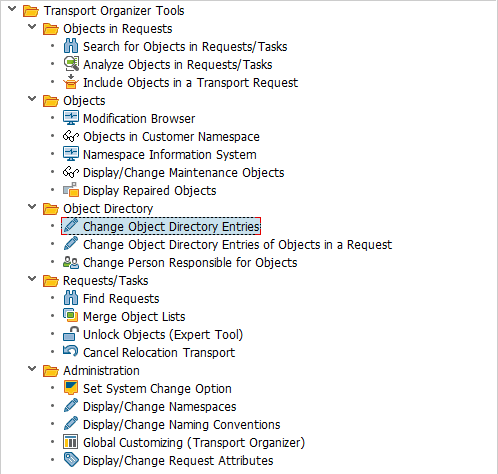
    Now open the transaction SE03 and choose under Object Directory >> Change Object Directory Entries.

    SE03 Change Object Directory Entries
    SE03 Change Object Directory Entries

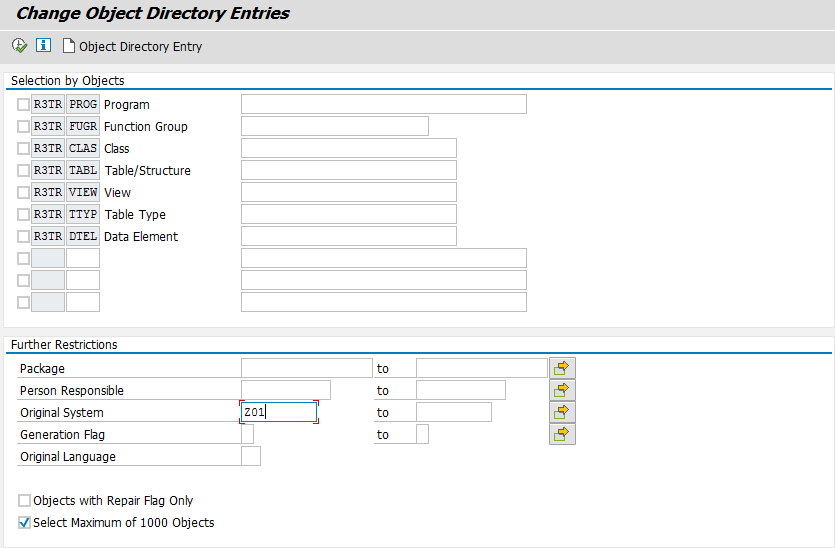
    Now you see a screen, where you can restrict your selection, in my case I want to find all objects which original system is Z01. After you filled your parameters click
    Execute (F8).

    Change Object Directory Entries Restrictions
    Change Object Directory Entries Restrictions

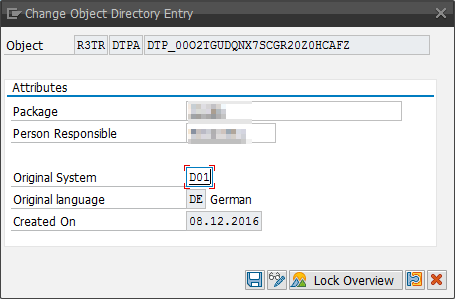
    You can either select each entry with a double click and edit it.

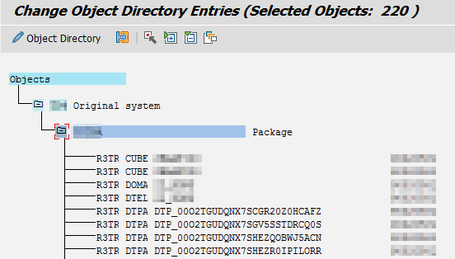
    Change Object Directory Entries
    Change Object Directory Entries
    Change Object Directory Entry
    Change Object Directory Entry

    Or you can select a bunch of entries with F6 or the menu item Select/Deselect.

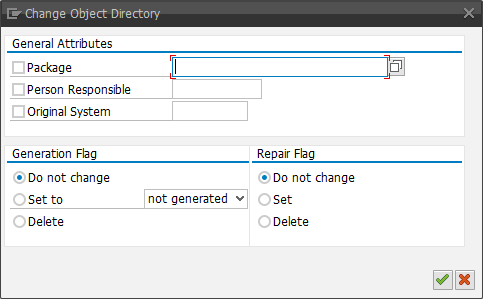
    And enter MASS in the transaction code field and press Enter. Now you get a other dialog displayed, which allows you change all object at once.

    Change Object Directory MASS
    Change Object Directory MASS

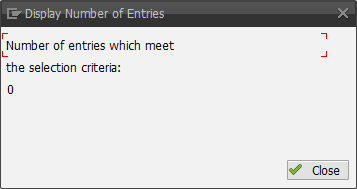
    As you can see it is really easy to change the source system of objects. If you now check the table TADIR, you will see that there are all entries for Z01 are
    gone.

    SE16 Table TADIR check
    SE16 Table TADIR check

    author.


    I am Tobias, I write this blog since 2014, you can find me on twitter and youtube. If you want you can leave me a paypal coffee donation. You can also contact me directly if you want.
  • SAP BW Transport of Copies (ToC)

    In my current project, we have a copy of the productive system as a maintenance system, because we made huge changes in

    the development system in case of the project. So if there is an error in the production, we can easily repair it.


    Some changes have also be transported into the development system, so we have the same state and our future request can be transported into production. For this we use the functionality
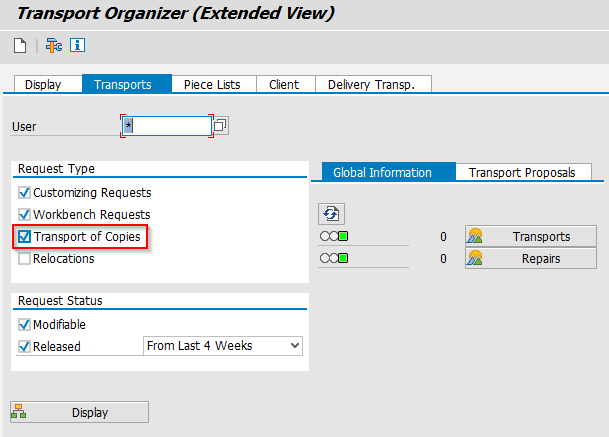
    Transport of Copies. All objects of the originally request are still locked. If you want to create a transport of copies, open the transaction SE01. Check the
    option “Transport of Copies” and click on Display.

    SAP BW Transport Organizer
    SAP BW Transport Organizer

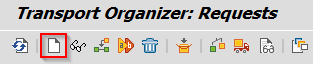
    Create a new transport via icon or F6.

    Create new transport
    Create new transport

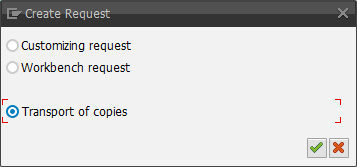
    Choose the request type Transport of copies.

    Create transport of copies
    Create transport of copies

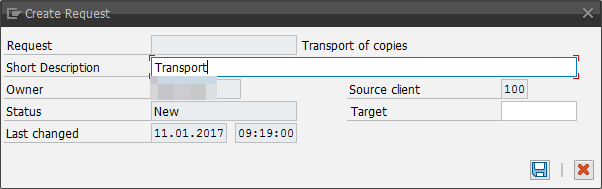
    Define a short description and a target system.

    Define transport of copies
    Define transport of copies

    The request is now created. Now we can add our objects we need to transport. We copy all objects of the original request into our new request. It is important to take task after task, because a
    request can contain more than one task.

    Copy original request/task
    Copy original request/task

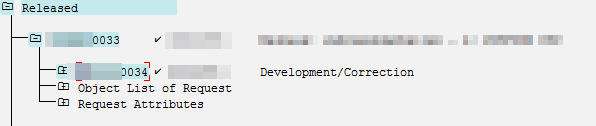
    Select the request id with CTRL + Y and copy it with CTRL + C. Now select the transport of copies request and click on Include Objects (CTRL + F11).

    Include Objects
    Include Objects

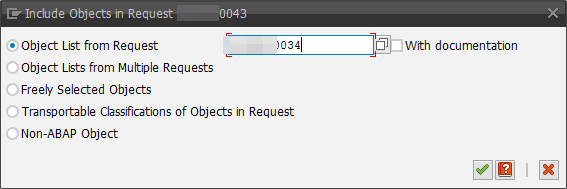
    Choose the Object List from Request and paste the original request id.

    Include Objects into transport of copies
    Include Objects into transport of copies

    Now all objects of the original request are in your copy and you can continue with your normal transport management.

    author.


    I am Tobias, I write this blog since 2014, you can find me on twitter and youtube. If you want you can leave me a paypal coffee donation. You can also contact me directly if you want.
  • SAP BW Create SPO via BAdI – Part 3

    After we created in Part 1 the transparent tables and in Part 2 all BAdI implementation, we can now maintain and create our SPO. First we have to fill our table ZSPOPATTERN with a
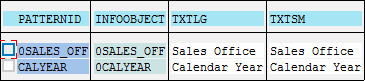
    PATTERNID and a corresponding INFOOBJECT. Go to the se16 and create a new table entry. As PATTERNID enter a unique id for
    example CALYEAR and as INFOOBJECT 0CALYEAR. For TXTLG and TXTSM enter a useful text. Depending on how many InfoObject are used for a partition, create the other
    pattern.

    Table ZSPOPATTERN
    Table ZSPOPATTERN

    After we filled ZSPOPATTERN, we can now fill ZSPOINFOPROV. As SPONAME enter the technical Name of the SPO. As PATTERNID1 to
    PATTERNID4 enter your previous created pattern. For example Y_TM as SPONAME and CALYEAR as PATTERNID1.

    Table ZSPOINFOPROV
    Table ZSPOINFOPROV

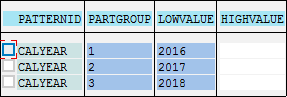
    The next table is ZSPOCRITERIA. Enter the previous created PATTERNID, a PARTGROUP, a LOWVALUE and if necessary a
    HIGHVALUE. For example:

    • PATTERNID – CALYEAR
    • PARTGROUP – 1
    • LOWVALUE – 2016

    For 2017 use PARTGROUP 2, for more explanation see the screenshot below.

    Table ZSPOCRITERIA
    Table ZSPOCRITERIA

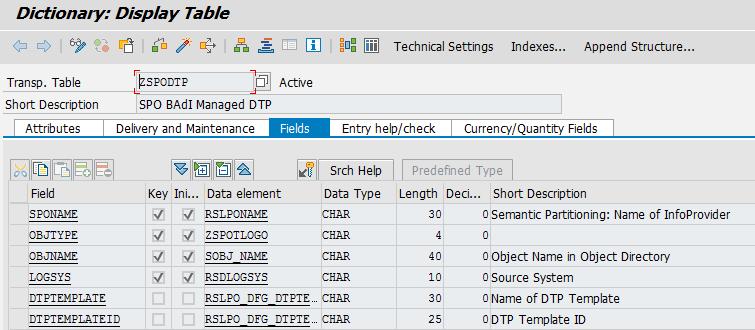
    The last table is ZSPODTP. Enter a SPONAME, OBJTYPE, LOGSYS, DTPTEMPLATE and DTPTEMPLATEID.
    The DTPTEMPLATEID can be found in table RSLPO_DFG_DTPTPL. For example:

    • SPONAME – Y_TM
    • OBJTYPE – ODSO
    • OBJNAME – YTM01
    • LOGSYS – T04CLNT100
    • DTPTEMPLATE – DSO FULL
    • DTPTEMPLATEID – 00O2TGUDQNX7RY71D737H5IZ2
    Table ZSPODTP
    Table ZSPODTP

    After the initial maintenance is done, we can go to the transaction RSA1. We can either maintain our SPO directly or under Administration you find the
    Mass Activation of BAdI SPOs. The first new partion will be created directly and the second and third under Mass Activation of BAdI SPOs. When you start from scretch you
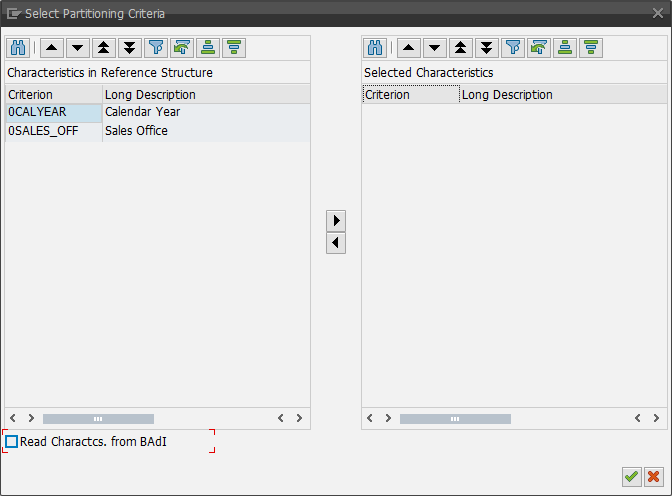
    click on Change Partitions to create your new partitions. Now you can choose your criteria.

    SPO: Select Partitioning Criteria
    SPO: Select Partitioning Criteria

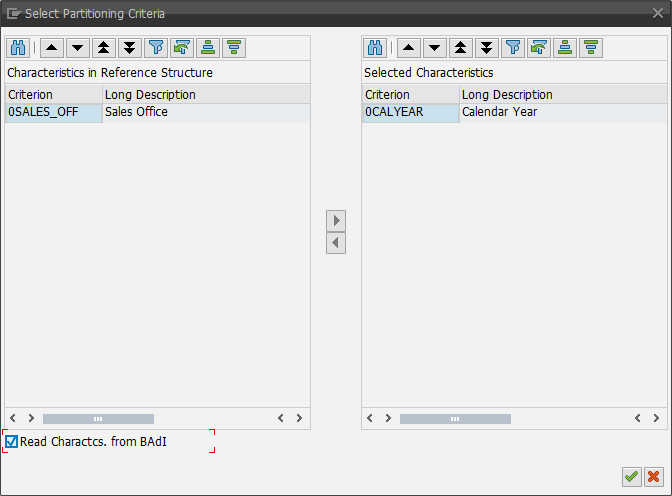
    As you can see on the screenshot below, when you select Read Charactcs. from BAdI, the InfoObject 0CALYEAR is automatically add as criteria.

    SPO: Select Partitioning Criteria via BAdI
    SPO: Select Partitioning Criteria via BAdI

    In the screenshot below you see the partition 1 is automatically added with the year 2016.

    SPO: Partition created by BAdI
    SPO: Partition created by BAdI

    Now we can activate our SPO and see, that the partition 1 is created. You can now add your new partitions either by clicking on Build Version From or via Mass Activation
    of BAdI SPOs
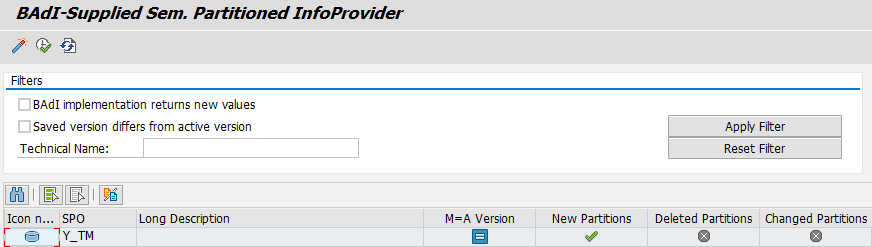
    . I choose the second way to show you how can activate multiple SPOs at once. Goto Administration >> Mass Activation of BAdI SPOs.

    SPO: Mass Activation of BAdI SPOs
    SPO: Mass Activation of BAdI SPOs

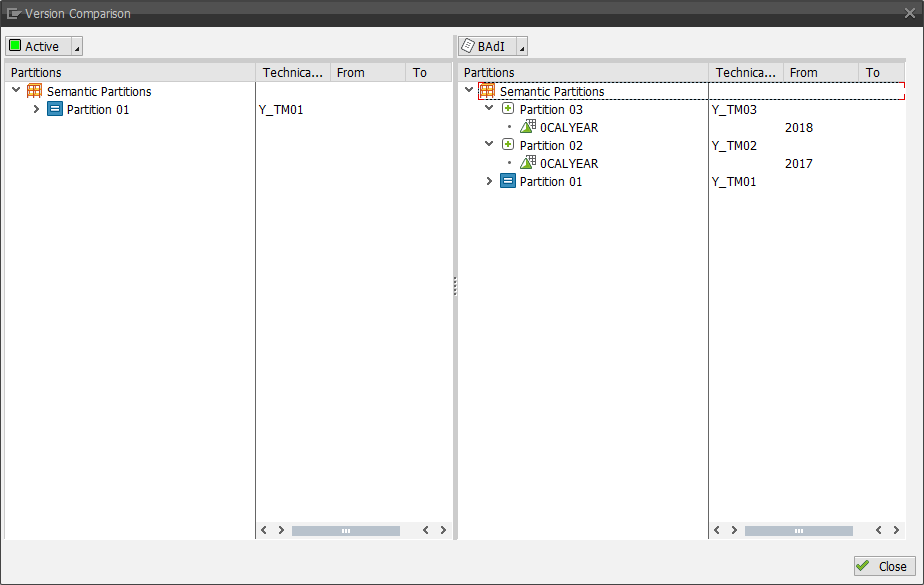
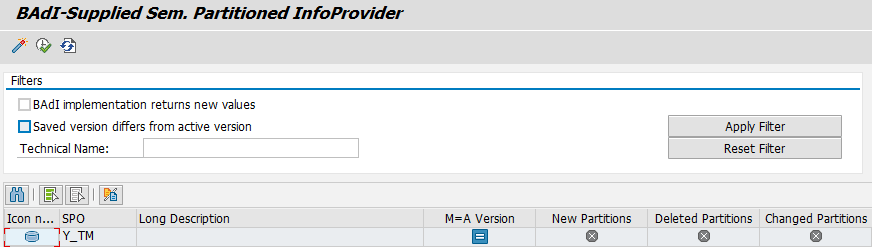
    As you can see in the screeshot above, our SPO find new partitions. With the function Version Comparison you can compare the actual version with the new.

    SPO: Version Comparison
    SPO: Version Comparison

    As you see, the two new partitions for 2017 and 2018 will be created. By click on Activate, the partitions are created.

    SPO: New partitions are created via Mass Activation
    SPO: New partitions are created via Mass Activation

    Now our SPO is up to date and all partitions are created. If you need for example 2019, you have to maintain the table ZSPOCRITERIA and go back to the Mass Activation of BAdI
    SPOs
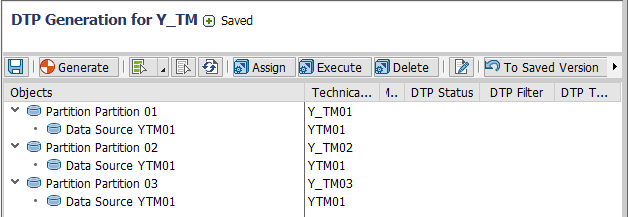
    . The last part is now to create the DTPs. Go to the SPO and open it in change mode. Click on Create Data Transfer Processes. You will see the following screen.

    SPO: Create DTP for SPO
    SPO: Create DTP for SPO

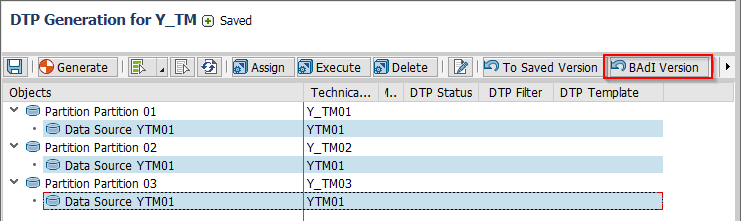
    Select your partitions and click on the button BAdI Version.

    SPO: Create DTP for SPO via BAdI
    SPO: Create DTP for SPO via BAdI

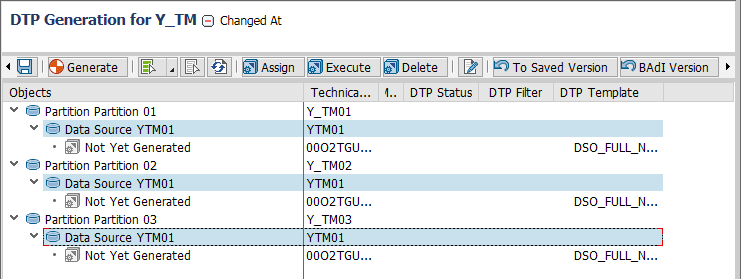
    The DTPs automatically appear and you only have to generate them.

    SPO: DTP created via BAdI
    SPO: DTP created via BAdI

    That’s it. Your SPO and associated DTPS can be created via BAdI. I tested it with a Business Warehouse 7.31 SP18, maybe it is a little bit
    different in a higher release.

    author.


    I am Tobias, I write this blog since 2014, you can find me on twitter and youtube. If you want you can leave me a paypal coffee donation. You can also contact me directly if you want.

  • SAP BW Create SPO via BAdI – Part 2

    After we created in part 1 all tables and objects, we can now create a new BAdI to generate the partitions. Go to
    the transaction se19 and create a new implementation with the Name RSLPO_BADI_PARTITIONING.

    BAdI Builder: Create Implementation
    BAdI Builder: Create Implementation

    Give the enhancement implementation a name and a short text.

    Create Enhancement Implementation
    Create Enhancement Implementation

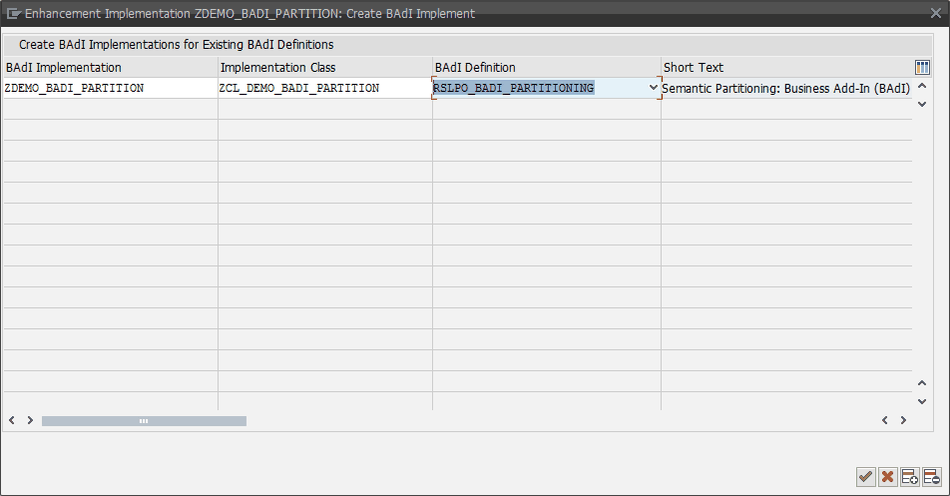
    Click continue and save. Now specify the BAdI implementation name, the implementation class and the BAdI
    definition
    . Select for the BAdI Definition RSLPO_BADI_PARTITIONING, click continue and save.

    Enhancement Implementation: Create BAdI Implement
    Enhancement Implementation: Create BAdI Implement

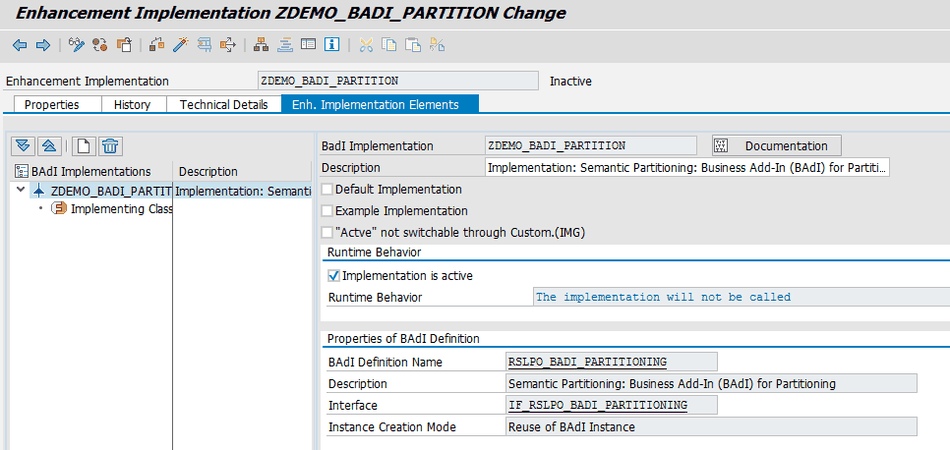
    After that the following screen appears.

    Enhancement Implementation ZDEMO_BADI_PARTITION Change
    Enhancement Implementation ZDEMO_BADI_PARTITION Change

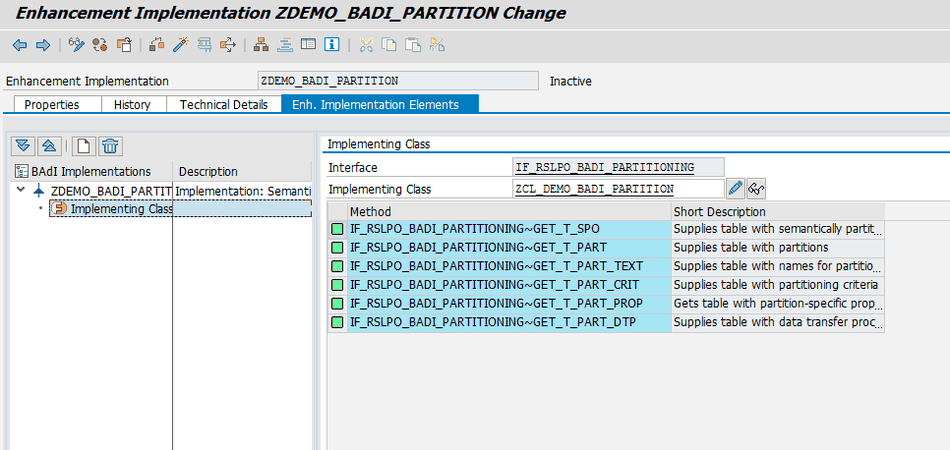
    Double click the implementation class and the following screen appears. The 6 methods of the class ZCL_DEMO_BADI_PARTITION which we use to define the partitions are displayed in the right panel.

    • GET_T_SPO
    • GET_T_PART
    • GET_T_PART_TEXT
    • GET_T_PART_CRIT
    • GET_T_PART_PROP
    • GET_T_PART_DTP

    Each method has a specific role, which you can see under the short description. Double click the method IF_RSLPO_BADI_PARTITIONING~GET_T_SPO.

    Enhancement Implementation: Implementing Class
    Enhancement Implementation: Implementing Class

    First we have to implement the name of the Semantic Partitioning Object (SPO).

    1
    2
    3
    4
    5
    6
    7
    8
    method IF_RSLPO_BADI_PARTITIONING~GET_T_SPO.
      DATA: l_spo TYPE rslponame.
      
      "Return a table with names of supported BAdI SPOs.
      SELECT SPONAME from ZSPOINFOPROV into l_spo.
        APPEND l_spo TO r_t_spo.
      ENDSELECT.
    endmethod.


    Save and activate the method and the class. Now implement the

     1
     2
     3
     4
     5
     6
     7
     8
     9
    10
    11
    12
    13
    14
    15
    16
    17
    18
    19
    20
    21
    22
    23
    24
    25
    method IF_RSLPO_BADI_PARTITIONING~GET_T_PART.
    
    DATA: l_cnt TYPE i,
          l_posit TYPE i VALUE 1,
          l_id TYPE c LENGTH 2,
          l_s_part TYPE rslpo_badi_s_part,
          "ZSPOINFOPROV Variable
          l_it_spoinfoprov TYPE TABLE OF ZSPOINFOPROV,
          l_wa_spoinfoprov TYPE ZSPOINFOPROV.
    
    SELECT * from ZSPOINFOPROV into CORRESPONDING FIELDS OF TABLE L_IT_SPOINFOPROV where SPONAME = I_SPO.
    
    Loop at L_IT_SPOINFOPROV into L_WA_SPOINFOPROV.
      SELECT COUNT(*) from zspocriteria into l_cnt where PATTERNID = L_WA_SPOINFOPROV-PATTERNID1.
        WHILE l_posit LE l_cnt.
          UNPACK l_posit to l_id.
          l_s_part-IDPART = l_id.
          l_s_part-POSIT = l_posit.
          APPEND l_s_part TO r_t_part.
          l_posit = l_posit + 1.
        ENDWHILE.
        CLEAR l_posit.
      ENDLOOP.
      
    endmethod. 
    

    IF_RSLPO_BADI_PARTITIONING~GET_T_PART_TEXT specifies the text for each partition. The problem is, the customer normally named the partitions after his own mind, so I just
    implemented a comment, so it would be initialized. The comment is necessary.

    1
    "Coding will follow later


    Now we implement the IF_RSLPO_BADI_PARTITIONING~GET_T_PART_CRIT. This implementation specifies the partition criteria.

     1
     2
     3
     4
     5
     6
     7
     8
     9
    10
    11
    12
    13
    14
    15
    16
    17
    18
    19
    20
    21
    22
    23
    24
    25
    26
    27
    28
    29
    30
    31
    32
    33
    34
    method IF_RSLPO_BADI_PARTITIONING~GET_T_PART_CRIT.
    
    DATA: l_id TYPE c length 2,
          l_s_part_crit TYPE rslpo_badi_s_part_crit,
          "SPOCRITERIA Variable
          l_it_criteria TYPE TABLE OF ZSPOCRITERIA,
          l_wa_criteria TYPE ZSPOCRITERIA,
          "ZSPOINFOPROV Variable
          l_it_spoinfoprov type table of zspoinfoprov,
          l_wa_spoinfoprov type zspoinfoprov.
    
    SELECT * from ZSPOINFOPROV into CORRESPONDING FIELDS OF TABLE L_IT_SPOINFOPROV where SPONAME = I_SPO.
    
    Loop at L_IT_SPOINFOPROV into L_WA_SPOINFOPROV.
      SELECT * from ZSPOCRITERIA into CORRESPONDING FIELDS OF TABLE l_it_criteria where patternid = L_WA_SPOINFOPROV-PATTERNID1 or patternid = l_wa_spoinfoprov-patternid2 or patternid = l_wa_spoinfoprov-patternid3 or patternid = l_wa_spoinfoprov-patternid4.
    
      LOOP AT l_it_criteria INTO l_wa_criteria.
        SELECT INFOOBJECT FROM ZSPOPATTERN into l_s_part_crit-IOBJNM where patternid = l_wa_criteria-patternid.
          If L_WA_CRITERIA-HIGHVALUE NE ''.
            l_s_part_crit-opt = 'BT'.
          ELSE.
            l_s_part_crit-opt = 'EQ'.
          ENDIF.
          UNPACK L_WA_CRITERIA-PARTGROUP to l_id.
          l_s_part_crit-IDPART = l_id.
          l_s_part_crit-low = l_wa_criteria-LOWVALUE.
          l_s_part_crit-high = l_wa_criteria-HIGHVALUE.
          l_s_part_crit-posit = L_WA_CRITERIA-PARTGROUP.
          APPEND l_s_part_crit TO r_t_part_crit.
        ENDSELECT.
      ENDLOOP.
    ENDLOOP.
    
    endmethod.
    

    The method IF_RSLPO_BADI_PARTITIONING~GET_T_PART_PROP will only be initialized with the following code:

    1
    "Coding will follow later


    The next and last method is IF_RSLPO_BADI_PARTITIONING~GET_T_PART_DTP. It specifies the template of the DTP.


     1
     2
     3
     4
     5
     6
     7
     8
     9
    10
    11
    12
    13
    14
    15
    16
    17
    18
    19
    20
    21
    22
    23
    24
    25
    26
    27
    28
    29
    30
    31
    32
    33
    34
    35
    method IF_RSLPO_BADI_PARTITIONING~GET_T_PART_DTP.
    
    DATA: l_posit TYPE i VALUE 1,
          l_cnt TYPE i,
          l_id TYPE c LENGTH 2,
          l_s_part_dtp type rslpo_badi_s_part_dtp,
          "ZSPODTP Variable
          l_it_dtp type table of zspodtp,
          l_wa_dtp type zspodtp,
          "ZSPOINFOPROV Variable
          l_it_spoinfoprov type table of zspoinfoprov,
          l_wa_spoinfoprov type zspoinfoprov.
    
    SELECT * from ZSPOINFOPROV into CORRESPONDING FIELDS OF TABLE L_IT_SPOINFOPROV where SPONAME = I_SPO.
    
    Loop at L_IT_SPOINFOPROV into L_WA_SPOINFOPROV.
    
      SELECT COUNT(*) FROM ZSPOCRITERIA into l_cnt where PATTERNID = L_WA_SPOINFOPROV-PATTERNID1.
      SELECT * from ZSPODTP into CORRESPONDING FIELDS OF TABLE l_it_dtp where SPONAME = I_SPO.
    
      LOOP at l_it_dtp into l_wa_dtp.
        l_s_part_dtp-DTPTEMPLATE = l_wa_dtp-DTPTEMPLATE.
        l_s_part_dtp-OBJNM = l_wa_dtp-OBJNAME.
        l_s_part_dtp-LOGSYS = l_wa_dtp-LOGSYS.
        l_s_part_dtp-TLOGO = l_wa_dtp-OBJTYPE.
        WHILE l_posit LE l_cnt.
          UNPACK l_posit to l_id.
          l_s_part_dtp-IDPART = l_id.
          APPEND l_s_part_dtp TO r_t_part_dtp.
          l_posit = l_posit + 1 .
        ENDWHILE.
      ENDLOOP.
    ENDLOOP.
    
    endmethod.
    

    After all methods are implemented, activate the Enhancement Implementation. Now we are able to create a Semantic Partitioning Object (SPO). What we need to maintain will be described in Part 3 of this series.

    author.


    I am Tobias, I write this blog since 2014, you can find me on twitter and youtube. If you want you can leave me a paypal coffee donation. You can also contact me directly if you want.
  • SAP BW Create SPO via BAdI – Part 1

    At my current project I needed a way to create Semantic Partitioning Object (SPO) via BAdI to reduce the end-of-year work. After a little search via Google (you cannot find anything on the new
    SAP Community Page), I found these threads.

    Both were not perfect, so I build a solution between them. I also put everything via control tables, so it would be easier for the users to manage them. So let’s get started.

    Create own data dictionary objects

    The following domains have to be implemented:

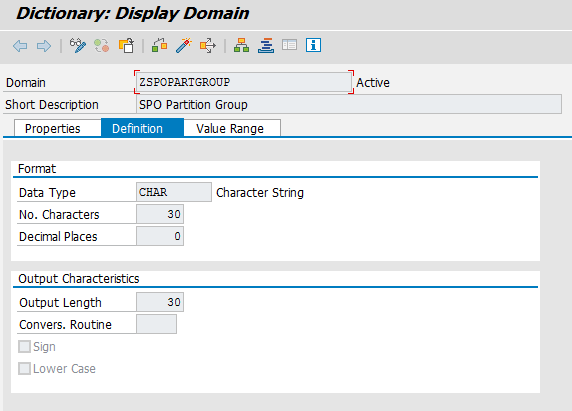
    • ZSPOPARTGROUP – SPO Partition Group
    • ZSPOPATTERNID – SPO Partitioning Pattern
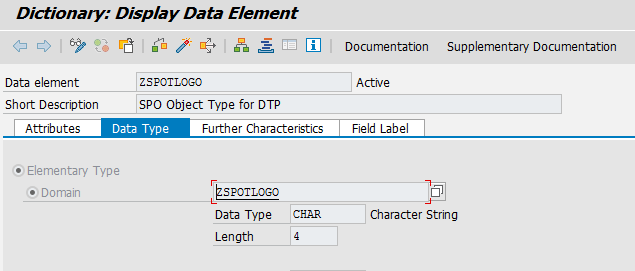
    • ZSPOTLOGO – SPO Object Type for DTP

    SPO Partition Group

    Domain: ZSPOPARTGROUP
    Domain: ZSPOPARTGROUP

    SPO Partitioning Pattern

    Domain: ZSPOPATTERNID
    Domain: ZSPOPATTERNID

    SPO Object Type for DTP

    Domain: ZSPOTLOGO
    Domain: ZSPOTLOGO
    Domain: ZSPOTLOGO Value Range
    Domain: ZSPOTLOGO Value Range

    After we created the domains, we have to create the following data elements:

    • ZSPOPARTGROUP – SPO Partition Group
    • ZSPOPATTERNID – SPO Partitioning Pattern
    • ZSPOPATTERNID1 – SPO Partitioning Pattern 1
    • ZSPOPATTERNID2 – SPO Partitioning Pattern 2
    • ZSPOPATTERNID3 – SPO Partitioning Pattern 3
    • ZSPOPATTERNID4 – SPO Partitioning Pattern 4
    • ZSPOTLOGO – SPO Object Type for DTP

    SPO Partition Group

    Data Element: ZSPOPARTGROUP
    Data Element: ZSPOPARTGROUP

    SPO Partitioning Pattern

    Data Element: ZSPOPATTERNID
    Data Element: ZSPOPATTERNID

    Note: The data elements ZSPOPATTERNID1, ZSPOPATTERNID2, ZSPOPATTERNID3 and ZSPOPATTERNID4 are defined like the ZSPOPATTERNID.

    SPO Object Type for DTP

    Data Element: ZSPOTLOGO
    Data Element: ZSPOTLOGO

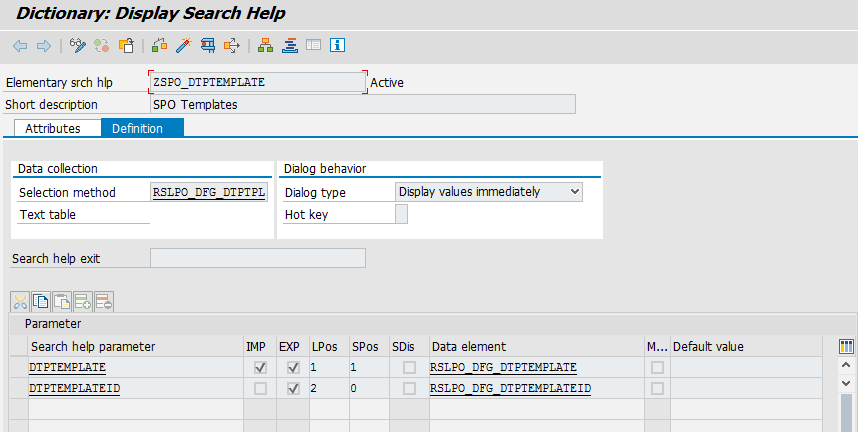
    We also implement a search help ZSPO_DTPTEMPLATE – SPO Templates

    SPO Templates

    Search Help: ZSPO_DTPTEMPLATE
    Search Help: ZSPO_DTPTEMPLATE

    Create Transparent Tables

    After all these elements are created, we can now create the following transparent tables:

    • ZSPOINFOPROV – SPO BAdI Managed InfoProvider
    • ZSPOPATTERN – SPO Authorized Partition Pattern
    • ZSPOPATTERNT – SPO Authorized Partition Pattern Text
    • ZSPOCRITERIA – SPO Pattern Partition Criteria
    • ZSPODTP – SPO BAdI Managed DTP

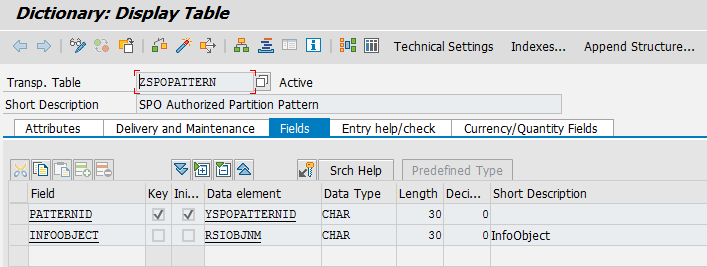
    Table ZSPOPATTERN

    The following fields have to be implemented:

    • PATTERNID
    • INFOOBJECT
    Table ZSPOPATTERN Fields
    Table ZSPOPATTERN Fields

    This entry helps and checks have to be implemented:

    Table ZSPOPATTERN Entry help/check
    Table ZSPOPATTERN Entry help/check
    Table ZSPOPATTERN Foreign Key
    Table ZSPOPATTERN Foreign Key

    Table ZSPOPATTERNT

    The following fields have to be implemented:

    • LANGU
    • PATTERNID
    • TXTLG
    • TXTSM
    Table ZSPOPATTERNT Fields
    Table ZSPOPATTERNT Fields

    This entry helps and checks have to be implemented:

    Table ZSPOPATTERNT Entry help/check
    Table ZSPOPATTERNT Entry help/check
    Table ZSPOPATTERNT Foreign Key
    Table ZSPOPATTERNT Foreign Key

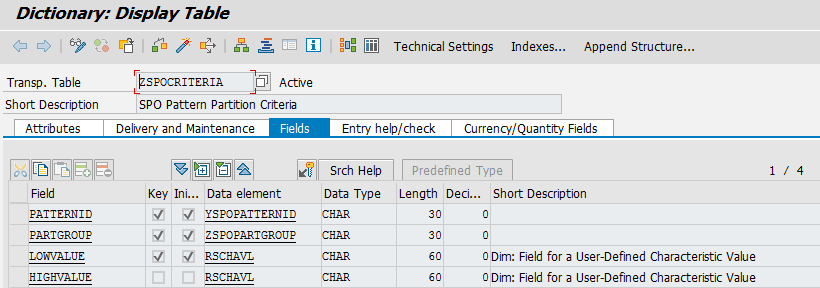
    Table ZSPOCRITERIA

    The following fields have to be implemented:

    • PATTERNID
    • PARTGROUP
    • LOWVALUE
    • HIGHVALUE
    Table ZSPOCRITERIA Fields
    Table ZSPOCRITERIA Fields

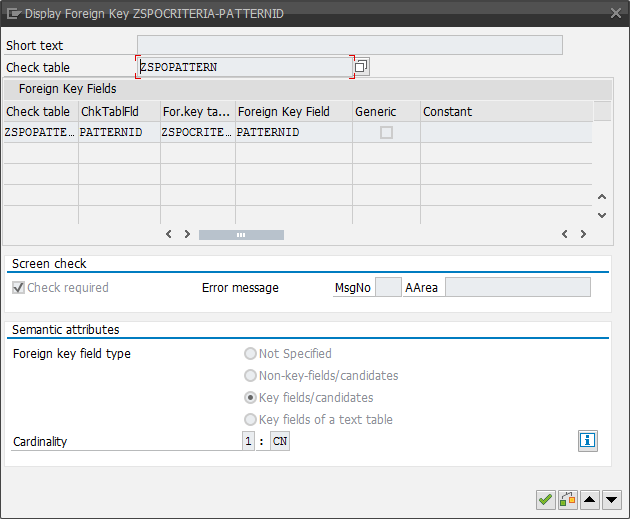
    This entry helps and checks have to be implemented:

    Table ZSPOCRITERIA Entry help/check
    Table ZSPOCRITERIA Entry help/check
    Table ZSPOCRITERIA Foreign Key
    Table ZSPOCRITERIA Foreign Key

    Table ZSPOINFOPROV

    The following fields have to be implemented:

    • SPONAME
    • PATTERNID1
    • PATTERNID2
    • PATTERNID3
    • PATTERNID4
    Table ZSPOINFOPROV Fields
    Table ZSPOINFOPROV Fields

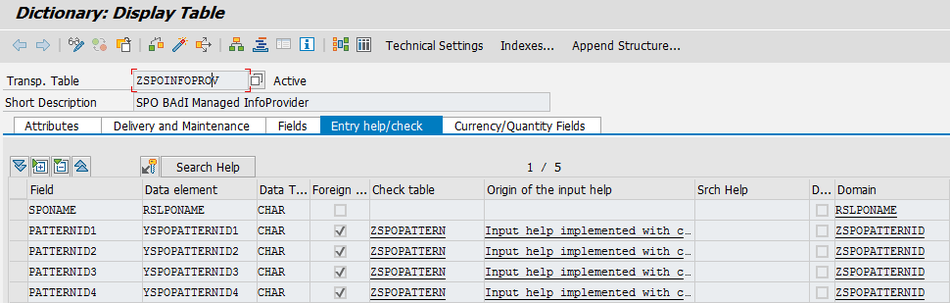
    This entry helps and checks have to be implemented:

    Table ZSPOINFOPROV Entry help/check
    Table ZSPOINFOPROV Entry help/check
    Table ZSPOINFOPROV Foreign Key
    Table ZSPOINFOPROV Foreign Key

    Table ZSPODTP

    The following fields have to be implemented:

    • SPONAME
    • OBJTYPE
    • OBJNAME
    • LOGSYS
    • DTPTEMPLATE
    • DTPTEMPLATEID
    Table ZSPODTP Fields
    Table ZSPODTP Fields

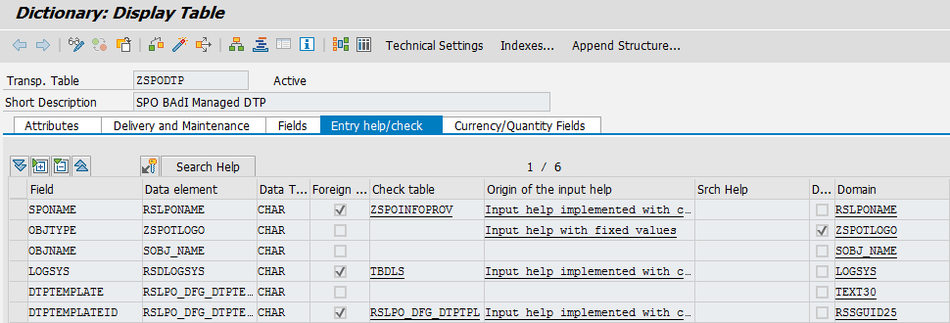
    This entry helps and checks have to be implemented:

    Table ZSPODTP Entry help/check
    Table ZSPODTP Entry help/check
    Table ZSPODTP Foreign Key ZSPOINFOPROV
    Table ZSPODTP Foreign Key ZSPOINFOPROV
    Table ZSPODTP Foreign Key TBDLS
    Table ZSPODTP Foreign Key TBDLS
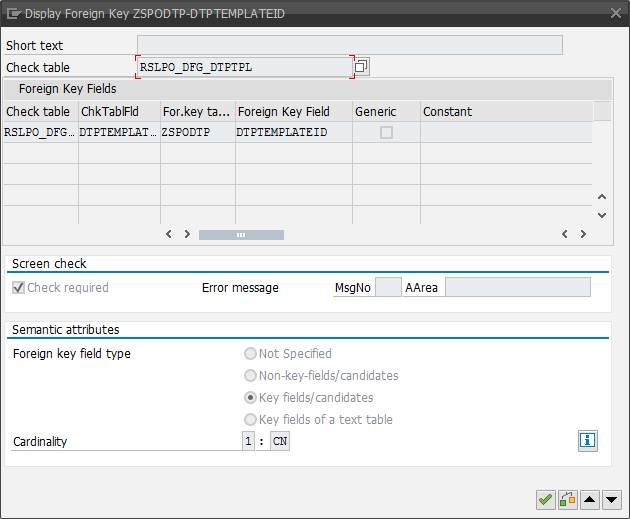
    Table ZSPODTP Foreign Key RSLPO_DFG_DTPTPL
    Table ZSPODTP Foreign Key RSLPO_DFG_DTPTPL

    After we created all control tables, we can now create an implementation of BAdI RSLPO_BADI_PARTITIONING. How this works, can be read in Part 2.

    author.


    I am Tobias, I write this blog since 2014, you can find me on twitter and youtube. If you want you can leave me a paypal coffee donation. You can also contact me directly if you want.
  • Setup BW/4HANA on Amazon AWS

    So after I read a lot about BW/4HANA, I decided to create a own SAP BW/4HANA 1.0 [Developer Edition] instance on my Amazon AWS account. First I had to extend my normal AWS account with a IAM
    user. For this you choose under Security, Identity & Compliance >> IAM. Under Users you click on Add user.

    Amazon AWS add user
    Amazon AWS add user

    You have to give the user a name, in my example bw4hana and as access type I choose Programmatic access. Next step is to set the permissions. I only attach
    existing policies directly, because it is only a test user. The following policies are needed:

    • AmazonEC2FullAccess
    • AmazonVPCFullAccess
    • ReadOnlyAccess
    • AWSAccountUsageReportAccess

    After you created the user, you have save your access key id and secret access key. These are required for the set up on the page cal.sap.com. After you logon you can choose the SAP BW/4HANA 1.0 [Developer Edition]  easily by click on Create Instance. Now
    you need the access key id and the secret access key to set up your instance. The costs are:

    • 1,31 USD per hour when the system is active and you use it
    • 23,00 USD per month when the system is suspended

    So you can see you don’t have to spend a lot of money to test the new technology. The setup process takes about 60 minutes.


    Note: The interesting part is you don’t need a S-User, you can also use a P-User.

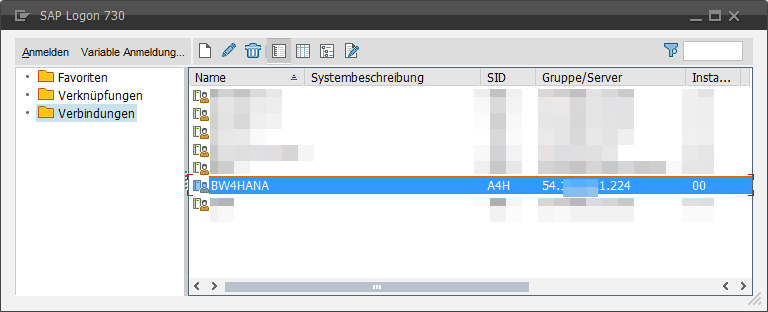
    SAP Logon Pad with BW/4HANA
    SAP Logon Pad with BW/4HANA

    After the setup is done, you can access the systems via RDP oder directly through a SAP Logon Pad. I used the SAP Logon Pad, because on my machine is also Analysis Office, Design Studio and the BW Modeling Tools
    installed. So I ran into my first issue, there is no RSA1 anymore. You have to use the BW Modeling Tools. Which is in some places hard to use, I hope they will fix some stuff there.


    After a little bit playing with new objects and load some sample data my first test ended here. So stay tuned. If there are any questions post them down here in the comments.

    author.


    I am Tobias, I write this blog since 2014, you can find me on twitter and youtube. If you want you can leave me a paypal coffee donation. You can also contact me directly if you want.
  • How to build a RFC Server with NCo 3.0 Part 2

    So it is done, Part 2 finally is written and an example is uploaded to github. It took me about 8 months to release Part 2 of these series. Part 1 was released in March 2016 and now I had time to write an example for Part 2 and upload it to
    github. Part 1 discover the basics about a
    RFC Server with the SAP NCo Connector, part 2 now explain how to build a RFC Server more flexible.

    First you have to create a new Microsoft Visual Studio project. In my case it was a Windows Form Application. I add some labels and textboxes so
    it look like this:

    SAP NCo RFC Server Sample Part 2
    SAP NCo RFC Server Sample Part 2

    I also add some fields in the application settings:

    Visual Studio Project Settings
    Visual Studio Project Settings

    After the fields are done, we can add our code for the save button.

    With My.Settings

    .RfcProgramId = txtProgramID.Text .

    .RfcGatewayHost = txtGatewayHost.Text

    .RfcGatewayService = txtGatewayService.Text

    .RfcIdleTimeout = txtIdleTimeout.Text

    .RfcMessageServer = txtMessageServerHost.Text

    .RfcMessageServerService = txtMessageServerService.Text

    .RfcMessageServerSystemID = txtMessageServerSystemId.Text

    .RfcLanguage = txtLanguage.Text

    .RfcPassword = txtPassword.Text

    .RfcUser = txtUser.Text

    .RfcRegistrationCount = txtRegistrationCount.Text

    My.Settings.Save()

    End With

    So now we are able to save our settings directly into the application settings. To switch between normal mode (able to save the settings) and a console mode I add a new module which checks if
    there are any arguments. In this case I check if the argument -R (remote) is available.

    Public Sub Main()

    Dim args() As String = Environment.GetCommandLineArgs()

    If args.Length > 0 And
    String.Equals(args(1).ToUpper, „-R“) Then

    Dim remoteServer As RfcServer

    Dim parameters As New RfcConfigParameters()

    parameters(RfcConfigParameters.Name) = „NCO_SERVER“

    Dim repository As String

    With My.Settings

    If String.IsNullOrEmpty(.RfcProgramId) OrElse String.IsNullOrEmpty(.RfcGatewayHost) OrElse String.IsNullOrEmpty(.RfcGatewayService) OrElse String.IsNullOrEmpty(.RfcIdleTimeout) OrElse String.IsNullOrEmpty(.RfcLanguage) OrElse String.IsNullOrEmpty(.RfcPassword) OrElse String.IsNullOrEmpty(.RfcUser) OrElse String.IsNullOrEmpty(.RfcRegistrationCount) Then

    MessageBox.Show(„Please fill all necessary fields!“, „Missing fields“, MessageBoxButtons.OK,
    MessageBoxIcon.Information)

    Exit Sub

    End If

    parameters(RfcConfigParameters.ProgramID) = .RfcProgramId

    parameters(RfcConfigParameters.GatewayHost) = .RfcGatewayHost

    parameters(RfcConfigParameters.GatewayService) = .RfcGatewayService

    parameters(RfcConfigParameters.ConnectionIdleTimeout) = .RfcIdleTimeout

    parameters(RfcConfigParameters.MessageServerHost) = .RfcMessageServer

    parameters(RfcConfigParameters.MessageServerService) = .RfcMessageServerService()

    parameters(RfcConfigParameters.SystemID) = .RfcMessageServerSystemID

    parameters(RfcConfigParameters.User) = .RfcUser

    parameters(RfcConfigParameters.Password) = .RfcPassword

    parameters(RfcConfigParameters.Language) = .RfcLanguage

    parameters(RfcConfigParameters.RegistrationCount) = .RfcRegistrationCount

    End With

    remoteServer = RfcServerManager.GetServer(parameters, New Type() {GetType(ServerFunction)})

    repository = CStr(My.Resources.ResourceManager.GetObject(„repo“))

    Dim fileFunc As New StringReader(repository)

    Dim rfcRepository As New RfcCustomRepository

    rfcRepository.Load(fileFunc)

    remoteServer.Repository = rfcRepository

    remoteServer.Start()

    Thread.Sleep(400000)

    Else

    Dim server As New NCoServer

    server.ShowDialog()

    End If

    End Sub

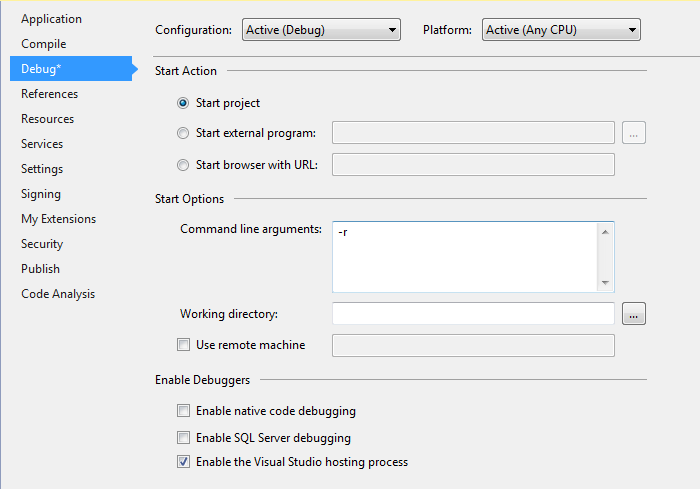
    You can check if the argument works when you add in the project properties under debug -R

    Visual Studio Project Properties Command line arguments
    Visual Studio Project Properties Command line arguments

    So if you run now Visual Studio in debug mode, the command line argument is executed. And code after this if will be executed.

    If args.Length > 0 And
    String.Equals(args(1).ToUpper, „-R“) Then

    So as you can see the RFC Server is build from the previous defined settings and it is more flexible than Part 1. And after we started the function module as in Part 1 described, our RFC Server now response.

    SAP NCo RFC Server Response after call from NetWeaver BW
    SAP NCo RFC Server Response after call from NetWeaver BW

    So that’s it. I hope you like the quick example and if there are any questions feel free to ask.

    author.


    I am Tobias, I write this blog since 2014, you can find me on twitter and youtube. If you want you can leave me a paypal coffee donation. You can also contact me directly if you want.